Monthly Archives: November 2014

loading..
beckham cowboys cover

Odell Beckham Jr’s Breakout Performance versus Cowboys

The rookie wide receiver from LSU, Odell Beckham Jr, has put together an impressive rookie season so far totaling 41 receptions, 601 yards and 5 touchdowns. But nothing was more impressive than his performance Sunday night versus the Cowboys. Let’s breakdown his plays.

Stats - 10 receptions on 11 targets, 146 yds, 14.6 yds/rec, 2 tds, 1 rush for -2 yds

Play 1
Situation: 3rd and 5 at NYG 25
Description: Q1 - (12:50) (No Huddle, Shotgun) E.Manning pass short middle to O.Beckham to NYG 37 for 12 yards (B.Church).
Sideline View

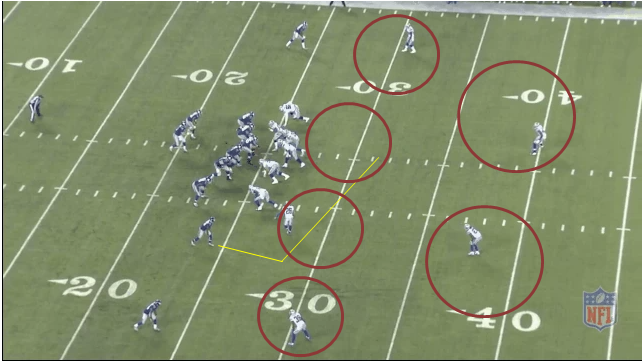
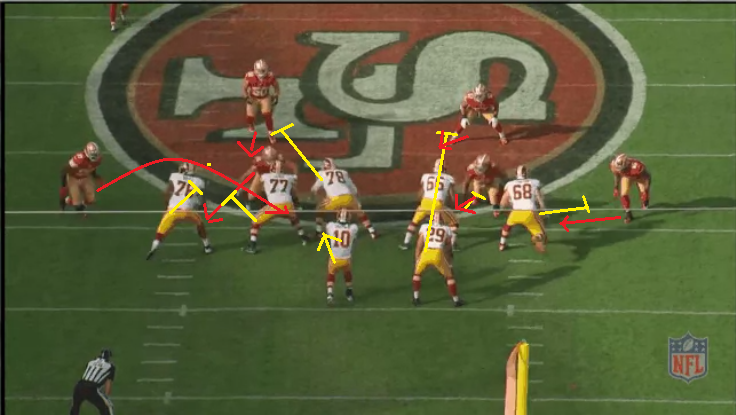
Beckham lines up in the slot and runs a slant route across the middle. The Cowboys are in Cover 2 with four underneath zones across the middle. FS38 Heath and DE93 Spencer drop into the interior zones.

Watch how quickly Manning moves through his progressions. His first read is WR83 Parker and then he quickly moves to his second read. Great throw by Manning.

Play 2
Situation: 3rd and 3 at DAL 3
Description: Q1 - (7:06) (Shotgun) E.Manning pass short middle to O.Beckham for 3 yards, TOUCHDOWN. J.Brown extra point is GOOD, Center-Z.DeOssie, Holder-S.Weatherford. PENALTY on DAL-O.Scandrick, Defensive Offside, 5 yards, enforced between downs.
Sideline View

Beckham lines up on the right outside and runs a slant-hitch route. Cowboys line up in single-high safety with six zones across the goal line.

Watch how Beckham runs his route. He doesn’t sprint off of the line. He knows his responsibility is just to sit at the goal line as the safety valve for Manning.

Play 3
Situation: 2nd and 11 at NYG 33
Description: Q1 - (2:19) (No Huddle) E.Manning pass short right to O.Beckham to NYG 46 for 13 yards (B.Carr).
Sideline View

Beckham lines up on the right outside and runs a deep comeback route. Cowboys line up in Cover 2, but are actually playing Cover 1 Robber. The outside CBs are in off-man coverage over their respective WRs.

Manning throws the ball too far to the outside and high of Beckham, but Beckham makes a leaping grab for it. Watch how quickly Beckham turns his hips at the top of the route. The ability to change directions on a dime makes Beckham very explosive.
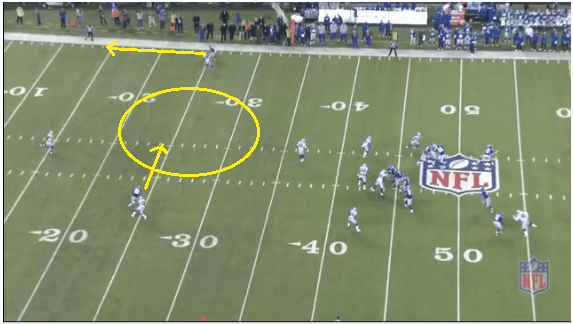
Play 4
Situation: 1st and 10 at DAL 43
Description: Q2 - (15:00) E.Manning pass deep right to O.Beckham for 43 yards, TOUCHDOWN. Penalty on DAL-B.Carr, Defensive Pass Interference, declined. The Replay Official challenged the pass completion ruling, and the play was Upheld. The ruling on the field was confirmed. J.Brown extra point is GOOD, Center-Z.DeOssie, Holder-S.Weatherford.
Sideline View

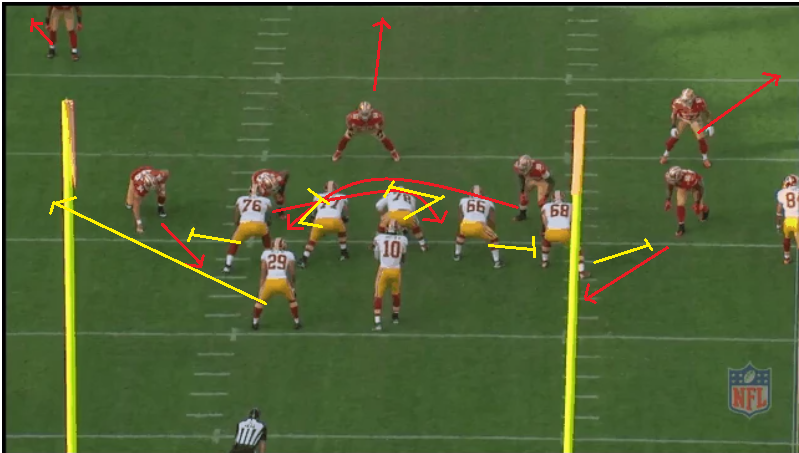
This is the catch heard round the world. Manning lines up in offset-I formation. Beckham is on the outside right with CB Carr playing man-to-man coverage. Cowboys are in single-high safety with four linebacker zones underneath. Manning runs a PA bootleg to the right that sucks up all of the linebackers into the line of scrimmage expecting a running play.

Beckham runs an out-and-up route that Carr actually covers well. Watch as Beckham cuts on the out portion of the route. Carr bets correctly that Beckham is going to go deep and he continues on his path. It is not until Carr turns his body expecting the ball to come down sooner that he interferes with Beckham. Beckham uses his strength to get off of the pass interference and make a leaping backwards dive for the ball to catch the touchdown.

To be critical, if I was Manning I would not have thrown the ball to Beckham in this situation. Watch WR83 Parker run his deep-in route across the middle of the field. Below is the snapshot of Manning’s view as he releases the ball. This is the point where Parker breaks on his route. He has a step over his CB in man-coverage and there is a huge hole between the deep Cover 1 safety and the 4 inside linebackers that were sucked up in the play-action.

Play 5
Situation: 3rd and 8 at NYG 34
Description: Q2 - (7:32) (No Huddle, Shotgun) E.Manning pass short middle to O.Beckham to NYG 48 for 14 yards (O.Scandrick).
Sideline View

Beckham lines up on the left outside of the formation and runs an in-route over the middle of the field catching the pass. CB Scrandrick is all over Beckham in great man-to-man coverage.

This play worked due to the timing of Manning’s pass. It was thrown right before Beckham breaks and the moment Beckham breaks inside he is open for the split second to catch the ball. Great throw by Manning and credit to Beckham for using his strength to haul in the pass.

Play 6
Situation: 1st and 15 at NYG 43
Description: Q2 - (6:49) (No Huddle, Shotgun) E.Manning pass short right to O.Beckham to NYG 49 for 6 yards (S.Moore).
Sideline View

Beckham lines up in the backfield with Manning in shotgun. The play is a screen pass to Beckham. Great blocking by WR82 Randle to set the edge and box out his CB. In the slot, WR83 Parker’s block on CB 26 Moore was not executed well and neither was TE84 Donnell’s block on LB55 McClain.

Play 7
Situation: 3rd and 6 at DAL 48
Description: Q2 - (5:30) (No Huddle, Shotgun) E.Manning pass short middle to O.Beckham to DAL 36 for 12 yards (J.Wilcox).
Sideline View

Beckham lines up on the left and motions pre-snap underneath the trips bunch right formation. CB32 Scandrick follows Beckham across the formation indicating man-to-man coverage. Beckham runs an angle route underneath the bunch that are running clear-out routes. This was a clear designed play to Beckham from the beginning.

Watch how Beckham uses his strength to fight off LB59 Hitchens and CB32 Scandrick from tackling him. Great show of strength.
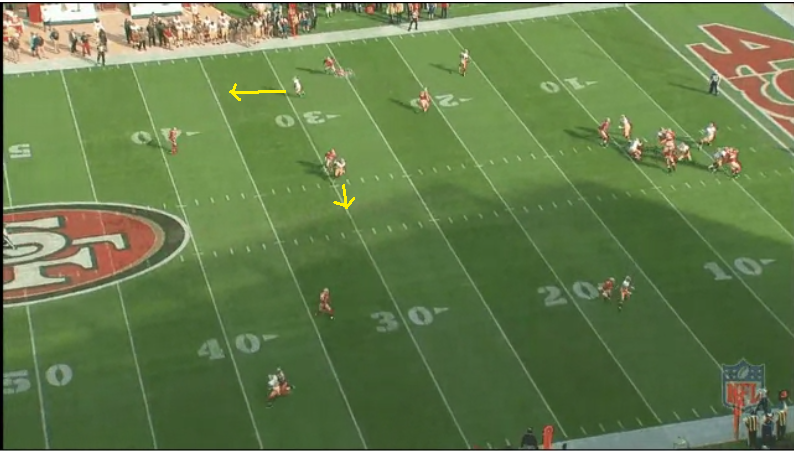
Play 8
Situation: 2nd and 20 at NYG 48
Description: Q2 - (:05) (Shotgun) E.Manning pass short right to O.Beckham to DAL 30 for 22 yards (S.Moore).
Sideline View

This is the last play of the half, so the Cowboys line up in prevent defense to make sure Manning doesn’t throw any deep passes. The play is a WR screen pass to Beckham on the right outside.

As the blockers on the edge set up the running lanes for Beckham, TE84 Donnell hesitates taking on CB26 Moore. I would like to have seen Donnell drive through the CB in a clear mismatch of size to help Beckham, but Moore is able to shut down the play. Granted the play probably would have only gone on for another 5 yards, but as a blocker on a screen pass your role is simply to clear out players and give a clear running lane for your WR.

Play 9
Situation: 1st and 10 at NYG 24
Description: Q3 - (6:29) O.Beckham right end to NYG 22 for -2 yards (B.Church). End around.
Sideline View


Endzone View

The play is an end-around to Beckham. The initial play-action to the RB draws some of the linebackers to the left side, but not SS42 Church or LB53 Lawrence who read the play well. Church does a good job of shedding TE84 Donnell’s block on the edge.

This is another play that shows that TE84 Donnell is a liability in the run/screen game. He needs to drive through the safety as opposed to shoving him backwards so he can readjust and make the play.
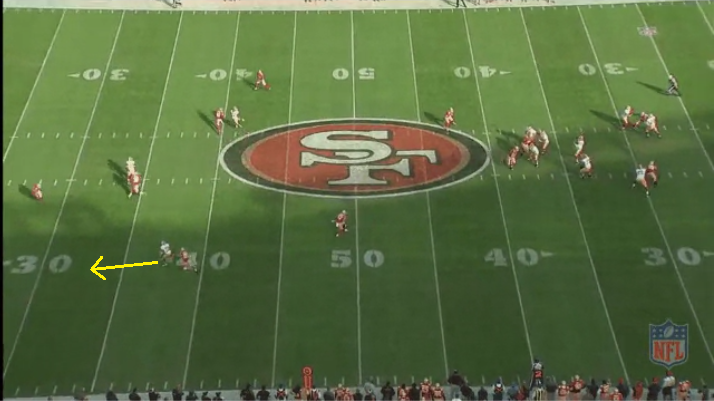
Play 10
Situation: 3rd and 2 at DAL 30
Description: Q3 - (3:39) (No Huddle, Shotgun) E.Manning pass short right to O.Beckham ran ob at DAL 18 for 12 yards (B.Church).
Sideline View

Beckham line up in twin stacks right and motions to the outside. Beckham runs a quick hitch route completely turning around the CB in man-to-man coverage on the edge.

Watch the cut Beckham makes back to the sideline as it causes two defenders to run into each other. This is actually the play that Beckham gets taken down outside the sideline, and the refs picked up their flags not calling the personal foul as Beckham is clearly off of the field.

Play 11
Situation: 1st and 10 at DAL 18
Description: Q3 - (3:25) (No Huddle, Shotgun) E.Manning pass incomplete deep left to O.Beckham.
Sideline View

Beckham lines up wide left and runs a stop-and-go. It fools CB32 Scandrick in man-to-man coverage allowing Beckham to gain separation over top. Manning from shotgun throws a touch pass to Beckham but places the ball too far in front of him. If the ball was placed half a yard back this would have been Beckham’s third touchdown on the day. Also, this is Beckham’s one target that goes for an incompletion and it wasn’t even his fault on the play.

Play 12
Situation: 3rd and 11 at NYG 29
Description: Q4 - (13:03) (No Huddle, Shotgun) E.Manning pass short middle to O.Beckham to NYG 38 for 9 yards (O.Scandrick). NYG-O.Beckham was injured during the play.
Sideline View

Beckham lines up on the far right side and runs a drag route across the middle underneath the Cowboys Cover 2 with three zones underneath. Beckham actually injures his back on the play and finishes the night with no more catches.

Overall an incredible performance by the rookie WR. He showed his game-breaking speed, great route-running and incredible hands topped off with the 43 yard touchdown catch with only three fingers.

The Giants have a formidable weapon that should give the rest of the NFC East fits for years to come, especially paired with Victor Cruz once Cruz comes back from his season long injury.

RG3 Benched; Redskins Made the Correct Decision

After one of the worst performances of RG3’s career against the Buccaneers, RG3 tried to redeem himself versus the San Francisco 49ers. This post will analyse how he played.

Play 1
Situation: 1st and 10 at WSH 17
Description: Q1 - (14:53) (Shotgun) R.Griffin pass short left to D.Jackson pushed ob at WAS 24 for 7 yards (C.Culliver). Caught at WAS 15. 9-yds YAC.
Sideline View


Endzone View

RG3 is in shotgun with four outside WRs in twin stacks on opposite sides. The play is a WR screen pass to Jackson. Grant blocks Culliver on the edge and allows Jackson to gain 7 yards.

This play could have gone to either Roberts on the right side or Jackson on the left side. Based on Culliver playing off-man coverage CBs playing closer to the line on the other side it makes Jackson the better choice.

Play 2
Situation: 2nd and 3 at WSH 24
Description: Q1 - (14:23) R.Griffin sacked at WAS 15 for -9 yards (Ald.Smith).
Sideline View


Endzone View

Sack Alert! RG3 is in offset-I formation with Garcon and Jackson on the outsides. Both of the outside CBs are in man-press coverage. Jackson runs a go-route taking the inside shoulder of his CB, while Garcon runs a curl route. Both of them are covered perfectly. Paulsen runs a seam route and is covered by the ILB.

This is a coverage sack. The offensive line actually does a good job of protecting RG3. McDonald gets good penetration on Chester forcing RG3 to step out of the pocket. By this point Smith gets around rookie LT Moses for the sack.

Play 3
Situation: 3rd and 12 at WSH 15
Description: Q1 - (13:48) (Shotgun) R.Griffin pass incomplete deep left to A.Roberts [J.Smith].
Sideline View


Endzone View

RG3 in shotgun has Jackson and Garcon on the outsides and Roberts in the slot. Jackson and Garcon run go-routes and Roberts runs a skinny post over the middle. SF is in Cover 2 with CBs in man coverage on the WRs. Garcon beats his CB and has potential on the right sideline if RG3 can place the ball. Instead, RG3 sees Roberts over the middle and sails the ball high and behind Roberts.

This is a terrible throw by RG3 that was almost intercepted. The only way this play would work is if he threw the ball low and in front of Roberts since the safety is over the top. Watch RG3’s footwork on this play. RG3 steps back into his throw sensing the pressure through the middle.

Play 4
Situation: 1st and 10 at WSH 43
Description: Q1 - (9:48) R.Griffin up the middle to WAS 40 for -3 yards (M.Wilhoite). Mishandled handoff.
Sideline View


Endzone View

I included this play to show a basic execution error. RG3 collides with FB Young and can’t hand the ball off to Morris from the I-formation. The fault lies with RG3 on this play. He steps too far to the outside on his 2nd step and he loses his handling on the ball after the collision.

Play 5
Situation: 2nd and 13 at WSH 40
Description: Q1 - (9:10) (Shotgun) R.Griffin pass incomplete deep left to D.Jackson (E.Reid). SF-E.Reid was injured during the play. His return is Probable.
Sideline View


Endzone View

RG3 in shotgun has trips left with Jackson, Garcon and Roberts. Jackson and Garcon both run go-routes and Roberts in the slot runs a post-route. Jackson beats Culliver who is in bump-and-run man coverage. RG3 finds him and releases the ball and throws it inside of Jackson where FS Reid makes a play on the ball causing the incompletion.

This is a bad throw by RG3. Jackson is open if the ball is placed closer to the sideline.

Play 6
Situation: 3rd and 13 at WSH 40
Description: Q1 - (9:02) (Shotgun) R.Griffin up the middle to WAS 40 for no gain (J.Smith, C.Borland). Quarterback draw.
Sideline View


Endzone View

The play is a quarterback draw up the middle. Jus. Smith and Ald. Smith run stunts from the left side. Ald. Smith almost gets the tackle for loss, but RG3 uses his elusiveness to avoid the hit but then gets wrapped up by Smith and Borland for no gain.

C Lichtensteiger needs to block out ILB Borland. LG Lauvao’s assignment is to seal the left edge of the running lane and then work up the field to help Lichtensteiger pave a path through the linebackers and secondary. Unfortunately the stunt slows down RG3 enough that he can’t make a gain after his juke.

Play 7
Situation: 3rd and 8 at WSH 26
Description: Q1 - (2:29) (Shotgun) R.Griffin sacked at WAS 19 for -7 yards (R.McDonald).
Sideline View


Endzone View

Sack Alert! Rg3 has trips right and Garcon alone on the left outside. Garcon runs a drag route over the middle while Jackson and Roberts run go-routes. TE Paul in the slot runs a post-route. RG3 is watching Jacksons’ and Roberts’ go routes develop and doesn’t see McDonald until it’s too late. If RG3 had more time Paul was actually wide-open coming across the field on the post-route.

This sack is on C Lichtensteiger. Watch as he attempts to help Lauvao with Ald. Smith after Lauvao gets beaten, but he forgets about his own DT McDonald on the play. RG3 actually plays this correctly and steps up into the collapsing pocket, but doesn’t expect to get hit this easily by McDonald.

Play 8
Situation: 3rd and 7 at WSH 43
Description: Q2 - (13:37) (Shotgun) R.Griffin pass incomplete short right to P.Garcon.
Sideline View


Endzone View

RG3 is in shotgun and has four WRs. Roberts and Garcon are on the right. The two slot receivers run go routes while the outside WRs run hitch routes. Garcon is the pre-snap first read since his CB is in off-man coverage while Jackson’s CB is in press coverage on the line. RG3 delivers the ball innaccurately too high and outside of Garcon so he can’t make a play on the ball. Terrible throw from a simple 1 step drop in shotgun.

CLICK HERE FOR NEXT PAGE

Josh Gordon’s Impressive Return to the NFL in Atlanta

Josh Gordon finished the 2013 season leading the league with 1646 yards in only 14 games. After another NFL violation this off-season, Gordon finally returned to play in this Week 12 match-up against the Falcons. This post will take a look at his plays.

Stats - 8 receptions on 16 targets for 120 yards, 15.0 yards/rec, 1 pass incompletion

Play 1
Situation: 3rd and 8 at CLE 28
Description: Q1 - (10:35) (Shotgun) B.Hoyer pass incomplete deep right to J.Gordon (D.Trufant).
Sideline View

Gordon is in the slot and runs a go-route against Trufant who is playing man-to-man. Trufant takes inside technique off of the line, so Gordon sprints to his outside shoulder. Hoyer throws the ball to the right sideline to avoid the FS who is playing single-high over the top. The ball is thrown slightly too far in front of Gordon as it slips through his fingers for an incompletion. Trufant has excellent man-coverage this entire play staying with Gordon.

Play 2
Situation: 3rd and 6 at CLE 24
Description: Q1 - (5:04) (Shotgun) B.Hoyer pass short left to J.Gordon to CLV 36 for 12 yards (J.Wilson).
Sideline View

Gordon lines up on the right outside and runs a drag route over the middle. Hoyer hits Gordon in stride and Gordon is able to pick up the first down. There was a miscommunication on the play after the TE motions from the left side to the right side. This pulls the FS20 Lowery over to the right. It looks like Trufant thought he was going to take the outside receiver if they crossed, but Lowery ends up taking the TE. This causes Gordon to be wide-open over the middle on the crossing route.

Play 3
Situation: 1st and 10 at ATL 33
Description: Q1 - (2:05) B.Hoyer pass short left to J.Gordon pushed ob at ATL 11 for 22 yards (D.Lowery).
Sideline View

Gordon lines up in the slot. The play is a WR screen. Hoyer on the 3-step drop passes to Gordon. FB46 Agnew seals the outside edge and TE81 Dray seals the inside edge allowing Gordon to scamper for a large gain. Great team effort blocking by the Browns.

Play 4
Situation: 3rd and 6 at ATL 15
Description: Q2 - (13:26) (Shotgun) B.Hoyer pass incomplete short right to J.Gordon.
Sideline View

Gordon lines up on the right outside. He runs a fade route and takes the outside shoulder of Trufant who is man-to-man coverage on the line of scrimmage. Hoyer places the ball way too far to the inside, so the play is an incompletion. Trufant stays with Gordon the entire play and is able to box him out of making any attempt on the poorly thrown ball.

Play 5
Situation: 1st and 10 at ATL 40
Description: Q2 - (11:15) B.Hoyer pass short right to J.Gordon to ATL 23 for 17 yards (D.Trufant).
Sideline View

Gordon lines up on the right outside. Trufant is in off-man coverage with a single-high safety over the top. Gordon runs an in-route and Hoyer places the ball accurately on Gordon after he makes his break. Gordon actually doesn’t run a good route on this play. He rounds it way too much on the top. However, he gets away with it due to the off-man coverage, but that’s something to take note of in the future.

Play 6
Situation: 1st and 10 at ATL 23
Description: Q2 - (10:52) B.Hoyer pass incomplete short right to J.Gordon.
Sideline View

Gordon lines up on the left outside. He runs a drag route over the middle. He is open for the entirety of this play after Hoyer comes off of the PA bootleg. Hoyer places the ball behind Gordon who can’t secure it for the reception. The fault lies solely with Hoyer’s inaccuracy on this play.

Play 7
Situation: 1st and 10 at CLE 20
Description: Q2 - (:55) B.Hoyer pass incomplete deep left to J.Gordon.
Sideline View

Gordon on the left outside runs a stop-and-go route. Trufant plays man-to-man coverage with Gordon and stays with him unconvinced of Gordon’s “stop” on the play. Hoyer throws the ball too far to the outside shoulder of Gordon and it goes out of bounds. The safeties start the play in a Cover 2 look, but actually are playing robber over the middle with one deep.

Play 8
Situation: 2nd and 10 at CLE 20
Description: Q2 - (:49) (No Huddle) B.Hoyer pass short right to J.Gordon to CLV 39 for 19 yards (K.Ishmael; K.Biermann).
Sideline View

The play is a WR screen to Gordon. Gordon is in the trips bunch right. The TE is in motion and blocks Trufant from stopping the play in the backfield. Great downfield blocking by the RG Greco and RT Schwartz. Credit to Kyle Shanahan for the great play design.

Play 9
Situation: 2nd and 5 at ATL 42
Description: Q2 - (:08) (Shotgun) B.Hoyer pass incomplete deep left to J.Gordon.
Sideline View

Gordon lines up on the outside of the trips left bunch and runs a deep post route. Gordon is open over the middle, but Hoyer misses the pass high and behind Gordon. Gordon is open on this play due a miscommunication between Trufant and FS Lowery who came over to the left side of the field after the TE motion. This is the second time there is a miscommunication between these two after the TE motions to the same side as Gordon.

Play 10
Situation: 1st and 10 at CLE 20
Description: Q3 - (15:00) B.Hoyer pass short right to J.Gordon pushed ob at CLV 25 for 5 yards (P.Worrilow).
Sideline View

This play is very similar to play 2 where Gordon runs a drag route across the middle from Hoyer’s PA bootleg. The defensive cooridnator blitzes both outside CBs Trufant and McClain. McClain almost sacks Hoyer, but he uses his elusiveness to avoid the sack. Hoyer then finds Gordon at the end of his route near the sideline for a short gain on the play. Credit goes to Hoyer for avoiding the sack on the play.

Play 11
Situation: 2nd and 6 at CLE 35
Description: Q3 - (13:24) T.West FUMBLES (Aborted) at CLV 25, recovered by CLV-J.Gordon at CLV 16. J.Gordon pass incomplete short right to B.Hoyer.
Sideline View


Endzone View

The play is an end around WR pass back to the QB. RB West laterals the ball too high to Gordon and the ball hits the turf. Fortunately, Gordon is able to grab the ball on the second bounce. There is a defender in the vicinity of Gordon so Gordon launches the ball out of bounds in the general direction of Hoyer to avoid a big loss on the play.

Play 12
Situation: 1st and 10 at ATL 40
Description: Q3 - (2:38) B.Hoyer pass short left to J.Gordon pushed ob at ATL 31 for 9 yards (D.Trufant).
Sideline View

Gordon lines up in the left outside and runs a simple out-route. Hoyer hits Gordon with the ball quickly after his break. Trufant is in off-man coverage so this is a simple short route to take advantage of the space given by Trufant.

Play 13
Situation: 1st and 10 at CLE 48
Description: Q4 - (7:34) B.Hoyer pass short left to J.Gordon ran ob at ATL 40 for 12 yards (D.Trufant).
Sideline View

Gordon lines up on the left outside and runs a 7 yard hitch route. Hoyer takes a 3-step drop and hits Gordon shortly after his break. Fantastic route by Gordon. Extremely crisp and sudden, fooling Trufant who expected him to go long on the play.

Play 14
Situation: 1st and 6 at ATL 6
Description: Q4 - (4:59) B.Hoyer pass short right intended for J.Gordon INTERCEPTED by D.Trufant [T.Jackson] at ATL 0. Touchback.
Sideline View

This play is similar to play 2 and play 10. Gordon on the left outside runs a drag route across the middle of the field. Gordon is covered well by Trufant in off-man coverage. Hoyer runs a play-action bootleg to the right but gets chased down by DT98 Matthews. Hoyer throws the ball off of his backfoot high into the back of the endzone. Trufant makes the most of it and pulls it down for the interception. Overall, great read by DT Matthews on the play and Trufant for the interception.

Play 15
Situation: 3rd and 7 at CLE 19
Description: Q4 - (2:51) (Shotgun) B.Hoyer pass deep right intended for J.Gordon INTERCEPTED by D.Southward at 50. D.Southward to ATL 45 for -5 yards (J.Gordon).
Sideline View

Gordon lines up on the outside of the trips right bunch. The TE motions across the screen and FS Lowery follows him. Trufant and Lowery seem to agree pre-snap that one will take the inside receiver and the other will take the outside receiver. Trufant stays with the TE who goes to the outside flat while Gordon runs a deep corner. This leaves Gordon wide-open again. Lowery thinks his receiver is the slot receiver running a drag route, but that receiver is already covered in man-to-man by CB McClain.

The play results in an interception. Hoyer sails his pass deep and inside of Gordon for FS Southward to take the easy interception. Horrific pass by Hoyer.

Play 16
Situation: 1st and 10 at CLE 20
Description: Q4 - (:44) (Shotgun) B.Hoyer pass incomplete short middle to J.Gordon [O.Umenyiora].
Sideline View

Gordon runs a deep in route from the right outside. Hoyer snaps the ball and steps up into the pocket. Hoyer throws the ball and it is tipped by Umenyiora off of the line.

Hoyer is extremely lucky his ball was tipped on this play. This could have easily been an interception to end the game. FS Southward is in robber underneath Gordon and had an easy interception. Hoyer did not see him at all.

Play 17
Situation: 1st and 10 at CLE 31
Description: Q4 - (:32) (Shotgun) B.Hoyer pass deep middle to J.Gordon to ATL 45 for 24 yards (P.Worrilow).
Sideline View

Gordon lines up on the outside of the trips right bunch. The TE motions across the screen for the fourth time in this formation. Instead of playing man-to-man coverage like the CBs have been in this formation, they decide to play zone coverage in a Cover 3. Gordon runs a deep in-route and sits between the zones for Hoyer to find him over the middle. Great zone recognition by Gordon and good pass by Hoyer to set up a chance at the game-winning field goal for Cleveland.

If you notice throughout these plays, Gordon ran a lot of simple routes while Kyle Shanahan designed his plays beautifully around him. As a Redskins fan, seeing these plays reminds me of all the plays we ran with Pierre Garcon last year. He was always open and it looks the same with Josh Gordon in Cleveland. The play-action bootleg to the drag route was a staple play of the Redskins under Shanahan.

Layout mode
Predefined Skins
Custom Colors
Choose your skin color
Patterns Background
Images Background