Monthly Archives: December 2014

loading..

Rookie Recap: Trent Murphy - 2.5 sacks, 6 hits, 15 hurries

Trent Murphy was chosen by the Redskins with the 47th pick in the 2014 NFL Draft. With Ryan Kerrigan and the recently franchise-tagged Brian Orakpo on the roster, many thought this pick should have been used on a position of greater need. The Redskins needed a right tackle, guard, inside linebacker, cornerback and safety going into the 2014 season. Even though this was seen as a luxury pick, Murphy’s addition to the defensive unit has been positive as he is already one of the Redskins’ best run defenders while showing flashes of pass rushing ability.

According to scouting reports, the Stanford prospect fit well in a 3-4 outside linebacker position as a quality run defender with a repetoire of pass rushing moves. He was also a hard worker with excellent strength and a strong motor. In 2013 Murphy led the NCAA in sacks, but it was his lack of speed and explosiveness that dropped him out of first round consideration.

For the Redskins, Murphy started the season as a situational pass rusher in the Redskins’ 3rd down pass rushing package where the Redskins lined up Orakpo, Hatcher, Murphy and Kerrigan on the same defensive line. After Brian Orakpo was lost for the season with a torn pectoral muscle in Week 7 versus the Titans, Murphy was thrust into the starting right outside linebacker position opposite of Redskins’ Ryan Kerrigan. For this breakdown, Trent Murphy’s role in pass rush, run defense and pass coverage will be analyzed to show his effectiveness and areas that need to be improved over the off-season.

Stats
  • Total - 2.5 sacks, 6 hits, 15 hurries for 24 total pressures, +6.9 Pass Rushing Productivity in 64% of defensive snaps
  • Before Week 8 - 0 sacks, 3 hits, 4 hurries for 7 total pressures, +5.3 Pass Rushing Productivity in 39% of defensive snaps
  • After Week 8 - 2.5 sacks, 3 hits, 11 hurries for 17 total pressures, +7.8 Pass Rushing Productivity in 90% of defensive snaps
  • Pass Rush

    Murphy already had a strong set of pass rushing moves coming from Stanford. For an outside linebacker the number one trait you are judged on most is your ability or inability to get to the quarterback. These plays below will analyze Murphy’s pass rushing moves.

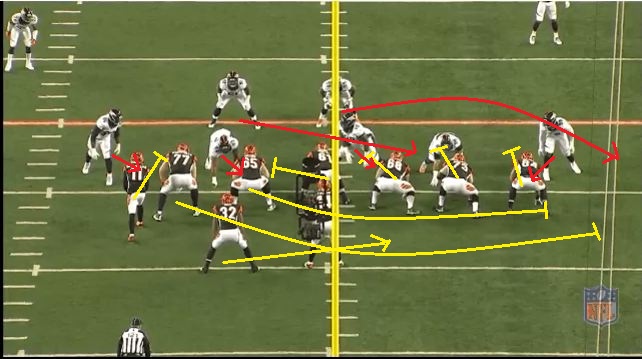
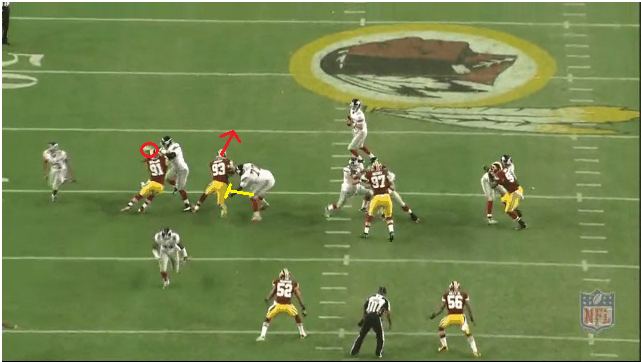
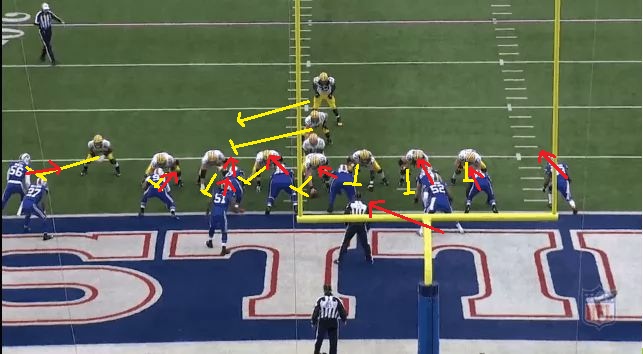
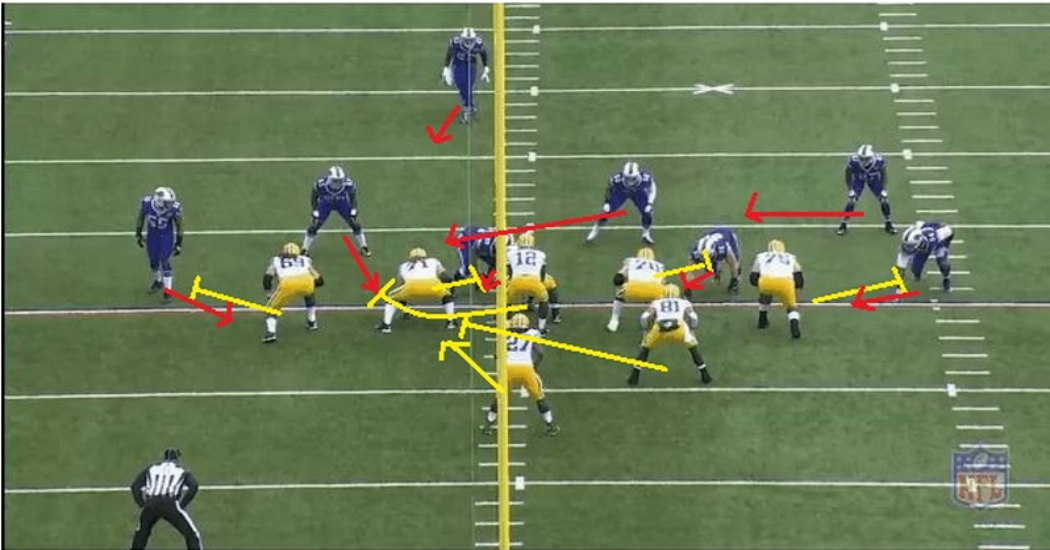
    Play 1 - Murphy lines up in the 3-tech and speed-rushes through the B-gap between the right guard and the right tackle. This pulls the right guard out of the play and makes Manning step up into the pocket. Kerrigan finishes Manning for the sack. This play would have not have been possible without Murphy’s intial speed rush through the pocket.

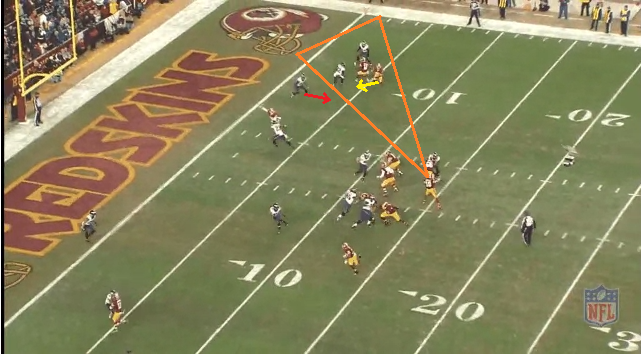
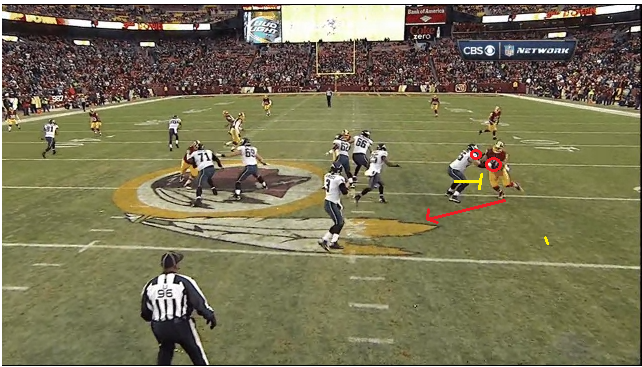
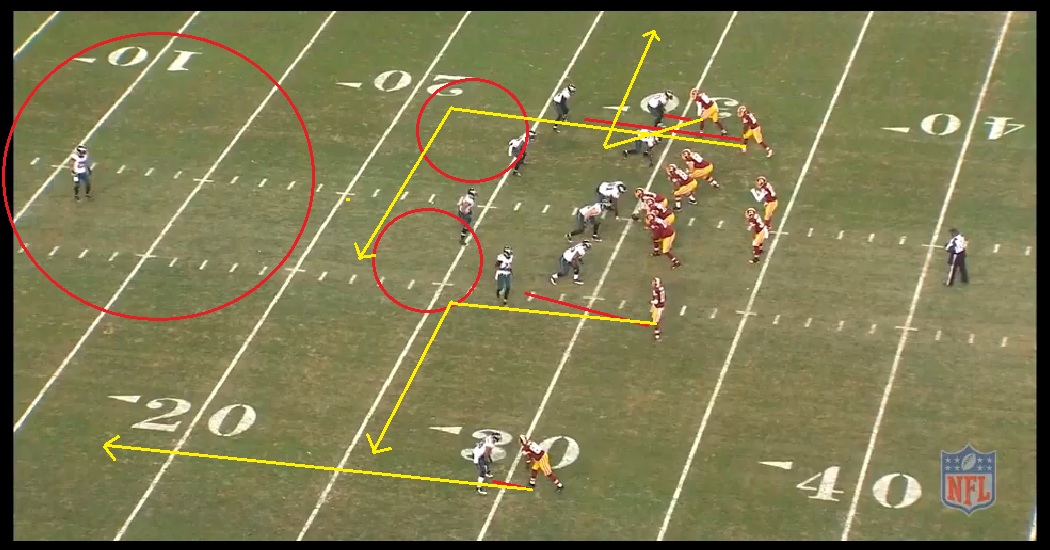
    Play 10 - This is the endzone non-holding call that should have ended the Cowboys game when the Redskins played them in Week 8. Murphy takes 3-steps forward and then cuts inside to find Romo in the endzone. LT77 Smith is clearly beaten and jumps on Murphy’s back to neutralize him. Romo steps up into the pocket and fires down field for the wide receiver on the crossing route. Great penetration by Murphy on the elite left tackle.

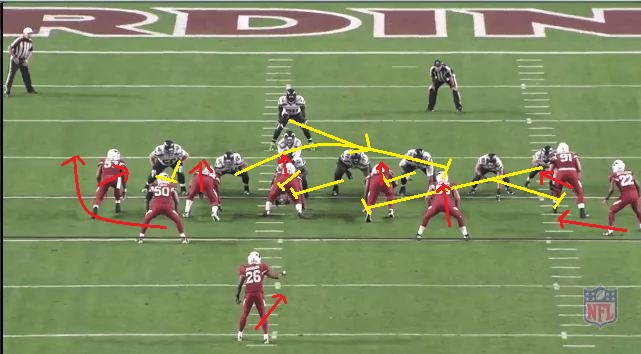
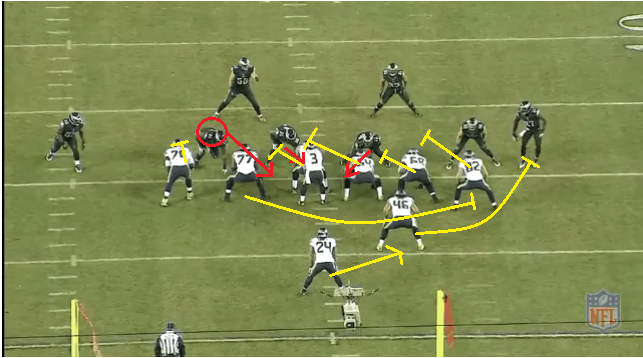
    Play 11 - Sack Alert! Murphy takes 3-steps toward LT Kalil and cuts inside the pocket. The left guard attempts to slow down Murphy, but Murphy is too fast for him. He finshes Bridgewater for the first sack of his career. Great decisiveness on the cut inside.

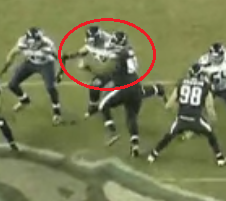
    Play 15 - TE85 Ellison in the backfield moves across the pocket to block Murphy. Murphy cuts inside and uses the double-swipe to make sure Ellison can’t engage him directly. Murphy dives at the elusive QB Bridgewater disrupting his rhythm. Murphy gets credited for the QB Hurry, but not the sack here.

    Play 23 - Murphy uses the swim move to get inside penetration on the left tackle. Murphy is almost there to hit the quarterback, but needs to a better job of disengaging on the offensive lineman. Once Murphy takes his first 3-4 steps, he needs to cut back inside with the swim move as opposed to waiting until the offensive lineman is fully extended before acting. A quicker move would have at least set up Murphy for the QB hit.

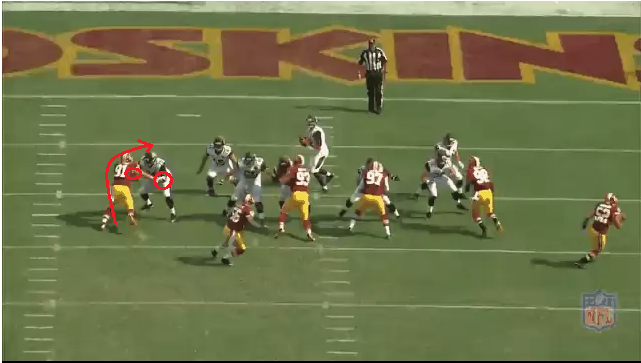
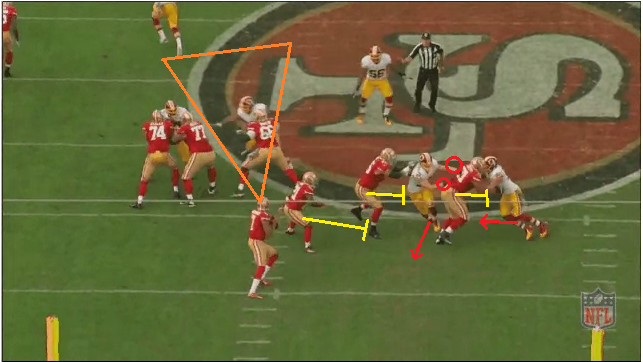
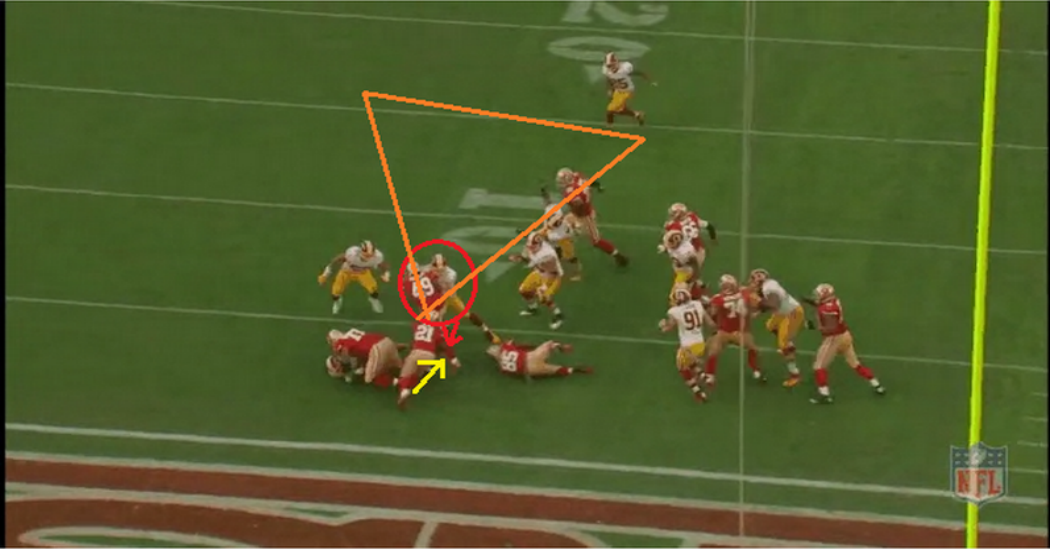
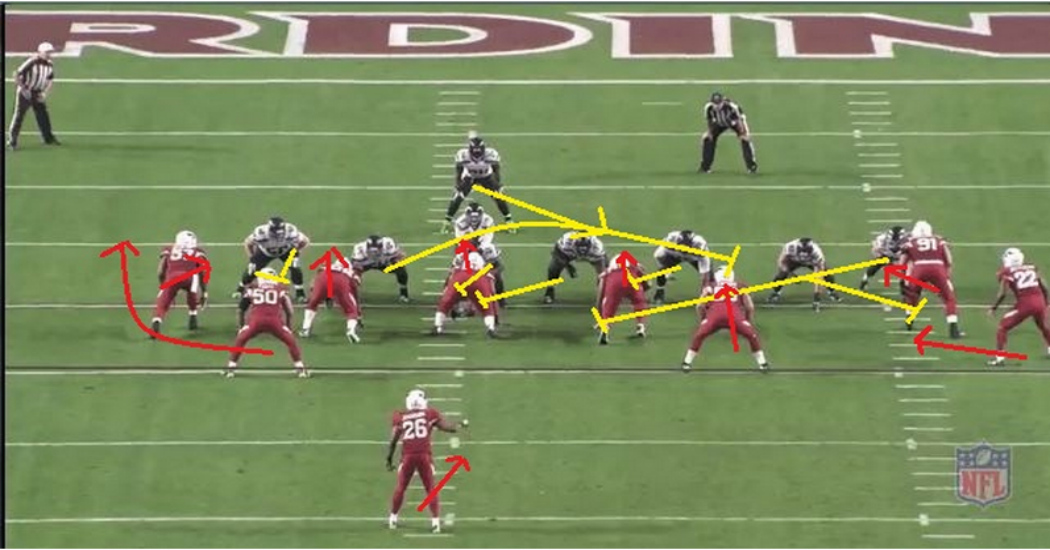
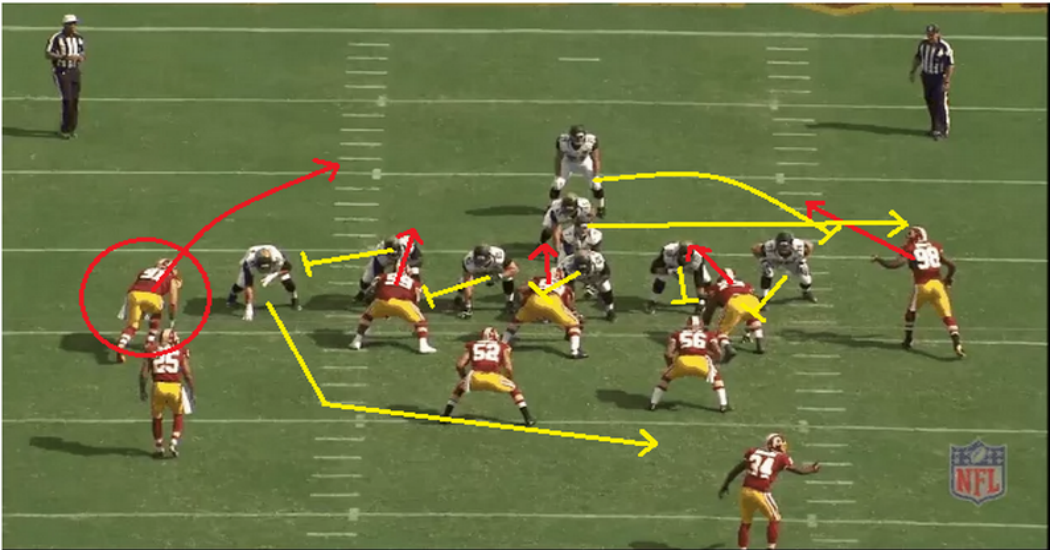
    Play 29 - This is one of my favorite plays made by the combination of Kerrigan and Murphy that I analyzed in Kerrigan’s Double Swipe 13.5 sacks article. Murphy rushes from the 3-tech position and shoves the right tackle out of the way allowing Kerrigan to cut inside. Murphy continues speed rushing pulling the right guard and the runningback out of the play as well. I mentioned in the previous article that I wondered why they didn’t try this more often, but the 49ers were actually ready for the double attack later in the game when the ‘Skins tried again. I would however like to see this used in general by more teams as it seems pretty effective.

    There were times when Murphy’s pass rushing was not very effective at all where Murphy was removed from the play. This was seen a lot in the Indianapolis Colts game in Week 13 where the left tackle clearly won the battle each time not allowing Murphy any rushing room.

    Play 39 - Murphy rushes from the right edge attempting to cut back inside, but the lengthy left tackle stops him in his tracks completely.

    Play 12 - In this play Murphy starts from the right edge and spin moves back inside. If you notice, Murphy’s spin move is actually pretty effective, but he rarely used it. In the second half of the season I counted a total of 5 times and most were inside spins from the 3-tech position as opposed to a fake edge speed rush into a spin move which is what is shown here. This can also be something that Murphy works on incorporating in the future.

    Play 22 - This is by far the most frustrating pass rush Murphy does all season. He has a completely open shot at the quarterback, but he hestitates! No idea why as McCown should have been lit up on this play, but instead Murphy allows him to complete the pass.

    As you can see, Murphy definitely has positives, and has definitely has things he needs to work on. For one, being more decisive will be beneficial for Murphy. It seemed like when he had a move in mind pre-snap, Murphy did a much better job of planning and executing it against the offensive lineman. When he didn’t have the move pre-planned, he always seemed to be a step or two behind when he was trying to come up with the move spontaenously. Murphy needs to get better at this.

    The one major promising thing for Murphy is the variety of his moves. He does a great job with inside cut move, but has to work on his speed rush around the edge and completely turning his hips to angle at the quarterback. Hopefully another off-season in the NFL will help him do this. I would love to see Murphy use the swim and spin moves more often from the edge. This will also help him piece together pass rushes to get to the quarterback.

    Run Defense

    One of Murphy’s best attributes this off-seasn was his run stopping ability with the use of his strength at the point of attack in plays 25, 30, 33 and 40.

    Play 25 - Murphy engages with the fullback and shoves him back clearly winning the battle and seals the outside edge of the play so the ball carrier is taken down for a loss on the play.

    Play 30 - Murphy engages with the right tackle on the stretch run to the outside and maintains his edge to grab RB Gore for a short gain.

    Play 33 - Murphy avoids FB49 Miller’s chop block in order to tackle RB21 Gore for a loss.

    Play 40 - This is my favorite run stop by Murphy all season.

    Murphy engages with TE85 Davis on the stretch run to the left from I-formation.

    Murphy shoves Davis to the ground and then Murphy engages with FB49 Miller.

    Murphy completely removes Miller from the play with a quick jab.

    Then Murphy takes down Gore for the run stop. Just an excellent use of strength at the point of attack to out-muscle Davis and Miller out of the play and shut down the run.

    Pass Coverage

    Unlike most rookie 3-4 outside linebackers, Murphy was used in pass coverage as well to cover runningbacks in the flat and underneath zones. Murphy is surprisingly fluid in space for a bigger, bulkier linebacker. This can be seen in plays 26, 36, 37, and 38.

    Play 26 - Murphy in the ROLB position shoves the tight end who was releasing from the line of scrimmage now allowing separation.

    Play 36 - RB21 Gore is in the left slot and Murphy doesn’t allow separation by using his strength to push Gore out of the play. This is a great use of the allowed contact within 5 yards of the line of scrimmage.

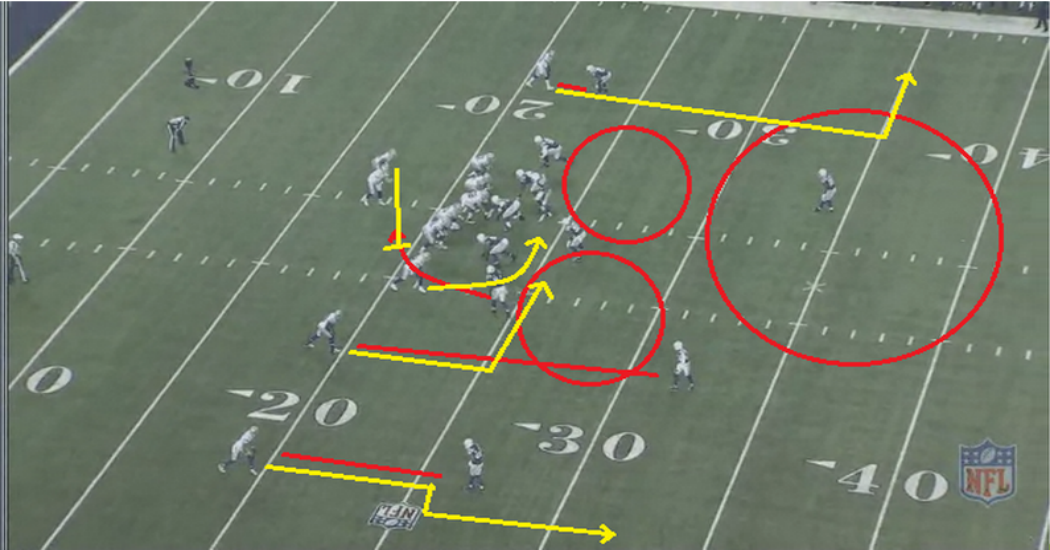
    Play 37 - Murphy’s responsibility is the underneath zone on the far side. Murphy shades to his far zone and then realizes Kaepernick wants to scramble outside left. Murphy then shuts down the checkdown route not allowing Kaepernick an easy underneath completion.

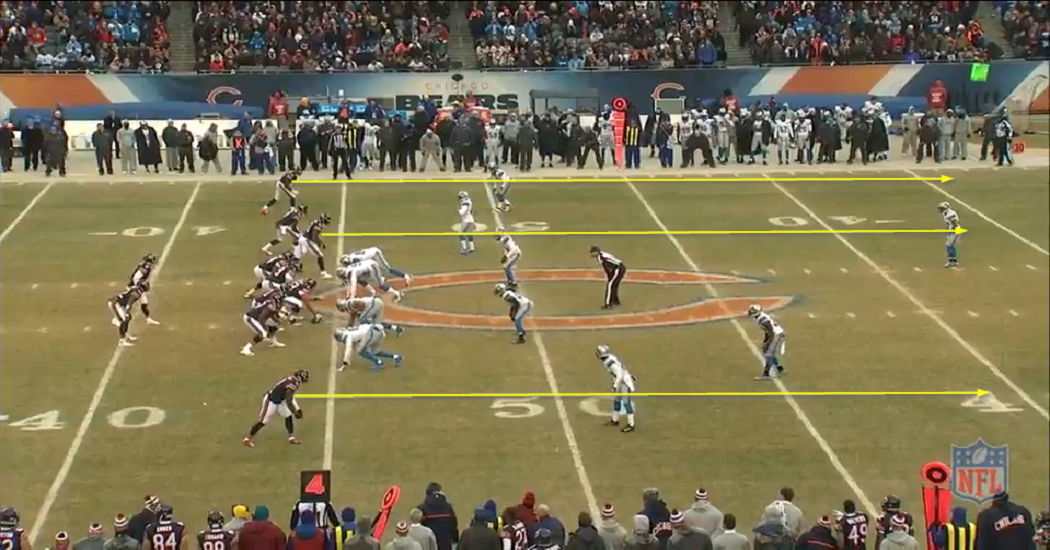
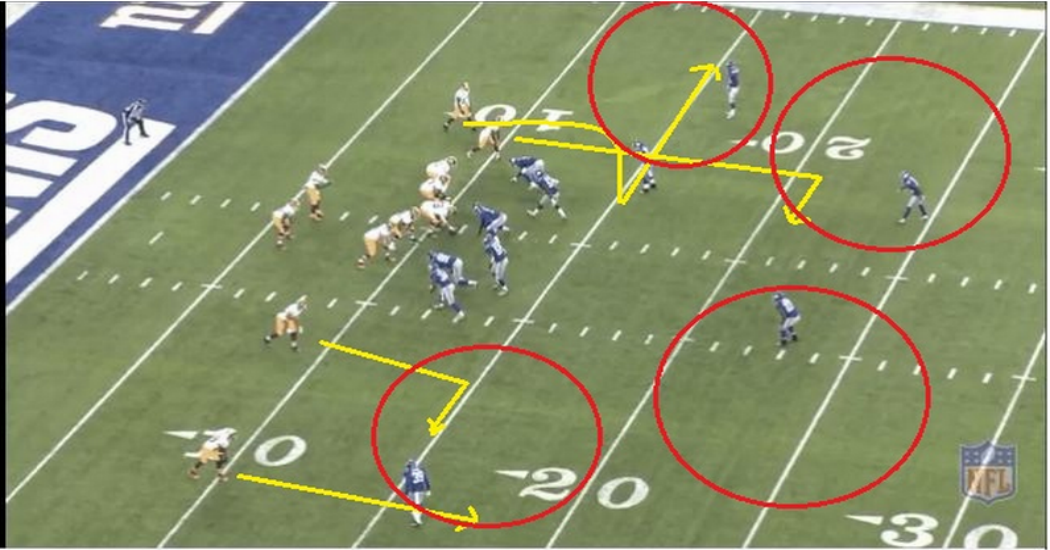
    Play 38 - Murphy does a good job of initial contact on the twins bunch left to slow their routes down. Then Murphy runs to the sideline to make sure the flat route is covered as well.

    In Jim Haslett’s 3-4 hybrid system, Murphy has already been seen as a great addition to the defense. His fluid hips, strength at the point of attack and overall versatility allows Haslett to line Murphy up all over the line of scrimmage to help the Redskins’ defense. Switching to a more traditional 3-4 or even back to a 4-3 right defensive end will probably help with his sack totals and pass rushing attempts, but it is good that the Redskins have a defender that is good in space as well to be used in more exotic situations.

    Here are more of Trent Murphy’s plays in GFY form:

    PlayOpponentQTimeTypeLink
    14. NYG2:14Pass RushEndzone
    28. DAL12:23Run DefenseEndzone
    38. DAL2:23Pass RushEndzone
    48. DAL2:56Pass RushEndzone
    58. DAL25:30Pass RushEndzone
    68. DAL26:18Pass RushEndzone
    78. DAL213:08Pass RushEndzone
    88. DAL37:59Pass RushEndzone
    98. DAL3:53Run DefenseEndzone
    108. DAL412:35Pass RushEndzone
    119. MIN13:31Pass RushEndzone
    129. MIN12:52Pass RushEndzone
    139. MIN21:12Pass RushEndzone
    149. MIN2:54Pass RushEndzone
    159. MIN47:34Pass RushEndzone
    169. MIN37:17Run DefenseEndzone
    179. MIN311:59Pass CoverageALL-22
    189. MIN413:44Pass CoverageALL-22
    1911. TB111:58Pass RushEndzone
    2011. TB312:07Pass RushEndzone
    2111. TB36:11Pass RushEndzone
    2211. TB16:17Pass RushEndzone
    2311. TB3:07Pass RushEndzone
    2411. TB48:44Pass RushEndzone
    2511. TB16:54Run DefenseEndzone
    2611. TB114:16Pass CoverageALL-22
    2711. TB112:44Pass CoverageALL-22
    2811. TB210:14Pass CoverageALL-22
    2912. SF21:30Pass RushEndzone
    3012. SF112:04Run DefenseEndzone
    3112. SF14:38Run DefenseEndzone
    3212. SF215:00Run DefenseEndzone
    3312. SF22:44Run DefenseEndzone
    3412. SF311:05Run DefenseEndzone
    3512. SF410:12Run DefenseEndzone
    3612. SF111:20Pass CoverageALL-22
    3712. SF11:41Pass CoverageALL-22
    3812. SF47:36Pass CoverageALL-22
    3913. IND21:13Pass RushEndzone
    4013. IND113:11Run DefenseEndzone
    4114. STL26:17Pass RushEndzone

    Tony Romo vs the Colts - 18/20, 218 yards, 4 TDs

    Tony Romo’s performance versus the Colts was very impressive completing 90% of his passes and four touchdowns. This post will analyze his performance.

    Stats
    Romo - 18/20, 218 yards, 10.9 ypa, 4 TDs, 0 INTs, 3 rushes for 28 yards, 1 sack for 11 yards

    Play 1
    Situation: 2nd and 8 at DAL 22
    Description: Q1 - (14:25) (Shotgun) T.Romo pass short middle to D.Bryant to DAL 31 for 9 yards (D.Butler). Pass complete on a “crossing” pattern.
    All-22 View


    Endzone View

    Offense Formation: Shotgun Trips Right Far
    Offensive Grouping: 11
    Defense Formation: Cover 1, 2 underneath zones, man-coverage by CBs

    Romo has WR88 Bryant in the center of the trips right grouping running a crossing/in-route over the middle of the field. Romo snaps the ball and hits Bryant right in the numbers to start the game with a quick and accurate pass.

    Bryant makes a quick cut in front of CB20 Butler in off-man coverage to create the separation necessary for the catch.

    Play 7
    Situation: 2nd and 6 at IND 22
    Description: Q1 - (8:11) (Shotgun) T.Romo pass short middle to J.Witten to IND 5 for 17 yards (L.Landry). Pass complete on a “skinny” post.
    All-22 View


    Endzone View

    Offense Formation: Empty-set Shotgun
    Offensive Grouping: 02
    Defense Formation: Cover 1, man-coverage across the board

    Romo has TE82 Witten in the left slot runs a skinny-post over the middle. SS30 Landry is in off-man coverage playing outside-technique so Romo finds him quickly for the strike up the middle of the field. Great read and throw by Romo.

    DE90 Redding makes an excellent bull-rush through LG65 Leary, but Romo’s pass is too quick for it to be effective. Still a very good pass rush into the pocket.

    Play 8
    Situation: 2nd and 4 at IND 4
    Description: Q1 - (6:44) T.Romo pass short left to D.Bryant for 4 yards, TOUCHDOWN NULLIFIED by Penalty. PENALTY on DAL-D.Murray, Illegal Motion, 5 yards, enforced at IND 4 - No Play.
    All-22 View


    Endzone View

    Offense Formation: Singleback Far
    Offensive Grouping: 13
    Defense Formation: Three Linebackers underneath, man-coverage on outside WR

    Romo motions Murray from the backfield and then quickly snaps the ball. WR88 Bryant runs a fade route on the left side of the field and Romo places the ball on his outside shoulder. Bryant uses his body positioning to jockey the defender out of the play for the touchdown.

    This play got called back due to illegal motion by Murray. Murray never reset his feet and was still moving forward during the snap. Luckily for the Cowboys they scored on the very next play.

    Play 9
    Situation: 2nd and 9 at IND 9
    Description: Q1 - (6:40) (Shotgun) T.Romo pass short middle to T.Williams for 9 yards, TOUCHDOWN. Pass complete on a “slant” pattern. D.Bailey extra point is GOOD, Center-L.Ladouceur, Holder-C.Jones.
    All-22 View


    Endzone View

    Offense Formation: Shotgun Trips Right
    Offensive Grouping: 11
    Defense Formation: Cover 1, man-coverage across the board

    Romo has WR83 Williams from the right outside run a slant route across the field. This is a designed pick play where WR11 Beasley’s quick-out route interferes directly with the path of Williams’ defender. Good play design to get rid of the man-coverage for the easy score.

    Play 10
    Situation: 1st and 10 at IND 19
    Description: Q1 - (4:30) T.Romo pass deep right to D.Bryant for 19 yards, TOUCHDOWN. Penalty on IND-G.Toler, Defensive Holding, declined. D.Bailey extra point is GOOD, Center-L.Ladouceur, Holder-C.Jones.
    All-22 View


    Endzone View

    Offense Formation: I Slot Left
    Offensive Grouping: 21
    Defense Formation: Cover 2 with 3 underneath zones

    WR88 Bryant runs a sluggo against CB28 Toler. Toler grabs and holds onto Bryant knowing he is beat drawing the penalty.

    Romo places the ball perfectly infront of Bryant for him to make a play on the ball. Romo also does a great job of looking off the safety right before he throws the ball to make sure this option to Bryant stays open.

    Play 11
    Situation: 2nd and 5 at DAL 30
    Description: Q1 - (2:17) (Shotgun) T.Romo pass deep left to D.Bryant to IND 46 for 24 yards (V.Davis). Penalty on IND-V.Davis, Defensive Holding, declined.
    All-22 View


    Endzone View

    Offense Formation: Empty-set Shotgun Doubles
    Offensive Grouping: 01
    Defense Formation: Cover 3 with four underneath zones and man-coverage on Bryant

    Romo throws a beautiful back shoulder fade to Bryant on the sideline for the 24 yard gain while he is being held by CB21 Davis. Great throw by Romo and great job by Bryant to use his body positioning to secure the catch.

    Play 13
    Situation: 1st and 10 at IND 24
    Description: Q2 - (14:19) Cole Beasley 24 Yd TD pass from Tony Romo (Dan Bailey Kick).
    All-22 View


    Endzone View

    Offense Formation: Shotgun Slot Left Far
    Offensive Grouping: 11
    Defense Formation: Cover 1, three underneath zones and man-coverage on the WRs

    WR11 Beasley runs a slant-route and avoids being tackled to score the touchdown. His CB was in off-man coverage so this was a quick-first read pass by Romo.

    Beasley gets the vast majority of the credit here. Normally a linebacker that tackles you would take you down, but Beasley sheds the tackle. Watch the free safety on this play run up the field to cut off Beasley. The FS needs to stay back further to prevent the cutback lane as there are multiple defenders directly in front of Beasley if he continued on that route.

    Play 18
    Situation: 3rd and 14 at IND 23
    Description: Q3 - (13:13) (Shotgun) T.Romo sacked at IND 34 for -11 yards (A.Jones).
    All-22 View


    Endzone View

    Offense Formation: Shotgun Twins Stack Right Far
    Offensive Grouping: 11
    Defense Formation: Cover 4

    Sack alert! Obvious passing play on 3rd and long, the Colts are in deep Cover 4. Romo tries to buy time in the pocket but the pressure gets to him eventually and he is sacked for an 11 yard loss. Kicker Bailey attempts the 52 yard field goal, but misses it wide right on the next play.

    I’m not a fan of this play call nor am I fan of Romo holding onto the ball this long. Witten is open in the flat so Romo didn’t need to take a sack. Sure the Cowboys weren’t knocked out of field goal range, but this would have been a much easier kick for Bailey.

    Going back to the play call, the Cowboys are going up against deep Cover 4 coverage and you have three routes that go right into their zones. An offensive coordinator’s job is to be more clever than call an obvious three deep route play. The Cowboys should have run a screen pass or possibly even a RB Draw up the middle. Regardless all options most likely wouldn’t have succeeded but either of the options I mentioned would have been a better call than this play call. Also, by this point the Cowboys are up 28-0, so the Cowboys should just want to protect their lead and protect their players.

    Terrible play-call. Romo should just throw the short pass and live to fight another day.

    Play 22
    Situation: 2nd and 11 at IND 25
    Description: Q3 - (4:48) Jason Witten 25 Yd TD pass from Tony Romo (Dan Bailey Kick).
    All-22 View


    Endzone View

    Offense Formation: Empty-set Shotgun Trips Left
    Offensive Grouping: 01
    Defense Formation: Cover 4, Four underneath zones

    Witten runs a seam route up the middle of the field and beats the underneath linebacker zone to be wide-open for a lob pass. The center two zones of the Cover 4 split outside giving Romo a free shot up the middle. Great throw by Romo for the TD and good job by him to look off the safeties to give him the clear throwing lane.

    In these plays, Romo uses his scrambling ability to keep the drive alive.

    Play 2
    Situation: 2nd and 10 at DAL 31
    Description: Q1 - (13:13) T.Romo scrambles up the middle to DAL 39 for 8 yards (D.Jackson).
    All-22 View


    Endzone View

    Offense Formation: Offset-I Left
    Offensive Grouping: 11
    Defense Formation: Cover 1, One LB zone underneath, man-coverage outside

    Immediately after the snap C72 Frederick and RG70 Martin miss completely on their blocking assignments. DE90 Redding rushes into the backfield through the A-gap at Romo. Romo sees this in time to scramble around the pocket.

    Meanwhile NT96 Chapman falls victim to the play-action, but realizes it after Murray cuts outside the pocket giving him a free running lane at Romo. Frederick redeems himself pushing Chapman out of the play.

    Romo scrambles through the hole for an 8 yard gain on the play. In this play, Romo uses his vision to avoid being tackled and his scrambling ability to keep the play alive. Complete credit goes to Romo on this play as it was doomed from the snap.

    Play 4
    Situation: 2nd and 11 at DAL 40
    Description: Q1 - (11:28) T.Romo scrambles right end ran ob at IND 47 for 13 yards.
    All-22 View


    Endzone View

    Offense Formation: I Twin Bunch Right
    Offensive Grouping: 21
    Defense Formation: Cover 2, two LB zones underneath, man-coverage outside

    In this play, Romo takes the snap and reads the field before realizing the entire right side of the field is open for him to scramble. Normally, when a quarterback gains 13 yards and a first down you can’t be upset, but Romo completely misses on a wide-open Dez Bryant on the post-route over the middle.

    For all of his plays during this impressive game this was Romo’s only blemish of the night.

    Romo only had two incomplete passes during the game. The first was in Play 5 on a WR screen to Harris that was batted down at the line of scrimmage, while the second was in Play 25 (below) which almost resulted in a pick-six.

    Play 25
    Situation: 2nd and 11 at IND 27
    Description: Q4 - (13:02) (Shotgun) T.Romo pass incomplete short middle to C.Beasley (S.Brown).
    All-22 View


    Endzone View

    In this play, FS38 Brown undercuts WR11 Beasley’s route and almost has a pick-six. CB20 Butler lining up directly over Beasley and blitzes after the snap. Brown takes Butler’s man-coverage responsibility on Beasley.

    Many will instantly criticize Romo for this play thinking that he “didn’t see the safety”, but in fact this was a miscommunication with Beasley’s route. Romo thinks Beasley will adjust to the blitzing CB and continue with the slant, which explains why the ball was so outside of Beasley. Instead Beasley continues on his route up the field on the slant-and-go giving Brown a free shot at the interception.

    Overall, Romo simply was dominant against the Colts defense. It’s amazing that his only two incompletions occurred on a WR screen pass and one route miscommunication. If Romo and the Cowboys continue at this pace, they can easily be contenders for the Super Bowl this year. Credit should also go to LT77 Smith for a phenomenal job protecting Romo all day. Keep an eye out for him in the GFYs below as he did an expert job earning his eight year extension.

    Here are all of Romo’s plays in GFY form for you to analyze yourself as well!

    PlayDownDisSideYDQDescriptionLink
    12nd8DAL221(14:25) (Shotgun) T.Romo pass short middle to D.Bryant to DAL 31 for 9 yards (D.Butler). Pass complete on a "crossing" pattern.ALL-22 , Endzone
    22nd10DAL311(13:13) T.Romo scrambles up the middle to DAL 39 for 8 yards (D.Jackson).ALL-22 , Endzone
    33rd2DAL391(12:30) (Shotgun) T.Romo pass short left to J.Witten pushed ob at DAL 41 for 2 yards (L.Landry).ALL-22 , Endzone
    42nd11DAL401(11:28) T.Romo scrambles right end ran ob at IND 47 for 13 yards.ALL-22 , Endzone
    52nd11IND481(10:09) (Shotgun) T.Romo pass incomplete short right to D.Harris (B.Werner). Pass knocked away at the line of scrimmage.ALL-22 , Endzone
    63rd11IND481(10:05) (Shotgun) T.Romo pass short left to L.Dunbar to DAL 48 for -4 yards (J.Freeman). PENALTY on IND-J.Freeman, Taunting, 15 yards, enforced at DAL 48.ALL-22 , Endzone
    72nd6IND221(8:11) (Shotgun) T.Romo pass short middle to J.Witten to IND 5 for 17 yards (L.Landry). Pass complete on a "skinny" post.ALL-22 , Endzone
    82nd4IND41(6:44) T.Romo pass short left to D.Bryant for 4 yards, TOUCHDOWN NULLIFIED by Penalty. PENALTY on DAL-D.Murray, Illegal Motion, 5 yards, enforced at IND 4 - No Play.ALL-22 , Endzone
    92nd9IND91(6:40) (Shotgun) T.Romo pass short middle to T.Williams for 9 yards, TOUCHDOWN. Pass complete on a "slant" pattern. D.Bailey extra point is GOOD, Center-L.Ladouceur, Holder-C.Jones.ALL-22 , Endzone
    101st10IND191(4:30) T.Romo pass deep right to D.Bryant for 19 yards, TOUCHDOWN. Penalty on IND-G.Toler, Defensive Holding, declined. D.Bailey extra point is GOOD, Center-L.Ladouceur, Holder-C.Jones.ALL-22 , Endzone
    112nd5DAL301(2:17) (Shotgun) T.Romo pass deep left to D.Bryant to IND 46 for 24 yards (V.Davis). Penalty on IND-V.Davis, Defensive Holding, declined.ALL-22 , Endzone
    122nd8IND331(:34) (Shotgun) T.Romo pass short right to J.Randle pushed ob at IND 26 for 7 yards (J.Freeman). Pass complete in the flat.ALL-22 , Endzone
    131st10IND242(14:19) Cole Beasley 24 Yd pass from Tony Romo (Dan Bailey Kick)ALL-22 , Endzone
    142nd9DAL342(12:30) T.Romo pass short right to J.Witten to IND 46 for 20 yards (M.Adams). Pass complete on a "corner" route.ALL-22 , Endzone
    152nd9IND452(11:03) (Shotgun) T.Romo pass short left to L.Dunbar to IND 31 for 14 yards (V.Davis).ALL-22 , Endzone
    163rd1IND102(7:24) (Shotgun) T.Romo pass short right to J.Witten to IND 1 for 9 yards (D.Jackson). Pass complete on a "corner curl" route.ALL-22 , Endzone
    172nd11DAL322(2:17) (Shotgun) T.Romo pass short middle to C.Beasley to DAL 37 for 5 yards (D.Butler). Pass complete on a "drag" route.ALL-22 , Endzone
    183rd14IND233(13:13) (Shotgun) T.Romo sacked at IND 34 for -11 yards (A.Jones).ALL-22 , Endzone
    191st10DAL373(9:37) T.Romo pass short left to D.Bryant pushed ob at DAL 48 for 11 yards (V.Davis). Pass complete on a "comeback curl" route.ALL-22 , Endzone
    202nd8503(8:16) (Shotgun) T.Romo pass short right to J.Witten to IND 43 for 7 yards (J.Freeman).ALL-22 , Endzone
    212nd3IND343(6:06) (Shotgun) T.Romo pass short right to J.Witten pushed ob at IND 24 for 10 yards (M.Adams). Pass complete on an "out" route.ALL-22 , Endzone
    222nd11IND253(4:48) Jason Witten 25 Yd pass from Tony Romo (Dan Bailey Kick)ALL-22 , Endzone
    232nd7IND463(:23) (Shotgun) T.Romo pass short left to D.Bryant to IND 36 for 10 yards (G.Toler). Pass complete on a "slant" pattern.ALL-22 , Endzone
    242nd12IND384(14:19) (Shotgun) T.Romo scrambles up the middle to IND 31 for 7 yards (M.Adams). PENALTY on IND-J.Freeman, Defensive Holding, 5 yards, enforced at IND 31.ALL-22 , Endzone
    252nd11IND274(13:02) (Shotgun) T.Romo pass incomplete short middle to C.Beasley (S.Brown).ALL-22 , Endzone

    Jimmy Clausen vs. the Lions (23/39, 188 Yards, 2 TDs, 1 INT)

    Jimmy Clausen was a highly touted QB prospect when he began his college career at Notre Dame, but fell short of expectations and also fell in the draft, going 48th overall to Carolina in 2010. In his first season as a QB, when went 1-9 as a starter, and the Panthers then took Cam Newton with the #1 overall pick, relegating Clausen to the bench. During the 2014 offseason, he signed with the Bears and beat out Jordan Palmer to back up Jay Cutler. With the Bears reeling and Marc Trestman benching Cutler for week 16, Clausen got the nod to start for the first time in almost four years. This article will break down every dropback Clausen had in his start for the Bears.

    I personally was very critical of the move to bench Cutler and start Clausen, and while I still think Cutler is a better player, Clausen actually performed reasonably well against the Lions. He dropped back to pass 44 times, and went 23/39 for 181 yards with 2 TDs and an INT. He was sacked twice and scrambled 3 times for 9 yards.

    While Clausen’s raw numbers are not impressive, that a function of two main things. First, the Bears were extremely conservative, throwing a multitude of screens and other short passes. Clausen only threw three passes on deep routes (7, 8, or 9 routes), and while he went just 1/3 on those passes, that completion was a 20 yard TD, one was just a hair too far (and had great coverage) and the third was a desperation pass at the end of the game. Outside of that, the second reason Clausen’s numbers don’t look impressive is that I counted seven drops from Bears receivers. One was on a play where a defensive penalty was called so it didn’t matter, but a few of them were hurtful, especially toward the end of the game. The throws on these plays were accurate, and Clausen should have really been 29/39 on the day.

    The Bears also allowed consistent pressure to get to Clausen from the Lions’ excellent defensive line. This caused him to have to get the ball out more quickly on throws than he might have wanted to and also forced a few incompletions. In general, Clausen did a relatively good job of handling the pressure, choosing to get the ball out quickly.

    Something I think Clausen should be commended for in the game is his work on slant, dig, and curl routes. He made strong, decisive throws that went where only the receiver could catch the ball, and it’s the primary way he got his yardage. Matt Forte also did damage, as he always does, after the catch on screen plays. However, Clausen’s main targets on the day were receivers Marquess Wilson and Alshon Jeffery. He seemed to have a rapport with Wilson, completing 7 of 10 passes to him for 66 yards. Jeffery he targeted 15 times, but only connected with 6 times.

    Without further ado, I’m going to get into breaking down every play of Clausen’s game:

    1-10-CHI 25 (Q1, 14:55) J.Clausen pass incomplete short right to M.Bennett.

    The Bears try to start Clausen off quick by rolling him out to the right and having him target Martellus Bennett in the flat. However, Bennett drops the pass. It’s difficult to tell, but it looks like the pass came in hotter than Bennett expected so he juggled it. If this is the case, I’d just attribute it to nerves on Clausen’s first pass play. This is a ball that should be caught by Bennett.

    2-10-CHI 25 (Q1, 14:50) E.Britton reported in as eligible. J.Clausen pass short left to M.Wilson to CHI 26 for 1 yard (R.Mathis).

    The Bears try to give Clausen confidence again by giving him a quick screen to Marquess Wilson. This time Clausen completes the pass. However, Rashean Mathis is right there to tackle Wilson before he can pick up any yardage. The Bears would run the ball on third and long, and Clausen’s first drive as a Bear would end as a 3-and-out.

    3-6-CHI 21 (Q1, 8:30) (Shotgun) J.Clausen pass incomplete short left to A.Jeffery.

    When the Bears got the ball back they ran twice and set up Clausen in a third and 6. Clausen once again looks to get the ball out quickly, and he targets his best receiver, Alshon Jeffery on an out route. I don’t agree with this decision for a couple of reasons. First, Jeffery isn’t past the first down marker and Mathis is in great position to bring Jeffery down short of the first down. Second, Jeffery does not have separation from Slay, while Josh Morgan, who is running a dig route over the middle at about the 30 got more separation from his defender. I’d like to see Clausen target Morgan in this scenario. Either way, the throw is not good, as he leads Jeffery too far for an incompletion and a second 3-and-out.

    1-10-CHI 20 (Q1, 5:15) E.Britton reported in as eligible. J.Clausen pass short left to M.Wilson pushed ob at CHI 37 for 17 yards (R.Mathis).

    Overall this is a very nice play from Clausen. His first read is Alshon running a post route but he wisely decides to not attempt to thread the ball into a very tight window and comes over to Wilson, his second read, who is running a comeback route. The corner, Mathis, has deep responsibility on the route so Clausen puts the ball in a very good place: away from the safety that’s moving over to cover the route. This allows Wilson to make a clean catch and turn upfield for a handful of extra yards.

    While this is a pretty basic throw for a NFL QB to make, it’s still a good sign that Clausen is putting the ball in a good position and not trying to force it to his big target in Jeffery.

    1-10-CHI 37 (Q1, 4:48) (Shotgun) J.Clausen pass short left to M.Forte pushed ob at CHI 47 for 10 yards (D.Levy).

    This play is a double screen. Clausen’s first option is Jeffery at the top of the screen, but that part of the play is snuffed out by Josh Bynes. Therefore, he comes back to the other side and dumps it to Matt Forte, who has a couple of blockers in front of him and takes the ball 10 yards for a first down.

    2-9-DET 37 (Q1, 2:49) (Shotgun) J.Clausen pass short left to M.Wilson to DET 31 for 6 yards (R.Mathis).

    As in his second throw of the game, Clausen’s first option is a quick screen to a WR. However, this time Clausen decides to wait for other options. At the same time, the pocket is disrupted by interior pressure. Clausen moves to his right to avoid a sack, and finds Wilson open after he was vacated by the DB, who is off on a late blitz. It’s a good, safe decision that brings up third and short.

    4-2-DET 30 (Q1, 1:31) (Shotgun) J.Clausen pass short right to A.Jeffery to DET 26 for 4 yards (D.Tapp; D.Levy).

    The Bears ran the ball on third down ad didn’t get much, but since they were in fourth and short and had what would have been a long field goal attempt, they decided to go for it on 4th down. To convert, they drew up a WR screen to Jeffery. With trips bunched to the right, Jeffery has space to work with and he takes the pass for a first down. Not an especially difficult throw, but it’s a good thing Clausen didn’t let Suh, who got instant penetration, bat the pass down.

    1-10-DET 26 (Q1, :45) (Shotgun) J.Clausen pass incomplete short left to M.Wilson (R.Mathis).

    With a fresh set of downs, the Bears come out with three WRs split wide to the left. Clausen goes through his progressions and targets Wilson, who is a good choice. Remember earlier, the two connected for 16 yards on a similar comeback route. This time, Mathis is in man coverage and closer to Wilson, but Clausen makes a very good throw, putting it where Wilson can make a clean catch. However, Wilson straight up drops the pass. This was a good decision and throw by Clausen, and bad execution by Wilson.

    2-10-DET 26 (Q1, :40) (Shotgun) J.Clausen scrambles right end to DET 22 for 4 yards.

    The Lions do a good job of covering all of Clausen’s options on this play, and even though he buys himself some time by drifting backwards nobody is open. He decides to run it himself and shows a little athleticism. Then he intelligently slides after picking up a gain of four.

    3-6-DET 22 (Q2, 15:00) (Shotgun) J.Clausen pass short right to A.Jeffery to DET 10 for 12 yards (D.Slay; D.Levy).

    This play is a simple decision for Clausen. His first read, Jeffery, does a nice job of setting Darius Slay up on the outside and then breaking inside, coming open past the sticks. Clausen makes a nice throw, hitting Jeffery in stride and allowing him to pick up a few more yards after the catch.

    2-1-DET 1 (Q2, 13:30) J.Clausen pass incomplete short left to A.Jeffery (N.Suh).

    On this play Clausen means to throw a fade to Jeffery, but he never gets the chance. Ndamukong Suh gets an excellent jump off the snap, and then he gets a hand on Clausen’s throwing arm. This causes the ball to just kind of flutter in the air and drop to the ground. The throw ended up being very dangerous, but it’s not Clausen’s fault; it’s just Suh being the nightmare that he is and a poor job of stopping him by the offensive line.

    4-1-DET 1 (Q2, 12:47) E.Britton reported in as eligible. J.Clausen pass incomplete short right to E.Britton (D.Slay).

    It’s now fourth and goal at the one, and the Bears want to roll Clausen out to his right and get a TD to one of the receivers there, but there’s a problem. Three unblocked Lions are in Clausen’s face immediately. This play had no chance. Clausen makes a last ditch throw off of his back foot and it is knocked down, but this play is not Jimmy’s fault. Well, it actually might be if he’s responsible for the protections. Matt Forte tries to cut one defender and fails, but even then there should never be two unblocked defenders getting a free run at the QB. Whoever was telling the OL what to do on this play (which was probably Clausen) made a big mistake when calling the protections at the line.

    2-13-CHI 17 (Q2, 7:23) (Shotgun) J.Clausen pass incomplete short left to A.Jeffery.

    On this play, Clausen tries to fit the ball into a tight window to Jeffery on a slant. He actually does a very good job with the throw: it’s a tad low but on target and where only Jeffery can get to it. However, Jeffery just flat out drops the pass. That’s the third drop so far for a Bears player.

    3-13-CHI 17 (Q2, 7:19) (Shotgun) E.Britton reported in as eligible. J.Clausen pass incomplete short left to A.Jeffery.

    On this play, it’s third and long, and Clausen does a very nice job of stepping up in the pocket to avoid Ansah coming around the edge. However, he does not make a very good decision, choosing to force a throw to a double covered Jeffery. He has two much safer options underneath in Bennett and Forte, and I really don’t like the decision to throw to Jeffery here. That’s asking for an interception, and it would have given the ball to the Lions in scoring position. At this point in the game I would rather see him dump the ball off and give the defense slightly better field position than risk a throw that is not very likely to be successful.

    Week 16’s Longest Runs - Kaepernick, Hill, Lynch, Todman, Gore

    Week 16 featured some incredible plays on the ground. I wanted to analyze how these plays were produced. This post will break down the runs by Kaepernick, Hill, Lynch, Todman, and Gore.

    Play 1
    Situation: 2nd and 3 at PHI 40
    Description: Q3 - (2:40) (Shotgun) C.Kaepernick scrambles right end for 90 yards, TOUCHDOWN. Penalty on SD-M.Gilchrist, Illegal Contact, declined. P.Dawson extra point is GOOD, Center-K.Nelson, Holder-A.Lee.
    All-22 View


    Endzone View

    Offensive Formation: Pistol Twins Right
    Offensive Grouping: 12
    Defensive Formation: Cover 1, man-to-man coverage on WRs and TEs

    Kaepernick goes through his reads starting on the right side of the field watching TE45 Cleveland running a hitch route. Cleveland gets pushed to the ground illegally by SS38 Gilchrist since this contact was 5 yards past the line of scrimmage.

    DT98 Lissemore throws C66 Martin out of the way on a bull-jerk from the 1-tech position. Kaepernick scrambles around him through the open hole between the center and the right guard.

    Kaepernick then runs out of the pocket looking downfield setting up his running lanes.

    Finally, FS32 Weddle is directly in front of Kaepernick attempting to make the open field tackle, but Kaepernick jukes him to the right completely avoiding the tackle.

    As you can see, this play was the product of great running ability by Kaepernick with his juke move on Weddle and good downfield blocking by TE85 Davis who set the edge after Kaepernick decided to scramble.

    Play 2
    Situation: 2nd and 3 at PHI 40
    Description: Q1 - (10:25) (Shotgun) J.Hill right tackle for 85 yards, TOUCHDOWN. M.Nugent extra point is GOOD, Center-C.Harris, Holder-K.Huber.
    All-22 View


    Endzone View

    Offensive Formation: Shotgun
    Offensive Grouping: 11
    Defensive Formation: Cover 2 with two underneath zones and man-to-man coverage on the outside

    Here is the blocking scheme breakdown on this Off-tacke Lead Pull run.

    Hill takes the handoff and follows LT77 Whitmorth and LG65 Boling up the right side of the formation.

    Hill finds the C-gap between RT73 Winston and TE84 Gresham, but it is filled by LB51 Davis. Hill sees Davis just in time and bounces his run outside of the formation nearly getting tackled.

    Hill uses his left arm to swipe away FS26 Moore’s attempted tackle while WR19 Tate does an excellent job sealing the right edge of the running lane from CB21 Talib.

    Hill weaves back and forth to set up blocking down the field to score on this 85 yard touchdown run.

    As you can see, Hill does an excellent job setting up his blocks and using his vision to find open running lanes. LB51 Davis almost shutdown the play, but due to Hill’s surprising quickness he was able to shed the tackle. Credit to the downfield blocking by the Bengals here.

    Play 3
    Situation: 2nd and 3 at PHI 40
    Description: Q4 - (10:30) M.Lynch up the middle for 79 yards, TOUCHDOWN. S.Hauschka extra point is GOOD, Center-C.Gresham, Holder-J.Ryan.
    All-22 View


    Endzone View

    Formation: Singleback Ace
    Offensive Grouping: 12
    Defensive Formation: Cover 1, two underneath zones and 2 CBs in man-to-man coverage

    Here is the blocking scheme. The play call is a Trap Lead run to the left.

    Lynch takes the handoff and reads the A-gap hole between the right guard and the center, but DE93 Campbell is present. Lynch runs outside following the pulling left guard.

    Lynch barrels his way through the hole created by TE82 Wilson and TE84 Helfet. Lynch sees that FS26 Johnson is directly in front of him so he bounches his run to the right, but not before collecting his first missed tackle by LB56 Carson. Carson gets drawn inside the play due to Lynch’s cutting in the backfield.

    Lynch uses his power to hold off CB21 Peterson from taking him down while WR83 Lockette removes FS26 Johnson from the play. Lockette might have been called for a block in the back penalty if he fully pushed Johnson out of the play. Instead, Lynch gets the credit for that.

    Somehow, Lynch stays in bounds and runs up the field for the touchdown.

    Watch WR83 Lockette on the play. His goal is to trap block FS26 Johnson, but Johnson avoids the block in the center of the field. Lockette then redeems himself and hustles down the field after Lynch to help him block downfield. Amazing effort by Lockette. Even after Lockette helps clear Johnson by the sideline, he sprints upfield again to protect Lynch right before the endzone. Incredible.

    In this play, Lynch avoided multiple tackles and was able to use his balance and power to run for this long touchdown.

    Play 4
    Situation: 2nd and 3 at PHI 40
    Description: Q4 - (9:24) J.Todman up the middle for 62 yards, TOUCHDOWN. J.Scobee extra point is GOOD, Center-C.Tinker, Holder-B.Anger.
    All-22 View


    Endzone View

    Formation: Offset-I Slot Left
    Offensive Grouping: 21
    Defensive Formation: Cover 1, two underneath zones and 2 CBs in man-to-man coverage

    Here is the blocking scheme broken down. The run is a counter fake-end around.

    Todman takes the handoff while WR11 Lee runs around the bottom of the play drawing two defensive lineman up the field.

    This gives Todman a hole to cut through where he sees LB59 Woodyard take an angled approach to tackle him. Todman explodes upfield avoiding the tackle.

    Watch DE90 Jones throw RT74 Bradfield out of the play. Todman is lucky Jones misread the play and didn’t finish him off before he could make it outside.

    Todman quickly jukes around FS33 Griffin and cuts back outside.

    Finally, SS21 Wilson attempts a tackle but Todman uses a stiff arm to keep Wilson away to breakaway for the 62 yard score.

    This is the second most impressive run of the week. Todman’s quick cuts combined with an excellent play design with the fake end-around create the running lanes. Todman’s explosiveness needs to be used more by the Jaguars.

    Play 5
    Situation: 2nd and 3 at PHI 40
    Description: Q1 - (13:22) F.Gore right tackle for 52 yards, TOUCHDOWN. P.Dawson extra point is GOOD, Center-K.Nelson, Holder-A.Lee.
    All-22 View


    Endzone View

    Formation: Offset-I
    Offensive Grouping: 21
    Defensive Formation: Cover 2 with four underneath zones.

    Here is the blocking scheme broken down. This is a Power Fullback Lead since the left guard pulls around the formation to lead block for Gore.

    Gore takes the handoff and immediately reads the center and the right guard. LB50 Te’o seals the B-gap between the RG and RT, so Gore runs outside.

    Next, Gore reads his lead blockers and cuts inside to avoid LB53 Conner who has the edge. Meanwhile WR81 Boldin trap blocks SS38 Gilchrist out of the play giving Gore a clean running lane.

    Gore uses force and his stiff arm to shed three tackles, while WR11 Patton runs across the screen to help block downfield.

    This is probably my favorite part of this play. Patton starts pushing FS32 Weddle out of the play and then realizes it’s a block in the back if he continues so he stops.

    Gore uses his cutting ability to allow Patton to reset and fully block Weddle before he can make his way into the endzone.

    Excellent downfield blocking by LT74 Staley on DE94 Liuget.

    Overall, the blocking was excellent and the play design of the above plays worked to perfection to free the runners. Great individual effort overall combined with downfield blocking by the respective teams made these plays happen.

    RG3 Redeemed; Film Breakdown of His Passes versus the Eagles

    RG3 showed very positive signs of improvement during his Week 16 match-up versus the Eagles. In this game, RG3 showed a better grasp of fundamental quarterbacking that he hasn’t shown all season. If RG3 continues to show these signs of progress, the Redskins should be confident in naming him their quarterback of the future.

    Stats
    RG3 - 16/23 for 220 yards (9.6 ypa), 0 TDs, 1 INTs, 1 fumbled snap, 2 sacks for 15 yards, and two-50+ yard bombs to DeSean Jackson

    Offensive groupings are denoted as a two digit number, where the first digit represents the number of runnings backs, and the second number represents the number of tight ends in the set.
    For example, “12” offensive grouping refers to 1 RB, 2 TE and 2 WRs.

    Play 1
    Situation: 2nd and 3 at PHI 40
    Description: Q1 - (11:05) R.Griffin pass short left to D.Jackson pushed ob at PHI 33 for 7 yards (C.Williams).
    All-22 View


    Endzone View

    Formation: Singleback Big
    Offensive Grouping: 12

    RG3 has Jackson and Garcon as his wide outs. Jackson runs a quick out underneath off-man coverage for a gain of 7 yards on the play.

    Jackson makes a quick cut on the out-route and RG3 places the ball in stride. Quick, accurate throw to start the game.

    Play 2
    Situation: 2nd and 9 at PHI 32
    Description: Q1 - (9:56) (Shotgun) R.Griffin pass short right to C.Thompson to PHI 30 for 2 yards (M.Kendricks).
    All-22 View


    Endzone View

    Formation: Empty-set Shotgun
    Offensive Grouping: 01

    RG3 throws a quick WR screen pass to RB37 Thompson who lines up wide right. This play works much better against man-to-man coverage, so the zone coverage of the Eagles on the right side is able to shutdown the screen quickly. TE82 Paulsen needs to block out Kendricks for this play to be effective. If he did, Thompson would have had a clear running lane up the sideline for a bigger gain.

    RG3’s throw is a little bit high and in front of Thompson, but still catchable.

    Play 3
    Situation: 3rd and 7 at PHI 30
    Description: Q1 - (9:12) (Shotgun) R.Griffin pass short middle to A.Roberts to PHI 16 for 14 yards (B.Fletcher) [B.Graham].
    All-22 View


    Endzone View

    Formation: Shotgun Twins Stacks Right
    Offensive Grouping: 13

    RG3 starts with his first read WR11 Jackson. Jackson is running an out route running an out-route.

    Jackson’s CB has tight off-man coverage so RG3 moves onto his next read. TE86 Reed who is running a smash route from the top of the twin stacks right.

    Reed’s defender barely allows any separation off of the line of scrimmage. Typically this is a good match-up of Reed versus a linebacker due to Reed’s agility, but the linebacker maintains good man coverage.

    RG3 moves onto to his final read with WR12 Roberts running an in route from the back of the twins stack right. Roberts gets out of his break quickly and RG3 places the ball accurately to him. Roberts bobbles the ball, but is able to bring it in for a 14 yard gain.

    On this play, RG3 stood tall in the pocket, went through his reads and delivered an accurate ball to his wide receiver. RG3 struggled with completing his progresssions in previous games so this is a great sign of development for the QB that many people claim is a bust.

    Play 4
    Situation: 2nd and 9 at PHI 15
    Description: Q1 - (7:56) (Shotgun) R.Griffin pass incomplete short right to D.Jackson (M.Kendricks).
    All-22 View


    Endzone View

    Formation: Pistol Twins Left
    Offensive Grouping: 11

    RG3 runs play-action bootleg to the right. DE91 Cox reads the play fake well and chases down RG3 into the backfield. RG3 throws to his underneath receiver WR11 Jackson, but the pass is low and too slow for Jackson to make a play on the ball since the ball was thrown off of RG3’s backfoot.

    It’s a tough throw to make when you are getting chased by a stud defensive lineman like Cox. All of the receivers were covered as they were flooding right and Jackson does his best to sit in between defenders.

    On the positive side, RG3 doesn’t force a throw into coverage, but the credit goes to the defense on this play specifically through Cox for reading it and Kendricks for defending the ball from Jackson.

    Play 5
    Situation: 3rd and 9 at PHI 15
    Description: Q1 - (7:47) (Shotgun) R.Griffin pass incomplete short left to J.Reed [M.Kendricks]. PENALTY on PHI-C.Williams, Unnecessary Roughness, 7 yards, enforced at PHI 15.
    All-22 View


    Endzone View

    Formation: Shotgun Trips Right
    Offensive Grouping: 11

    This is the Redskins favorite offensive formation. It utilizes the team’s greatest strength; the top three wide receivers (Jackson, Garcon and Roberts) and TE Jordan Reed in the same set. Typically from this formation we see a lot of screen passes, pick plays and crossing routes to help free the receivers from the defenders.

    RG3 snaps the ball and instantly feels pressure from the left side of the line through LT71 Williams. LB55 Graham bull-rushes Williams into the backfield, while ILB95 Kendricks is the free rusher through the A-gap between the RG66 Chester and C74 Lichtensteiger.

    RG3 gets rid of the ball in time throwing the out-and-up route to Reed on the left side of the field. The ball goes out of bounds in Reed’s direction. CB26 Williams gets called for unneccessary roughness for pushing Reed on the play giving the Redskin sa first down.

    The Redskins offensive line needs to do a better job picking up the delayed blitzer in Kendricks. Hits like this aren’t pretty to see on your QB.

    Play 6
    Situation: 2nd and 8 at PHI 8
    Description: Q1 - (6:59) (Shotgun) R.Griffin scrambles left end to PHI 7 for 1 yard (B.Boykin).
    All-22 View


    Endzone View

    Formation: Shotgun Trips Left
    Offensive Grouping: 11

    RG3 fakes the handoff to RB37 Thompson in the backfield and starts his reads looking left at Garcon and Jackson. Both Jackson and Garcon are running smash routes. I think Jackson was supposed to run a slant route but he cut back since his CB had the inside-leverage. RG3 sees this and stares at them a little bit too long.

    Next, RG3 progresses to Roberts running a post route from the slot who is actually open in the back of the endzone for a lob pass.

    All RG3 has to do is release the ball, but the linebackers underneath in zone coverage see RG3 looking at Roberts and close the gap.

    Finally, RG3 senses the pressure incoming from the defensive lineman.

    He looks right quickly and then scrambles outside of the pocket to his left. outside of the pocket RG3 attempts to cut upfield but slips on Washington’s terrible turf and hits the deck ending the play.

    If RG3 did not watch Garcon and Jackson and decided to move on to Roberts this play would have been a touchdown. The defenders were not ready for Roberts post route and even Roberts knew it too as he instantly threw his hand up into the air asking for the ball off of his cut.

    This is a play that RG3 needs to complete in order for the Redskins to keep up with the elite teams in the NFL. Instead, RG3 scrambles outside of the pocket for a minimal gain. The only positive from this play is the protection by the offensive line and RB Thompson for the blitz pick-up on ILB50 Matthews. They all did an excellent job keeping this play alive for an extended period of time, which is something we did not see earlier in the season from them.

    Play 7
    Situation: 3rd and 7 at PHI 7
    Description: Q1 - (6:14) (Shotgun) R.Griffin pass incomplete short right to P.Garcon (M.Jenkins).
    All-22 View


    Endzone View

    Formation: Shotgun Trips Right
    Offensive Grouping: 11

    RG3 takes a high snap and instantly finds Jackson on a slant route. This is a designed pick play where WR12 Roberts route interferes with the Jackson’s defender. RG3 throws the ball at Jackson not reading the FS27 Jenkins playing zone coverage over the trips. Jenkins reads the play and should have had a pick six, but he drops the ball. Lucky break for the Redskins here.

    Terrible decision by RG3 here. Designed pick plays are meant for single man-to-man coverage when the safety or any zone defenders are out of the play. RG3 needs to read this play pre-snap and see that there are three defenders lining up directly off of their receivers and determine they are in man-to-man with a safety over top or three underneath zones.

    In the right slot next to the pick play is Reed who instantly beats his defender off of the line of scrimmage and is open for the ball for a lob pass touchdown. RG3 continues to struggle in the red zone just like last week against the Giants.

    Play 8
    Situation: 2nd and 9 at WSH 21
    Description: Q1 - (1:16) (Shotgun) R.Griffin pass deep right to D.Jackson to PHI 28 for 51 yards (B.Fletcher).
    All-22 View


    Endzone View

    Formation: Shotgun Double Left Far
    Offensive Grouping: 11

    RG3 has Jackson and Garcon as his wide-outs. Jackson immediately beats CB Fletcher off of the line of scrimmage with a step to the inside and then sprints downfield. RG3 does something that I have been preaching about in almost all of my RG3 articles: He looks off the safety!

    RG3 finds WR12 Roberts from the slot running to the flat wich draws the free safety over to the middle of the field thinking that RG3 is going to look for TE Reed running a post route. Instead, RG3 turns to the other side of the field and finds Jackson on the right sideline sprinting past Fletcher.

    RG3 throws a beautiful bomb to WR11 Jackson’s outside shoulder. Due to Fletcher playing catch-up in coverage, he can’t turn around in time to locate the ball allowing Jackson to track down the ball without interference. Finally, RG3 learned NOT to stare down his receivers!

    CLICK HERE FOR PAGE 2 OF THE ARTICLE.

    Ryan Kerrigan and the Double Swipe - 13.5 Sacks

    The former Purdue standout, Ryan Kerrigan has put together an impressive season collecting a team-high 13.5 sacks in 15 games. This post will breakdown how he used a variety of pass rushing moves to record sacks, with the double-swipe as his most notable pass rushing move.

    Stats - 13.5 sacks, 8 QB hits, 47 QB Hurries, #3 overall 3-4 outside linebacker in pass rushing productivity according to ProFootballFocus with +12.9 score

    Play 1
    Situation: 1st and 10 at JAX 43
    Description: Q2 - (7:04) (No Huddle) C.Henne sacked at JAX 36 for -7 yards (R. Kerrigan). Penalty on JAX, Illegal Formation, declined.

    Henne in singleback formation runs play-action bootleg to the right. Redskins rush four pass rushers with Kerrigan lining up as the left outside linebacker.

    Kerrigan reads the handoff and only momentarilly gets pulled inside on the fake.

    He then angles his pursuit to prevent QB Henne from running further outside of the pocket collecting the sack.

    Play 2
    Situation: 2nd and 10 at JAX 20
    Description: Q3 - (8:24) C.Henne sacked at JAX 15 for -5 yards (R. Kerrigan).

    The Redskins rush five pass rushers against Henne in I-formation. Kerrigan lines up wide left on the line of scrimmage.

    Kerrigan takes three steps up the field. RT78 Bradfield steps outside in an attempt to block him on a speed rush around the edge, but Kerrigan wisely cuts inside on his third step taking advantage of the off-balancd Bradfield attempting to seal the edge from a speed rush.

    RT Bradfield attempts to hook Kerrigan with his left arm, but Kerrigan shoves him off.

    He then turns on his speed and chases down Henne for the sack.

    Play 3
    Situation: 3rd and 15 at JAX 15
    Description: Q3 - (7:45) (Shotgun) C.Henne sacked at JAX 8 for -7 yards (R. Kerrigan).

    This was the Redskins’ favorite pass rush formation before Orakpo was injured for the season with a torn pectoral muscle. In this formation, Redskins line up their four best pass rushers across the defensive line: LB91 Kerrigan and LB98 Orakpo as the defensive ends, DE97 Hatcher as the 3-tech, and LB93 Murphy as the 1-tech. Normally, NT96 Cofield would occupy the 1-tech in this situation, but he was injured the previous week and wouldn’t return until Week 11 versus Tampa Bay.

    Redskins line up with six defenders on the line of scrimmage with Kerrigan outside of RT78 Bradfield. Kerrigan uses the double-swipe to collect the sack.

    Kerrigan takes a hard three steps up the field towards Bradfield and uses both of his hands to swipe away Bradfield’s hands.

    He then uses his speed to get around Bradfield. Bradfield never engages with Kerrigan directly due to the double swipe, so he loses balance trying to extend himself to stay with the Kerrigan.

    Kerrigan gets around the edge of Bradfield using his inside arm to keep Bradfield from hooking him to collect the sack.

    Play 4
    Situation: 1st and 10 at JAX 27
    Description: Q4 - (1:46) (Shotgun) C.Henne sacked at JAX 23 for -4 yards (R. Kerrigan).

    Redskins rush four pass rushers against Henne in shotgun. Kerrigan lines up in the 3-tech position on the defensive line and uses the bull jerk to collect the sack.

    Kerrigan takes a hard step toward RG65 Linder. Kerrigan angles his bull-rush against the outside shoulder of RG Linder. This is meant to unbalance the offensive lineman.

    Kerrigan pushes Linder hard into the backfield. At the top of the bull-rush, Linder is too upright in his stance so Kerrigan uses his weight against him and jerks Linder to the side.

    Kerrigan finishes the sack by reaching across Linder with his inside arm to grab Henne.

    Play 5
    Situation: 1st and 10 at WSH 35
    Description: Q2 - (:18) (No Huddle, Shotgun) E.Manning sacked at WAS 40 for -5 yards (R. Kerrigan).

    Kerrigan lines up in the left defensive end position in the Redskins favorite pass rushing formation. Unlike Play 3, LB93 Murphy and DT97 Hatcher switched positions to attack the offensive line.

    In this play Kerrigan uses the hump move to collect the sack against Manning. The credit for this sack should also go to LB93 Murphy for his pentration against RG77 Jerry.

    Kerrigan uses his hands to push RT67 Pugh’s outside shoulder backwards causing him to become unbalanced. Meanwhile, Murphy speed rushes through the hole between RT Pugh and RG Jerry.

    RG Jerry follows Murphy’s speed rush into the backfield. Manning sees that Murphy has clearly beat RG Jerry, so Manning steps up into the pocket to avoid him.

    Kerrigan cuts inside and has a clear running lane to collect the sack against Manning. Murphy gets credit with the QB hurry, while Kerrigan records the sack.

    Play 6
    Situation: 3rd and 9 at WSH 39
    Description: Q1 - (:36) (Shotgun) R.Wilson sacked at WAS 46 for -7 yards (R. Kerrigan).

    Kerrigan lines up in the 3-tech position against RG64 Sweezy. Kerrigan uses a speed rush around the right guard to collect the sack.

    This play is made possible by the free blitzer LB56 Riley who penetrates between LG77 Carpenter and C63 Schilling. QB Wilson sees Riley blitzing through the open hole, so he avoids him moving inside the pocket to the right.

    Kerrigan penetrates the offensive line past RG Sweezy and then raises his arm to prevent Sweezy from grabbing his shoulder. Kerrigan then cuts inside and sacks Wilson trying to escape the pocket.

    Watch LB98 Orakpo. He speed rushes around the edge, and then realizes his responsibility is actually to cover the flat and RB24 Lynch. Orakpo abandons his rush and chases down Lynch. Fortunately the pressure by LB Riley up the middle is enough to stop Wilson from seeing this clear mistake by Orakpo.

    Play 7
    Situation: 3rd and 8 at ARI 48
    Description: Q4 - (3:56) (Shotgun) C.Palmer FUMBLES (Aborted) at ARZ 44, and recovers at ARZ 43. C.Palmer sacked at ARZ 41 for -7 yards (sack split by R. Kerrigan and J.Hatcher).

    In this play, Kerrigan attempts to speed rush around the edge, but RT70 Massie does a great job stopping him from making progress. QB Palmer fumbles the ball off of the snap so Palmer is never able to fully start his progressions.

    DE97 Hatcher eventually penetrates on RG74 Fanaika by shifting left and right to off-balance him. Palmer tries to escape the pocket, but Kerrigan and Hatcher close down for the sack. Really it’s an opportunity sack split by Hatcher and Kerrigan as opposed to a sack created by a technical pass rushing move.

    Play 8
    Situation: 3rd and 3 at DAL 44
    Description: Q2 - (:23) (Shotgun) T.Romo sacked at DAL 32 for -12 yards (R. Kerrigan).

    Kerrigan runs a stunt from the left outside through the A-gap between RG70 Martin and C72 Frederick.

    Romo doesn’t see Kerrigan in time to avoid the sack.

    Good play design by the Redskins and great execution by Kerrigan to move around the line without the offensive line picking him up.

    Play 9
    Situation: 2nd and 10 at SF 44
    Description: Q2 - (1:30) (Shotgun) C.Kaepernick sacked at SF 40 for -4 yards (R. Kerrigan).

    This is my favorite sack by Kerrigan all season. Kerrigan lines up wide left in the two point stance.

    Kerrigan takes three steps forward and engages with RT71 Martin in the bull rush. Meanwhile, LB93 Murphy speed rushes through the B-gap and pushes Martin from behind.

    Martin becomes unbalanced and Kerrigan bull-jerks him out of the way, while Murphy continues to penetrate the pocket.

    Murphy’s penetration causes the HB and LG to turn and block him out of the pocket, so Kerrigan has a clear running lane towards Kaepernick for the sack.

    Amazing teamwork. I’m surprised we don’t see this more often from defensive lineman actually. It’s a very simple play and more teams would benefit from using it.

    Play 10
    Situation: 1st and 10 at IND 24
    Description: Q1 - (14:55) A.Luck sacked at IND 14 for -10 yards (R. Kerrigan). FUMBLES (R. Kerrigan), RECOVERED by WAS-J.Hatcher at IND 15. J.Hatcher to IND 15 for no gain (A.Castonzo).

    This sack came on the first play against the Colts.

    Kerrigan lines up outside RT78 Cherilus and uses the double-swipe move to collect the sack on QB Luck.

    Kerrigan takes a hard step up the field aiming at the outside shoulder of RT Cherilus. Kerrigan swipes Cherilus’ hands out of the way and speeds around the edge sacking Luck.

    Kerrigan again uses the double-swipe to great effect. On this play, Kerrigan forces the fumble and prevents Luck from recovering it as well.

    Play 11
    Situation: 2nd and 4 at WSH 4
    Description: Q2 - (6:59) S.Hill sacked at WAS 9 for -5 yards (R. Kerrigan). FUMBLES (R. Kerrigan), recovered by SL-T.Mason at WAS 6. T.Mason to WAS 6 for no gain (P.Riley).

    Kerrigan speed rushes unimpeded from the outside left for a quick sack on QB Hill. RB27 Mason is supposed to pick up Kerrigan on the blitz pick-up, but Kerrigan is way too fast. Kerrigan strips the ball, and Mason is able to redeem himself by diving on the fumble.

    Play 12
    Situation: 2nd and 9 at WSH 37
    Description: Q2 - (2:00) (Shotgun) S.Hill sacked at WAS 43 for -6 yards (R. Kerrigan).

    Kerrigan speed rushes around the edge against RT72 Barksdale. Kerrigan is way too fast for the right tackle as Kerrigan beats him almost immediately off of the snap.

    Play 13
    Situation: 2nd and 9 at WSH 42
    Description: Q3 - (8:56) E.Manning sacked at NYG 46 for -12 yards (R. Kerrigan).

    This is the same exact sack as Play 1. Kerrigan reads the fake on the play-action bootleg to the right and takes down Manning almost immediately. Great read on the fake handoff.

    Play 14
    Situation: 3rd and 14 at WSH 47
    Description: Q1 - (11:48) (No Huddle, Shotgun) M.Sanchez sacked at PHI 47 for -6 yards (R. Kerrigan). FUMBLES (R. Kerrigan), RECOVERED by WAS-R. Kerrigan at PHI 47. R. Kerrigan to PHI 47 for no gain (A.Gardner).

    Kerrigan lines up outside of RT65 Johnson.

    Kerrigan uses the double swipe to stop Johnson from engaging on him during his speed rush around the edge.

    Johnson gets off-balanced by Kerrigan’s speed rush and his inability to grab Kerrigan, so he misses his block completely following Kerrigan around the edge.

    Kerrigan slaps the ball out of QB Sanchez’s hand for the sack-strip-recovery on the play.

    Kerrigan has shown throughout his career with Washington that he is their best and most consistent pass rusher. He should be a building block for the Redskins as they look to clean house this off-season getting rid of defensive coordinator Jim Haslett. Based on Kerrigan’s skill set he’d fit nicely as a 4-3 defensive end or in another 3-4 scheme as an outside linebacker.

    Here are all of Kerrigan’s sacks in GFY form for you to analyze yourself as well!

    PlayDownDisSideYDQOpp.DescriptionLink
    11st10JAX4322. JAX(7:04) (No Huddle) C.Henne sacked at JAX 36 for -7 yards (R.Kerrigan). Penalty on JAX, Illegal Formation, declined.Endzone
    22nd10JAX2032. JAX(8:24) C.Henne sacked at JAX 15 for -5 yards (R.Kerrigan).Endzone
    33rd15JAX1532. JAX(7:45) (Shotgun) C.Henne sacked at JAX 8 for -7 yards (R.Kerrigan).Endzone
    41st10JAX2742. JAX(1:46) (Shotgun) C.Henne sacked at JAX 23 for -4 yards (R.Kerrigan).Endzone
    51st10WSH3524. NYG(:18) (No Huddle, Shotgun) E.Manning sacked at WAS 40 for -5 yards (R.Kerrigan).Endzone
    63rd9WSH3915. SEA(:36) (Shotgun) R.Wilson sacked at WAS 46 for -7 yards (R.Kerrigan).Endzone
    73rd8ARI4846. ARI(3:56) (Shotgun) C.Palmer FUMBLES (Aborted) at ARZ 44, and recovers at ARZ 43. C.Palmer sacked at ARZ 41 for -7 yards (sack split by R.Kerrigan and J.Hatcher).Endzone
    83rd3DAL4428. DAL(:23) (Shotgun) T.Romo sacked at DAL 32 for -12 yards (R.Kerrigan).Endzone
    92nd10SF44212. SF(1:30) (Shotgun) C.Kaepernick sacked at SF 40 for -4 yards (R.Kerrigan).Endzone
    101st10IND24113. IND(14:55) A.Luck sacked at IND 14 for -10 yards (R.Kerrigan). FUMBLES (R.Kerrigan), RECOVERED by WAS-J.Hatcher at IND 15. J.Hatcher to IND 15 for no gain (A.Castonzo).Endzone
    112nd4WSH4214. STL(6:59) S.Hill sacked at WAS 9 for -5 yards (R.Kerrigan). FUMBLES (R.Kerrigan), recovered by SL-T.Mason at WAS 6. T.Mason to WAS 6 for no gain (P.Riley).Endzone
    122nd9WSH37214. STL(2:00) (Shotgun) S.Hill sacked at WAS 43 for -6 yards (R.Kerrigan).Endzone
    132nd9WSH42315. NYG(8:56) E.Manning sacked at NYG 46 for -12 yards (R.Kerrigan).Endzone
    143rd14WSH47116. PHI(11:48) (No Huddle, Shotgun) M.Sanchez sacked at PHI 47 for -6 yards (R.Kerrigan). FUMBLES (R.Kerrigan), RECOVERED by WAS-R.Kerrigan at PHI 47. R.Kerrigan to PHI 47 for no gain (A.Gardner).Broadcast

    Eddie Lacy Shines in Loss vs. Buffalo - 15 carries, 97 yards, 1 TD

    Eddie Lacy faced a tough Bill’s defensive front featuring Mario Williams, Jerry Hughes and Marcell Dareus. In 16 touches, Lacy was able to muster 97 yards and a touchdown. He used hard cutting ability, and explosiveness through the holes provided by his interior offensive lineman. Extra credit goes to Packers’ center Linsley. These plays will breakdown his performance.

    Stats - 15 carries, 97 yards (6.5 ypc), 1 TD

    Play 1
    Situation: 1st and 10 at GB 20
    Description: Q1 - (15:00) E.Lacy left tackle to GB 32 for 12 yards (D.Williams, A.Williams).

    Lacy is in offset-I formation running an HB Lead Dive between LG71 Sitton and C63 Linsley.

    TE81 Quarless is the lead blocker and does a great job of blocking out LB53 Spikes.

    Lacy shows his ability to set up his blocks by shifting to the right before he enters the hole to allow Quarless take a better angle at Spikes.

    DT99 Dareus has been a run-stopping force for the Bills for years so the pulling of the center to allow LG71 Sitton a running start at the block was a good play design to negate the powerful nose tackle.

    C63 Linsley does an excellent job blocking out LB53 Bradham.

    Play 2
    Situation: 1st and 10 at GB 32
    Description: Q1 - (14:34) (Shotgun) E.Lacy left tackle to GB 35 for 3 yards (S.Gilmore, J.Hughes). BUF-S.Gilmore was injured during the play. S.Gilmore walks off.

    Lacy in the pistol pro formation runs off-tackle to the left.

    Immediately after the handoff, Lacy reads the interior hole between C63 Linsley and RG70 Lang. The hole is closed due to LB53 Bradham’s presence.

    Lacy decides to hug the left half of the offensive line seeing SS23 Williams playing outside of his current position.

    Lacy takes one step-forward and then realizes that DE55 Hughes has fought his way through the blocking and is too close, so Lacy cuts outside.

    From the left outside WR position WR17 Adams trap blocks SS23 Williams. CB24 Gilmore is free to tackle Lacy and brings him down by his feet, but not before Lacy is able to fall foward for an extra yard or two. Give credit to Hughes for busting through the defensive line and Gilmore for bringing down Lacy for the short gain.

    The Packers run the same exact play next in Play 3 (below) to no success as well.

    In plays 4, 5 and 6, the Packers offensive line combined with Lacy’s explosiveness through the hole gave the Packers three long gains on the ground.

    Play 4
    Situation: 1st and 10 at GB 20
    Description: Q1 - (2:09) E.Lacy right guard to GB 35 for 15 yards (A.Williams, S.Charles).

    Lacy in offset-I formation runs a counter lead between LG71 Sitton and C63 Linsley. FB30 Kuhn is the lead blocker.

    Lacy take the snap and starts right and then cuts back left through the open hole between the left guard and the center. Kuhn chop blocks LB53 Branham removing him from the play. Lacy then uses his surprising quickness to explode through the hole.

    At the 25 yard line, Lacy sees FS27 Williams in deep coverage come up to make the play, but Lacy cuts hard outside left.

    Lacy uses his toughness to fight off DT96 Charles from taking him down and then continues to stay on his feet to fight for more yards up the field. Great run by Lacy. It started with great blocking by the offensive line, but Lacy’s suprising quickness and hard cutting ability is what allowed him to scamper for an extra 5 yards on the play after contact.

    Play 5
    Situation: 1st and 10 at GB 35
    Description: Q1 - (1:41) E.Lacy left guard to BUF 48 for 17 yards (D.Williams).

    Lacy in offset-I formation runs HB Lead left between LT69 Bakhitari and LG71 Sitton.

    C63 Linsley pulls around LG71 Sitton to lead block through the hole on DE55 Hughes.

    Lacy again shows his hard cutting and explosiveness through the holes created by the pulling of C63 Linsley. FS27 Williams makes a good diving tackle at the legs of Lacy knowing that if he attempted to take him head on, Lacy would probably overpower him.

    Play 6
    Situation: 1st and 10 at BUF 48
    Description: Q1 - (1:04) E.Lacy right guard to BUF 26 for 22 yards (D.Williams).

    Lacy from offset-I formation runs an HB Dive through the hole created by C63 Linsley and RG70 Lang.

    I think the original read was to run behind FB30 Kuhn, but since that gap was closed by LB52 Spikes. Lacy chose correctly to cut up inside between the center and the right guard instead.

    After Lacy blasts through the hole he sees CB20 Graham break from his block from the blocking of WR87 Nelson. Lacy cuts left to avoid him.

    FS27 Williams makes another great open-field tackle to take down Lacy. This play was mainly the result of great blocking by RG70 Lang to seal the right edge of the hole and C63 Linsley on recognizing that the DT was trying to cut underneath him.

    Play 8
    Situation: 1st and 1 at BUF 1
    Description: Q2 - (14:19) Eddie Lacy 1 Yd Run (Mason Crosby Kick)

    Lacy in I-formation runs off-tackle to score a Packers touchdown.

    Lacy takes the handoff and reads the immediate hole between the center and the left guard, but decides not to take it, because he sees LB52 Spikes approaching the hole.

    This and play 10 (below) are my only criticisms of Lacy all day against Buffalo. You have one yard to gain, and there is an open hole. Lacy has the power that he can muster one yard against Spikes for the touchdown. In my opinion, he chooses the wrong hole. Fortunately, Lacy still scores on the play, but it’s by getting pushed through a pile of blockers and not through the “easy” path.

    Play 10
    Situation: 2nd and 10 at GB 25
    Description: Q2 - (4:15) E.Lacy right tackle to GB 26 for 1 yard (D.Williams, C.Bryant).

    Lacy in singleback formation runs an HB dive between RG70 Lang and C63 Linsley.

    As I said in the previous play, I don’t like Lacy’s decision in this play as well. There is a bus-sized hole provided by C63 Linsley and RG70 Lang, yet Lacy decides not to take it in favor of dancing/stutter-stepping behind the line of scrimmage. This should have easily been a 5-6 yard gain on the play with Lacy’s power, but he chooses incorrectly and the Packers only gain one yard. What a shame.

    Buffalo’s defensive line did a great job stuffing the run in plays 3 (above), 7, 9, and 15.

    Play 7 - Shotgun formation, RB Dive between C and RG, DT99 Darues with run stop

    Play 9 - Offset I-formation, RB Dive between LG and C, DT96 Charles with run stop

    Play 15 - Shogun formation, RB Dive between LG and C, DT99 Dareus with run stop

    Overall, Lacy had a very strong performance coupled with the great run blocking by C63 Linsley. The Packers definitely drafted a player that should be successful for years to come if he can minimize Play 10’s indecisiveness.

    Here are all of Lacy’s runs in GFY form for you to analyze yourself as well!

    PlayDownDisSideYDQDescriptionLink
    11st10GB201(15:00) E.Lacy left tackle to GB 32 for 12 yards (D.Williams, A.Williams).Click Here
    21st10GB321(14:34) (Shotgun) E.Lacy left tackle to GB 35 for 3 yards (S.Gilmore, J.Hughes). BUF-S.Gilmore was injured during the play. S.Gilmore walks off.Click Here
    32nd7GB351(14:03) E.Lacy left guard to GB 35 for no gain (J.Hughes, M.Dareus).Click Here
    41st10GB201(2:09) E.Lacy right guard to GB 35 for 15 yards (A.Williams, S.Charles).Click Here
    51st10GB351(1:41) E.Lacy left guard to BUF 48 for 17 yards (D.Williams).Click Here
    61st10BUF481(1:04) E.Lacy right guard to BUF 26 for 22 yards (D.Williams).Click Here
    71st10BUF141(:00) (Shotgun) E.Lacy left guard to BUF 12 for 2 yards (M.Dareus, A.Williams).Click Here
    81st1BUF12(14:19) Eddie Lacy 1 Yd Run (Mason Crosby Kick)Click Here
    91st10GB252(4:35) E.Lacy right tackle to GB 25 for no gain (S.Charles, N.Bradham).Click Here
    102nd10GB252(4:15) E.Lacy right tackle to GB 26 for 1 yard (D.Williams, C.Bryant).Click Here
    111st10GB403(8:46) E.Lacy left guard to GB 49 for 9 yards (A.Williams, M.Williams).Click Here
    122nd1GB493(8:23) E.Lacy left tackle to BUF 45 for 6 yards (A.Williams, M.Dareus). PENALTY on GB-D.Bakhtiari, Offensive Holding, 10 yards, enforced at GB 49 - No Play.Click Here
    131st10GB203(4:18) (Shotgun) E.Lacy left tackle to GB 23 for 3 yards (A.Williams, N.Bradham).Click Here
    141st10GB23(1:03) (Shotgun) E.Lacy up the middle to GB 6 for 4 yards (M.Williams, P.Brown).Click Here
    151st10GB134(15:00) (Shotgun) E.Lacy up the middle to GB 15 for 2 yards (M.Dareus, M.Lawson).Click Here
    161st10GB184(9:19) E.Lacy right tackle to GB 24 for 6 yards (J.Hughes).Click Here
    172nd4GB244(8:47) E.Lacy left tackle to GB 45 for 21 yards (A.Williams). PENALTY on GB-J.Sitton, Offensive Holding, 10 yards, enforced at GB 24 - No Play.Click Here

    Odell Beckham Jr. vs. Redskins - 12 receptions, 143 yards, 3 TDs

    Odell Beckham Jr. has taken the league by storm totaling 53 receptions, 757 yards and 5 TDs in the 8 weeks leading up to the Redskins game. Needless to say, Beckham represented a major challenge for the inept Redskins’ secondary. On the defensive side, Bashaud Breeland has shown a lot of promise as a starter as well, and this post will analyze their match-up as well as Beckham’s other receptions.

    Stats:
    Beckham (Total) - 12 receptions on 15 targets, 143 yards, 3 TDs
    Beckham vs. Breeland - 3 catches allowed on 6 targets, 33 yards, 1 pass deflection
    Beckham vs. Amerson - 5 catches allowed on 5 targets, 38 yards, 1 TD
    Beckham vs. Biggers - 3 catches allowed on 3 targets, 51 yards, 2 TDs allowed

    Right as soon as the game started and even before the first pass was thrown Breeland and Beckham get into a shoving match seen here:

    This is the first of Breeland’s four penalties on the afternoon.

    Play 1
    Situation: 3rd and 2 at NYG 49
    Description: Q1 - (13:16) (Shotgun) E.Manning pass incomplete short right to O.Beckham.

    Beckham motions from the outside left to the outside right wide receiver position. After the snap, Beckham runs a quick out route underneath Breeland’s off-man coverage. Breeland closes in on Beckham to prevent him from staying in-bounds.

    A quick out route is a good route underneath off-man coverage that the Redskins love to run. Good coverage by Breeland to prevent the gain on the play.

    Play 2
    Situation: 1st and 10 at NYG 44
    Description: Q1 - (6:38) (Shotgun) E.Manning pass incomplete short right to O.Beckham (B.Breeland).

    Beckham on the right outside runs a comeback route against Breeland’s man-press coverage. Breeland does a great job staying with Beckham the entire play and not getting his hips turned around once the Beckham cuts back.

    Manning overthrows Beckham who can’t haul in the pass.

    Play 3
    Situation: 3rd and 4 at 50
    Description: Q1 - (5:58) (No Huddle, Shotgun) E.Manning pass short middle to K.Ogletree to WAS 35 for 15 yards (P.Thomas, D.Amerson).

    Beckham on the right outside runs an inside hitch route. Breeland does a great job of sticking with him the entire play in man-to-man coverage. Look how quickly Breeland turns his body to stay with Beckham on his route.

    Manning goes elsewhere to Ogletree with the ball. Great coverage by Breeland again.

    Play 4
    Situation: 2nd and 10 at WSH 35
    Description: Q1 - (4:58) (No Huddle, Shotgun) E.Manning pass short left to P.Parker to WAS 23 for 12 yards (D.Amerson).

    Breeland is covering Ogletree on this play. Manning looks to Ogletree first, but Breeland has tight coverage on the go-route run by Ogletree.

    Beckham is running a go-route as well from the left slot which is covered well by Biggers’ off-man coverage.

    Play 5
    Situation: 1st and 10 at WSH 23
    Description: Q1 - (4:17) (No Huddle, Shotgun) E.Manning pass incomplete short right to P.Parker.

    In this play, Redskins’ Kerrigan gets good edge pressure on the right tackle, forcing Manning to roll outside the pocket to his right. Redskins secondary is in cover 2 with four underneath zones.

    Once Manning leaves the pocket he finds Parker running a deep-in route across the screen who is trailed by CB39 Amerson in tight press-man coverage. On the opposite side of the field both Beckham and Ogletree are running go-routes up the middle of the field which pulls Breeland inside as FS25 Clark is not looking at Ogletree breaking through the underneath zone coverage.

    Clark shortly after realizes this and finds Ogletree but by this point Beckham is already behind Breeland for an easy touchdown if Manning sees this breakdown.

    The Redskins were very lucky Manning threw to the underneath WR and did not see Beckham waving his hand in the endzone wide-open or this would have been an easy touchdown.

    Play 6
    Situation: 3rd and 5 at WSH 18
    Description: Q1 - (3:29) (No Huddle, Shotgun) E.Manning pass short middle to C.Washington to WAS 14 for 4 yards (C.Okoro, R.Clark).

    Beckham in the twins stack right runs a post route that completely burns CB30 Biggers. Watch the precision in Beckham’s route.

    Beckham steps outside off of the line of scrimmage that completely turns around Biggers when Beckham cuts back upfield. Perfection.

    Play 7
    Situation: 3rd and 8 at WSH 10
    Description: Q1 - (1:45) (Shotgun) E.Manning pass short right to O.Beckham for 10 yards, TOUCHDOWN. Penalty on WAS-D.Amerson, Illegal Use of Hands, declined. J.Brown extra point is GOOD, Center-Z.DeOssie, Holder-S.Weatherford.

    Beckham runs a wheel route from the slot right wide receiver position. Watch WR83 Parker not even attempt to get open. This a designed interference play where Parker’s goal is to get Breeland to interfere with Biggers to lose man coverage on Beckham.

    Manning throws the ball to Beckham’s back shoulder for the touchdown. Biggers does not even turn around to locate the ball and attempts to play Beckham. Beckham hauls it in for his first of three touchdowns on the day.

    Play 8
    Situation: 1st and 10 at NYG 20
    Description: Q2 - (8:19) E.Manning pass short right to O.Beckham to NYG 36 for 16 yards (B.Breeland). Penalty on WAS-B.Breeland, Defensive Holding, declined. PENALTY on WAS-B.Breeland, Taunting, 15 yards, enforced at NYG 36.

    Beckham on the right outside runs a deep comeback against Breeland’s off-man coverage. At the top of the route Breeland grabs Beckham’s arm getting the defensive holding penalty as Beckham was attempting to turn for the comeback route. Beckham still catches the ball for a large gain on the play.

    Immediately after the play, Breeland gets in Beckham’s face and gets called for another personal foul penalty for taunting seen here:

    [

    The NFL actually released a statement that said that he should not have been flagged for this. I agree with them.

    Play 9
    Situation: 3rd and 7 at WSH 46
    Description: Q2 - (6:46) (No Huddle, Shotgun) E.Manning pass incomplete short right to R.Randle (B.Breeland).

    Breeland is covering WR82 Randle on the right outside in off-man coverage. Randle is running a curl route to the sideline. The curl route doesn’t fool Breeland who shuts down the route and stops the reception.

    Beckham is being covered by Amerson in off-man coverage and Beckham runs an in-route over the middle. Amerson has good coveage the entire play.

    Overall the credit goes to Breeland for the good coverage on the play.

    Play 10
    Situation: 1st and 10 at NYG 40
    Description: Q3 - (9:37) (Shotgun) E.Manning pass incomplete deep right to O.Beckham. PENALTY on WAS-B.Breeland, Defensive Pass Interference, 17 yards, enforced at NYG 40 - No Play.

    Breeland is in off-man coverage on Beckham on the right outside. Beckham runs a hitch-and-go route which Breeland bites on. Instead of giving up a big play Breeland interferes with Beckham pushing him from getting any further down the field.

    Great route by Beckham to sell the hitch initially as it completely fools Breeland. This is the only case where a defensive pass interference penalty is deemed acceptable as it stopped Beckham from burning the Redskins deep, so good understanding by Breeland to prevent that at all costs.

    CLICK HERE FOR PAGE 2 OF THE ARTICLE

    Colt McCoy to IR; RG3 Passes vs Giants - 18/27, 236 yards, 1 TD

    Colt McCoy reaggravated his neck versus the Giants in the first quarter, so RG3 stepped back in as the Redskins starter. RG3 performed well on the ground, but still struggled with decision-making in the pocket as a traditional quarterback. This breakdown will explain his plays.

    Stats - 18/27, 236 yards, 1 TD, 0 INT, 5 rushes for 46 yards, 7 sacks for 47 yards, 3 Fumbles (1 lost)

    Play 1
    Situation: 2nd and 9 at WSH 34
    Description: Q2 - (15:00) (Shotgun) R.Griffin pass short left to P.Garcon to WAS 39 for 5 yards (C.Brown).
    Sideline View


    Endzone View

    RG3 in shotgun motions TE84 Paul from the right to the left side of the formation. Paul runs to the flat, while WR88 Garcon runs a quick out route.

    This a very simple play to give the Redskins a more manageable 3rd down. Also, it forces RG3 to release the ball early to avoid the pressure by the Giants’ defensive line. Since RG3 hasn’t played a full game in three weeks this was probably also used as a confidence booster.

    RG3 throws an accurate pass to pick up five yards on the play after reading that his first read Paul is covered.

    Play 2
    Situation: 3rd and 4 at WSH 39
    Description: Q2 - (14:20) (Shotgun) R.Griffin sacked at WAS 31 for -8 yards (C.Jenkins).
    Sideline View


    Endzone View

    Sack alert! RG3 in shotgun has trips bunch on his right with WR11 Jackson the lone WR on his left. RG3 snaps the ball and the pocket starts to close from the two edge rushers. RG3 steps up and tries to scramble outside the pocket, but gets taken down as he is escaping. This situation should never have happened. A quick decision is the solution. Look at RG3 as soon as he takes his 3-step dropback:

    RG3 has a couple of options. First, WR12 Roberts runs a stab route and sits underneath the linebacker zones. This is where the ball should have gone immediately. It was 3rd and 4 from his quick pass earlier and all he needed was 4 yards to pick up the first, so a quick strike to Roberts would have kept the drive alive. Second choice was FB36 Young running to the flat. As he was escaping into the pocket, he should have looked over and saw that his checkdown receiver is still open. The third option is Garcon running an angled go route towards the sideline to get into the space between the underneath zone coverage of the CB and the safety in Cover 2. This could be his choice only if he had time (so not to be used for this situation).

    Poor decision by RG3. He NEEDS to trust his receivers and make a quicker decision with the ball. Not a good sign as this sack could have been avoided.

    Play 3
    Situation: 2nd and 7 at WSH 48
    Description: Q2 - (11:20) R.Griffin pass short right to N.Paul to 50 for 2 yards (J.Hankins) [D.Moore]. PENALTY on NYG-D.Moore, Defensive Holding, 2 yards, enforced at WAS 48 - No Play.
    Sideline View


    Endzone View

    RG3 in singleback formation motions TE84 Paul across the formation. After the snap, Paul runs back across the formation, while RG3 fakes the handoff to RB46 Morris in the backfield. Paul gets held by DE98 Moore on the flat route, and then RG3 passes it to him anyways after the penalty for a short gain once Moore releases to chase RG3 down.

    This is one of the Redskins standard package plays that gets used multiple times a game. Not surprising the Redskins use it here to attempt to make it a more manageable 3rd down or better depending on Paul’s ability with the ball after the catch.

    Play 4
    Situation: 1st and 10 at 50
    Description: Q2 - (10:48) R.Griffin pass short left to N.Paul pushed ob at NYG 33 for 17 yards (C.Brown).
    Sideline View


    Endzone View

    RG3 in singleback formation motions TE84 Paul from the left side of the formation into offset-I formation. It’s another play-action pass where Paul runs an out route to the left. Paul’s momentary juke to get open is enough to free him completely of the linebacker in coverage. RG3 finds him immedately as his first read and Paul makes the most of it gaining 17 yards on the play.

    Paul was most likely running a choice route where he was trying to decide which direction to cut at the top of his stem from the backfield. He chose left due to LB53 McClain being the defender in coverage in man-to-man. This was most likely another packaged play seeing as all the WRs are running deeper routes and this would take advantage of the space they created where their men are in off-man coverage with single-high safety over top. RG3 makes a quick and accurate throw, but the credit goes to the great play design.

    Play 5
    Situation: 1st and 10 at NYG 33
    Description: Q2 - (10:16) R.Griffin pass short left to S.Moss pushed ob at NYG 15 for 18 yards (A.Rolle).
    Sideline View


    Endzone View

    RG3 in singleback formation runs play-action bootleg to the left. The WRs all flood left, so it’s an easy one-side of the field read for RG3 who makes the quick decision to throw to the open WR89 Moss on the drag route. Good accurate throw by RG3.

    Play 6
    Situation: 2nd and 8 at NYG 13
    Description: Q2 - (9:13) (Shotgun) R.Griffin pass short right to J.Reed to NYG 9 for 4 yards (D.Kennard).
    Sideline View


    Endzone View

    RG3 in empty-set shotgun has trips left, TE86 Reed in the right slot and WR11 Jackson on the right outside. The Giants are playing Cover 2 with five zones across the field.

    RG3 takes the snap and immediately finds Reed running an out-route for the short gain on the play. This is a good quick decision here by RG3. Reed is a matchup nightmare for linebackers so RG3’s recognition that either a LB was trying to cover him in man-to-man coverage or zone coverage would be a high probability play.

    RG3 throws the ball with accuracy and hits Reed for a short gain on the play.

    Play 7
    Situation: 3rd and 4 at NYG 9
    Description: Q2 - (8:24) (Shotgun) R.Griffin pass short right to C.Thompson for 9 yards, TOUCHDOWN. K.Forbath extra point is GOOD, Center-N.Sundberg, Holder-T.Way.
    Sideline View


    Endzone View

    RG3 in shotgun has Jackson and Garcon are the outside WRs while Roberts is the left slot receiver. The Giants bring seven pass rushers and RG3 wisely dumps the ball to his checkdown receiver RB37 Thompson who is wide open coming from the backfield to score the easy touchdown.

    The credit to this play goes to RG3 for recognizing the Cover 0 all-out blitz by the Giants and Thompson for his adjusting his route to help RG3 make the throw earlier than anticipated. Thompson was supposed to run more flat, but in the press conference RG3 revealed that Thompson adjusted to the pressure and cut up more inside for an easier throw.

    If RG3 had time, WR12 Roberts on the smash route was open as well as TE86 Reed coming from the left side of the formation had his linebacker beat for a lobbed ball overtop who waved for it.

    Play 8
    Situation: 1st and 10 at WSH 22
    Description: Q2 - (5:13) R.Griffin pass incomplete short left to D.Jackson (D.Rodgers-Cromartie).
    Sideline View


    Endzone View

    RG3 in offset-I formation has two outisde WRs. This is a simple 2-man concept the Redskins like running where WR11 Jackson on the left side is running an in-route while WR88 Garcon on the right side is running an out-route.

    Cromartie is covering Jackson well in man-to-man coverage. By the time RG3 releases the ball Jackson has already completed his cut and Cromartie regains coverage to help breakup the pass. The route that Jackson runs requires a pass that is released earlier by RG3.

    Essentially, by the time Jackson reaches the 30-31 yard line, RG3 needs to release the ball, but instead he releases the ball when Jackson is already at the 33-34 yardline making his cut. By this point the timing is off and it’s too late. The window of opportunity is really only available during his cut due to Cromartie’s excellent coverage. It also doesn’t help RG3 threw the ball near the feet/legs of Jackson.

    Play 9
    Situation: 2nd and 10 at WSH 22
    Description: Q2 - (5:05) (Shotgun) R.Griffin pass incomplete short left to D.Jackson.
    Sideline View


    Endzone View

    RG3 from shotgun throws an innaccurate screen pass to Jackson in the trips bunch left. Bad throw by RG3. Look at the blocking that is set up for the screen.

    It’s really well set up to give Jackson a running lane and due to the spacing of the safeties in Cover 2 this could have gone for a big gain with Jackson’s YAC ability. What a shame.


    CLICK HERE FOR THE NEXT PAGE OF THE ARTICLE.

    Cox Cover

    Fletcher Cox: A Force on the Eagles’ Defensive Line - 11 tackles vs. Seahawks

    Fletcher Cox has been an absolute force for the Eagles’ defensive line in their 2014 campaign. Against the Seahawks, Cox recorded 11 tackles and three quarterback hurries earning him a ProFootballFocus grade of +6.4 of which 6.2 came from his run defense score. These plays will break down Cox’s trench control and ability to shed blocks in pursuit of the Seahawks’ runningbacks.

    Here is a breakdown of defensive techniques that will be used for this analysis:

    Play 11
    Situation: 2nd and 10 at PHI 31
    Description: Q2 - (3:58) R.Turbin left end to PHI 32 for -1 yards (F.Cox).
    Endzone View

    Cox lines up in the 1-tech position. His run responsibility is the right A-gap between the center and the left guard. The Seahawks are in I-formation running a RB Dive, which is a running play where the RB follows the FB through the hole between the C and the LG.

    Immdediately after the snap, Cox bullrushes the center and gets penetration into the backfield. Turbin sees Cox and bounces outside, but Cox and ROLB55 Graham chase him down for the 1 yard loss.

    Great play by Cox. The center needs to be quicker on his feet to get better body positioning on Cox in order to block this in the future.

    Play 16
    Situation: 1st and 10 at SEA 30
    Description: Q3 - (5:54) M.Lynch right tackle to SEA 30 for no gain (F.Cox).
    Endzone View

    Cox lines up in the 5-tech position. The Eagles have 8 men in the box, expecting a run on 1st and 10. The Seahawks run from the offset-I formation FB lead pulling the LG across the formation to block the edge defender.

    Lynch takes the handoff and reads the line for any potential holes or if there is a breakdown in the protection.

    Lynch sees LG77 Carpenter blocking his man from the inside, so he cuts up into the hole for Cox to tackle him from the backside.

    This play is a great run stop by Cox due to his ability to use his speed to rush through the open hole left by the LG and avoid the block by the shifting C71 Jeanpierre who attempts to hook Cox with his left arm. Jeanpierre needs to a better job of shedding his block to pick up the rusher through the gap created by the pulling LG.

    Here are a few more plays of Cox dominating the line of scrimmage in the run game in plays 7, 9, and 18:

    Play 7 - Cox in 5-tech sheds the block of LG77 Carpenter to help bring down Lynch for a short gain on the play.

    Play 9 - Cox in 5-tech sheds the block by LT76 Okung to tackle Lynch for a short gain.

    Play 18 - Cox in the 3-tech position sheds the block of LG77 Carpenter to bring down Lynch for another short gain on the play.

    Not only was Cox dominant in run defense versus Seattle, Cox was solid in pass rushing.

    Play 13
    Situation: 3rd and 15 at SEA 45
    Description: Q2 - (:28) (Shotgun) R.Wilson pass deep left to P.Richardson to PHI 35 for 20 yards (N.Allen).
    Endzone View

    Cox lines up in the 5-tech position and pass rushes with Reggie White’s “hump” move. He takes a hard step up field towards RT68 Britt. Cox then fakes the rip move outside into the C-gap.

    Cox then throws RT Britt out of the way with his inside arm and steps into the B-gap to rush Wilson.

    Cox disrupts Wilson’s progressions and he has to scramble out of the way to avoid the sack. Cox dives at Wilson’s feet.

    Really this play is testament to how great Wilson is at avoiding the pass rush and then resetting his feet to find the downfield receivers. For any other quarterback this should have been a sack.

    Here are a couple more pass rushing plays where Cox makes an impact in plays 2 and 14:

    Play 2 - Cox lines up in the 5-tech and just powers his way into the backfield with a bullrush on the inside of LT76 Okung causing the QB hurry. Another great escape by Wilson out of the pocket.

    Play 14- Cox lines up in the 3-tech position and shows a nice spin move to the inside to rush Wilson. If there wasn’t a breakdown in coverage this would have been a very quick disruption for Cox.

    Overall, Cox put on an epic display of trench control showing power and surprising quickness. It’s very good news for Eagles’ fans seeing as Cox’s biggest negative trait was his ability to play run defense. They should be pleased with how well he’s progressing in that category.

    Here are all of Fletcher Cox’s plays versus the Seahawk:

    PlayDownDisSideYDQDescriptionLink
    11st10SEA231(14:56) (Shotgun) M.Lynch up the middle to SEA 28 for 5 yards (F.Cox).Click Here
    22nd5SEA281(14:22) (Shotgun) R.Wilson pass short left to P.Richardson to SEA 35 for 7 yards (T.Cole).Click Here
    31st10SEA351(13:44) M.Lynch right end to SEA 35 for no gain (F.Cox).Click Here
    42nd10SEA351(13:06) (Shotgun) M.Lynch left end to SEA 35 for no gain (F.Cox).Click Here
    53rd8SEA201(2:23) (Shotgun) R.Wilson pass incomplete short left to M.Lynch. PENALTY on PHI-B.Boykin, Defensive Holding, 5 yards, enforced at SEA 20 - No Play.Click Here
    62nd16SEA191(1:45) (Shotgun) R.Wilson pass deep left to D.Baldwin to SEA 44 for 25 yards (N.Allen).Click Here
    71st10SEA441(1:06) (No Huddle, Shotgun) M.Lynch up the middle to SEA 46 for 2 yards (F.Cox).Click Here
    82nd4PHI332(15:00) C.Michael right end to PHI 26 for 7 yards (T.Cole).Click Here
    91st10SEA162(12:10) (Shotgun) M.Lynch up the middle to SEA 19 for 3 yards (F.Cox).Click Here
    101st10SEA272(7:58) M.Lynch left end to SEA 27 for no gain (T.Cole; C.Matthews).Click Here
    112nd10PHI312(3:58) R.Turbin left end to PHI 32 for -1 yards (F.Cox).Click Here
    123rd13SEA302(1:08) (Shotgun) R.Wilson pass deep left to D.Baldwin to 50 for 20 yards (C.Williams).Click Here
    133rd15SEA452(:28) (Shotgun) R.Wilson pass deep left to P.Richardson to PHI 35 for 20 yards (N.Allen).Click Here
    141st10PHI233(9:06) (Shotgun) R.Wilson pass deep right to D.Baldwin for 23 yards, TOUCHDOWN. S.Hauschka extra point is GOOD, Center-C.Gresham, Holder-J.Ryan.Click Here
    151st10SEA163(7:12) (Shotgun) M.Lynch up the middle to SEA 19 for 3 yards (M.Kendricks; F.Cox).Click Here
    161st10SEA303(5:54) M.Lynch right tackle to SEA 30 for no gain (F.Cox).Click Here
    171st10SEA364(13:33) (Shotgun) R.Wilson pass short left to J.Kearse to SEA 47 for 11 yards (C.Williams).Click Here
    182nd4PHI364(11:34) (Shotgun) M.Lynch up the middle to PHI 33 for 3 yards (F.Cox; C.Matthews).Click Here
    191st10SEA304(9:00) M.Lynch left end to SEA 38 for 8 yards (M.Kendricks; F.Cox).Click Here
    202nd10SEA394(3:21) (Shotgun) M.Lynch up the middle to 50 for 11 yards (M.Jenkins).Click Here
    211st10504(3:12) C.Michael left end to PHI 48 for 2 yards (F.Cox).Click Here
    Layout mode
    Predefined Skins
    Custom Colors
    Choose your skin color
    Patterns Background
    Images Background