Monthly Archives: February 2015

loading..
Butler Cover

Malcolm Butler’s Other Super Bowl XLIX Plays


By ths point everyone has seen Malcolm Butler’s final interception against Russell Wilson to end the Super Bowl, but how did he play in his other snaps? This breakdown will show you that outside of his interception, Butler was phenomenal sticking to his receivers in man-to-man coverage making plays all evening.

Play 17
Situation: 2nd and 8 at SEA 47
Description: Q3 - (1:54) (Shotgun) R.Wilson pass short right to J.Kearse to NE 47 for 6 yards (M.Butler).


Offense Formation: Shotgun Slot Left Far
Offensive Grouping: 11
Defense Formation: Cover 1, Four LB zones, CBs in man-to-man coverage

CB21 Butler lines up on the right outside covering WR15 Kearse in bump-and-run coverage. Kearse runs a hitch route to New England’s 44 yardline breaking inside. Butler plays inside technique on Kearse tightly but slips at the top of the route allowing Kearse separation for the reception.

Play 18
Situation: 3rd and 2 at NE 47
Description: Q3 - (1:12) (Shotgun) R.Wilson pass incomplete deep left to J.Kearse (M.Butler).

Offense Formation: Empty-Set Shotgun Trips Left Double Right
Offensive Grouping: 11
Defense Formation: Cover 1, Two LB zones, CBs in man-to-man coverage

Butler lines up across Kearse and plays press man coverage jamming Kearse at the line. Kearse runs a wheel route to the outside and slips by the initial jam. This is actually a design rub route play to get Kearse open. TE82 Willson runs a slant route from Kearse’s left to interfere with Butler’s coverage, but Butler gets by.

Even though Butler doesn’t get picked, he is still a full step behind him as Kearse makes his way to the left sideline.

Wilson lobs the ball to Kearse in stride, but Butler makes an incredible diving grab to not allow Kearse to bring the ball in. Just an incredible play to stop a big gain.

Play 20
Situation: 1st and 10 at SEA 20
Description: Q4 - (7:55) R.Wilson pass incomplete deep middle to R.Lockette.

Offense Formation: Singleback Slot Right
Offensive Grouping: 12
Defense Formation: Cover 1, Two LB zones, CBs in man-to-man coverage

WR83 Lockette runs a deep crossing route over the middle as Butler turns following him in man coverage. Butler trips as Lockette cuts inside. Butler falls and reaches out tripping Lockette to the ground. Lockette throws up his hands knowing he was interfered, but the referees don’t throw the penalty flag.

What most don’t understand was that this was a great play by Butler not because he didn’t get penalized. This is a great move, because Butler knows he is going to get burned and instead of allowing a 40+ yard play he only allows a maximum of a 15 yard play due to the spot foul of a defensive pass interference penalty. This is a veteran move by the rookie corner.

Play 23
Situation: 1st and 10 at NE 49
Description: Q4 - (1:55) (Shotgun) R.Wilson pass incomplete deep right to J.Kearse (M.Butler).

Offense Formation: Shotgun Trips Right Far
Offensive Grouping: 11
Defense Formation: Cover 2, Three LB zones, man-to-man on trips right formation

Butler lines up in off-man coverage against WR15 Kearse who runs a seam route over the middle of the field. Kearse starts outside and jukes back inside in an attempt to gain separation. Butler sticks on Kearse and times his jump to swat the ball out of Kearse’s hands perfectly.

Another incredible play by Butler.

Play 26
Situation: 1st and 10 at NE 38
Description: Q4 - (1:14) (No Huddle, Shotgun) R.Wilson pass deep right to J.Kearse pushed ob at NE 5 for 33 yards (M.Butler).


Offense Formation: Empty-Set Shotgun Double Slot Left and Right
Offensive Grouping: 01
Defense Formation: Cover 1 Robber, Man-to-man coverage

This is the last passing play before Butler’s interception. This is also the play where Kearse helps set up the Seahawks for a potential game winning situation.

As you can see Butler has great coverage of Kearse but an unfortunate leg bounce causes the completion. Butler doesn’t get discouraged and forces Kearse out of bounds.

Overall, Butler was incredible even outside of his game winning interception. ProFootballFocus gave Malcolm Butler a score of +3.8 with +3.3 coming from passing plays in just 12 passing snaps. Very impressive for the undrafted rookie from West Alabama. Hopefully next season he will continue to develop and will be the Patriots nickle cornerback alongside teammates Brandon Browner and Darrelle Revis.

Feature Image

Marshawn Lynch vs. Eight in the Box in the Super Bowl

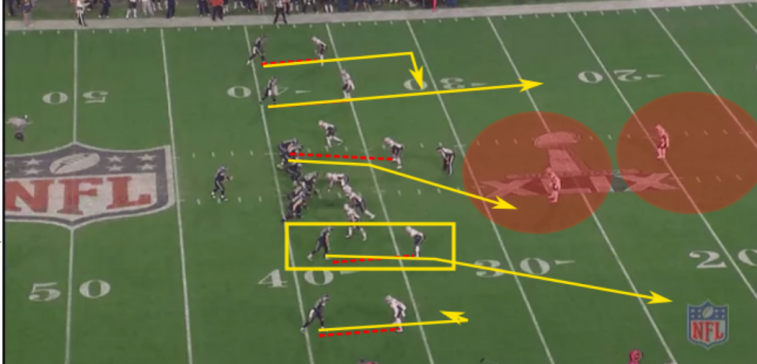
Super Bowl XLIX contained an ending for the ages, and Marshawn Lynch is a big part of the controversy surrounding the Seahawks’ final offensive playcall. Specifically, many people feel that Lynch should have been handed the ball to try to punch it in for the go ahead score. One of the common counterpoints to that is that the Seahawks were facing eight men in the box. So, I figured I’d take a look at how Lynch had faired against eight men for the rest of the game. Let’s hop right into the action.

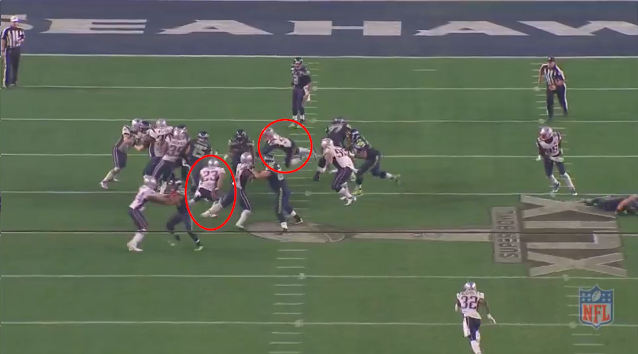
2-3-SEA 21 (Q1, :59) M.Lynch left end to SEA 25 for 4 yards (J.Collins).

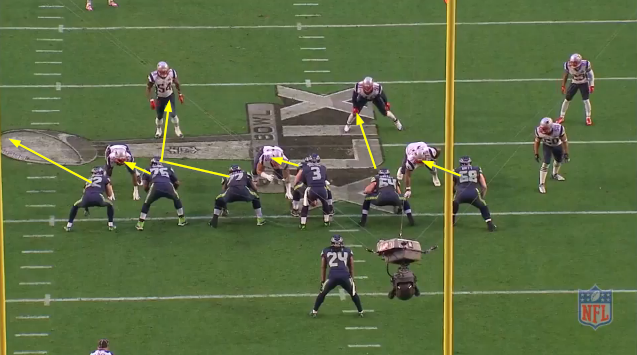
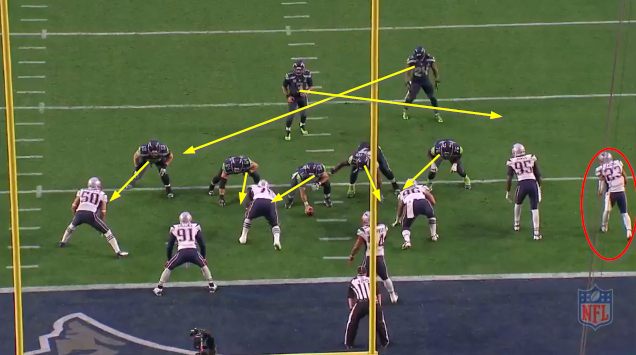
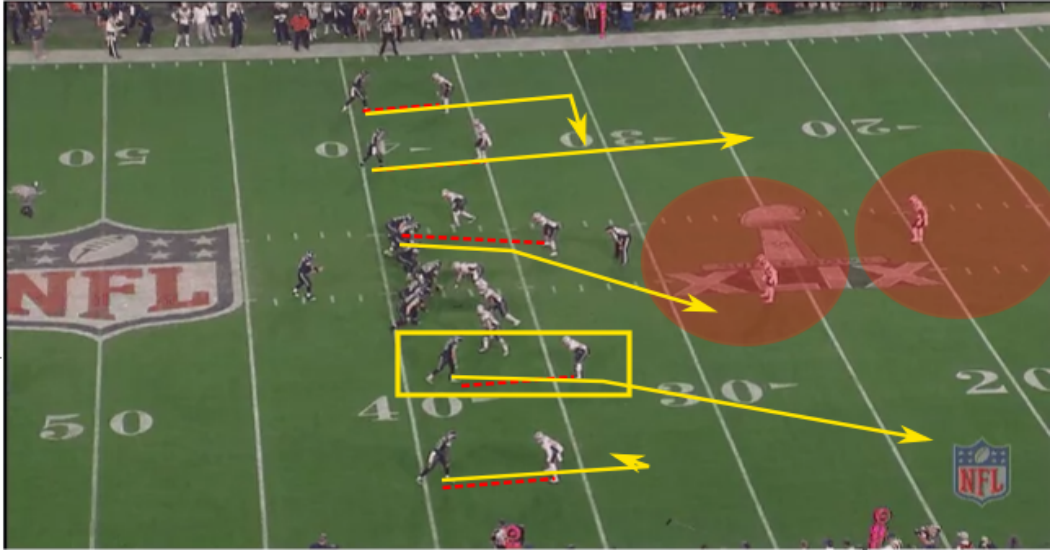
This play is a standard zone blocking concept. While from this angle it only looks like there are seven defenders in the box, another defender, #55 Akeem Ayers, is just off the screen to the left. Anyway, the blocking concept is simple. The offensive line flows to the left, and Marshawn follow that flow, cutting upfield where a hole opens up in the defense, or potentially cutting it back.

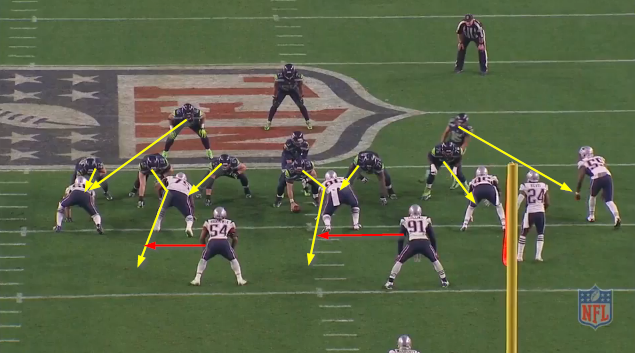
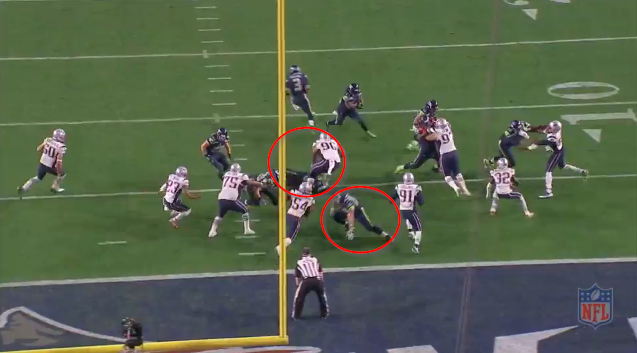
As you can see above, if Marshawn had tried to cut it back to the right, he wouldn’t have been very successful, as there are three defenders standing up against two blockers on the ground. So, he decides to push towards what should be a gap between LT Russell Okung and LG James Carpenter.

Unfortunately, as you can see in this image, Carpenter loses his battle with LB Dont’a Hightower. What’s impressive to me about this run is that Lynch has absolutely no space to run between his two blockers, but he still manages to squeeze his way through and gain four yards on the play.

2-5-NE 6 (Q2, 3:02) M.Lynch left tackle to NE 3 for 3 yards (Cha.Jones).

This is another zone run to the left for the Seahawks. Note how all of the players move in unison with their first step at the snap.

Frankly no one on the Seahawks’ OL does a good job blocking. Luke Willson and the FB make their blocks, but that’s about it. The two cut blocks on the back side whiff, and Okung and Unger miss the LBs they try to block, but James Carpenter’s failure killed the play. Chandler Jones beats him back, even knocking off Carpenter’s helmet in the process, which is a clear sign Carpenter is being physically dominated. This forces Lynch to run further to the outside than he probably would have liked. Also, since Jones has Carpenter on his back heels, he’s able to disengage easily and bring Lynch down before he reaches the goal line. It should be noted that even with mostly bad blocking, Lynch still gained a positive chunk of three yards on the play, which is good this close to the goal line.

3-2-NE 3 (Q2, 2:22) (Shotgun) M.Lynch right tackle for 3 yards, TOUCHDOWN.

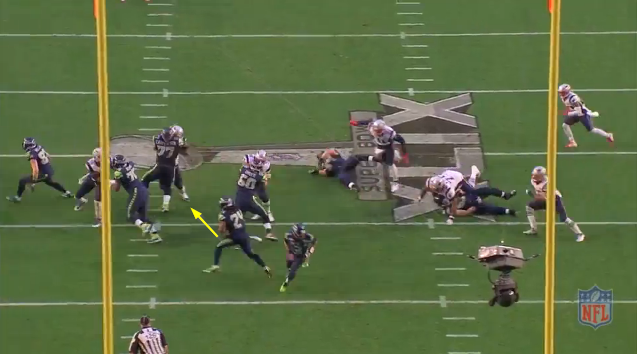
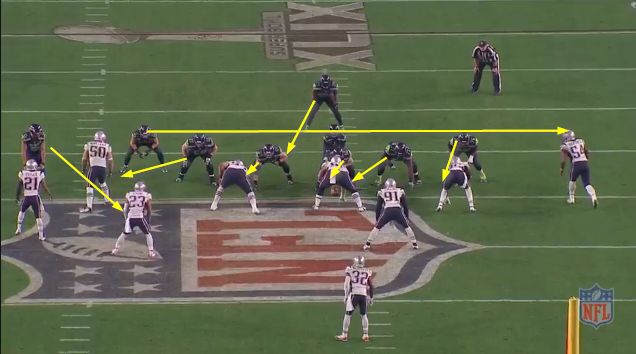
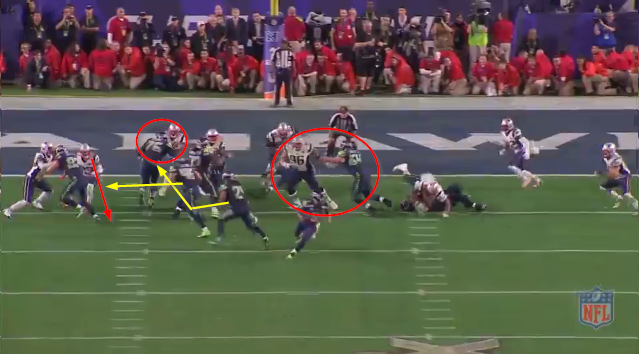
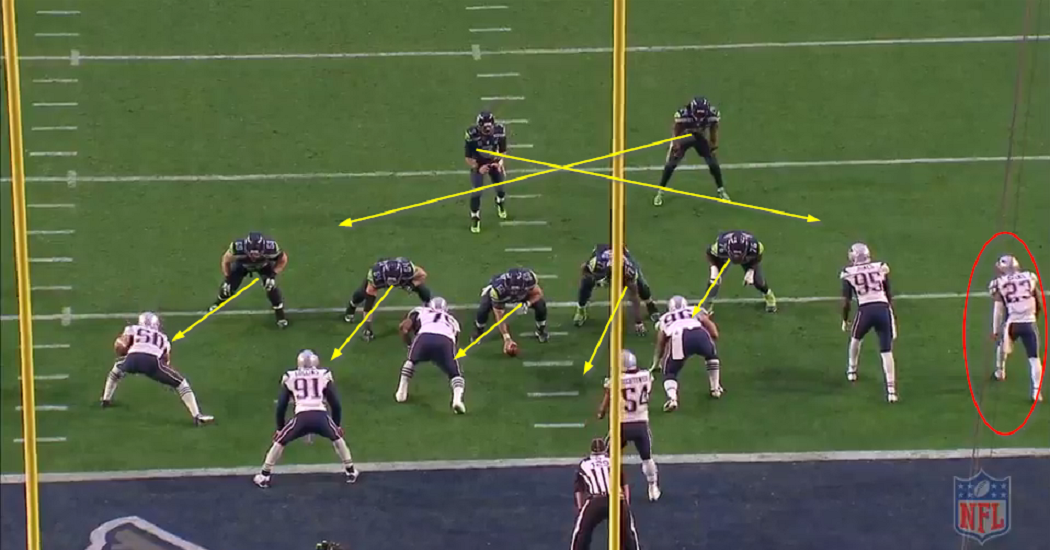
While there are only 7 players in the box on this play, it’s pertinent because of the potential similarities it has to the game ending play. The Seahawks are outnumbered on in the box by two players (5 blockers vs. 7 defenders instead of 6 vs. 8). It’s also very close to the goal line. It’s a read option

play, and Patrick Chung is the read defender.

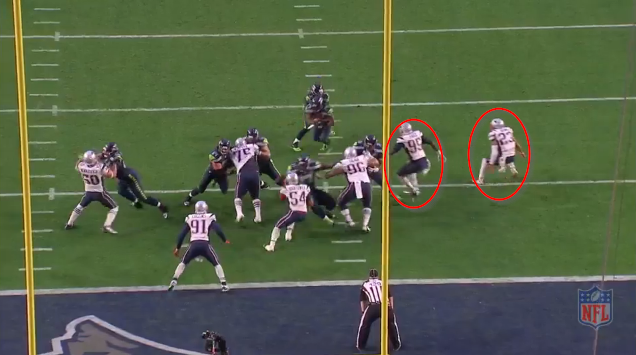
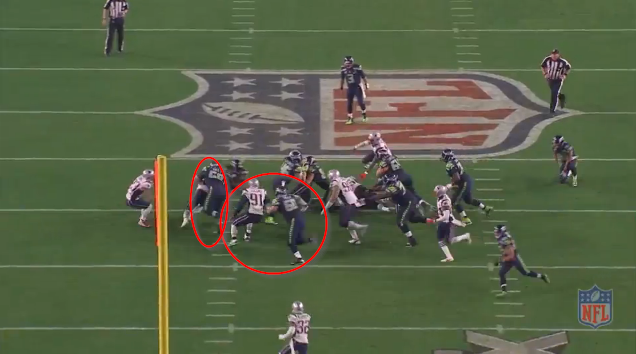
Normally, the read option is successful because it takes a player out of the play entirely by making him always wrong. Here, though, the Seahawks actually succeed in taking TWO players out of the game. Patrick Chung predictably contains Wilson, but you can also notice Chandler Jones pause due to the threat of the QB pulling the ball. Theoretically, this now gives Seattle 5 blockers on 5 defenders, but it doesn’t quite pan out that way. Both guards fail in their duties. You can see James Carpenter falling in the frame above, and JR Sweezy never gets off his combo block to climb to the second level and block Jamie Collins, which is his assignment. This leads to the following situation:

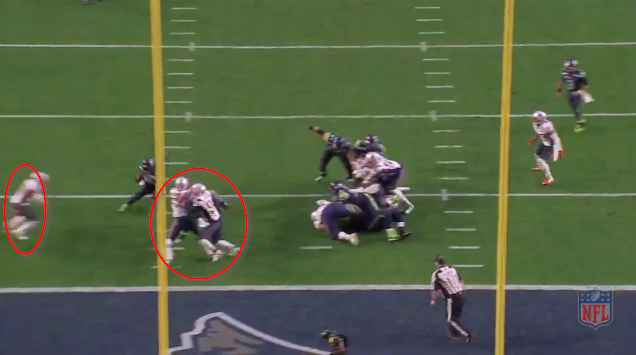
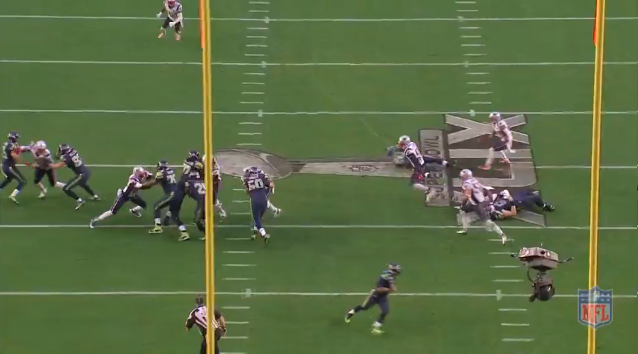
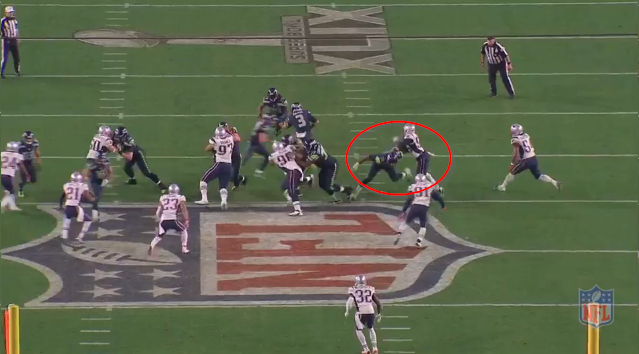
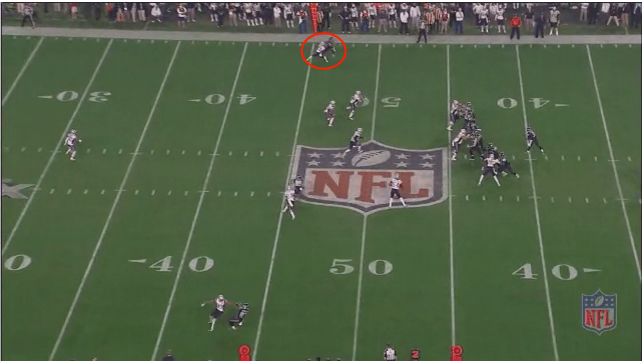
It’s hard to see RT Justin Britt with Ninkovich and Collins in the way, but he’s there. Jamie Collins ran into the two, which actually bailed Sweezy out of his failure. Still it’s 3 on two, and Lynch is 4 yards from the goal line. As you can see in the gfy above, Ninkovich actually gets off his block and hits Lynch, but Lynch is strong enough to bounce of the two hits and fall forward into the endzone.

1-10-SEA 20 (Q3, 15:00) M.Lynch up the middle to SEA 23 for 3 yards (P.Chung).

Hey, look, another zone run! The only thing different on this one is that the TE blocks back across to seal off the backside (and, as you can see from the gfy, he doesn’t do a very good job of it). This isn’t a particularly remarkable play but since the Pats had 8 in the box I’m including it.

One thing that might be of interest is that James Carpenter gets beat (again) and Jamie Collins is almost able to make a diving stop of Lynch in the backfield. he was too late, however, but Patrick Chung is sitting there in the hole to clean up. Still, the play gained three yards. That was definitely a constant for the Seahawks running game during the Super Bowl. Lynch was rarely held to no gain.

2-1-NE 41 (Q3, 7:26) M.Lynch right end to NE 38 for 3 yards (J.Collins).

Another zone run, this features a pair of combo blocks. The C and the RT are supposed to help their respective guards block the man in front of them and then move on to the LBs. However, as we see below:

Both have failed to get to the second level in time. Dont’a Hightower (who’s hidden by Britt) has forced Lynch back inside, which gives Collins an easy play to make.

1-4-NE 4 (Q3, 5:39) M.Lynch left tackle to NE 3 for 1 yard (J.Collins; S.Siliga).

This is a pretty similar setup to pretty much every other play we’ve seen so far.

There are two reasons this play only gains one yard and neither are Lynch’s fault. Based on what I’ve seen of this game so far, I would be absolutely livid if I were Tom Cable. Seriously, there hasn’t been a single cut block that I’ve seen executed well and this play has two more failed cut blocks. First, Sweezy fails to cut Siliga. Then, Max Unger not only attempts to block the wrong guy (he really should have been targeting Jamie Collins) but he completely whiffs when he tries to cut Hightower. This play failed because of blocking that was downright bad.

1-10-SEA 45 (Q3, 2:37) M.Lynch up the middle to SEA 47 for 2 yards (M.Butler).

The setup to this play is almost identical to play 4.

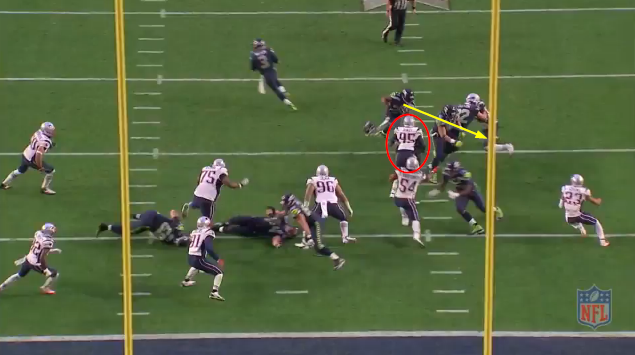
The Seahawks actually get really good horizontal movement from the offensive line on this play. There’s just one problem. Chandler Jones absolutely embarrasses Okung with a swim move. Lynch wants to cut the ball back to the other side, and there appears to be a sizable chunk of yardage there for him as the players (besides Jones) are blocked. However, Jones hits him before he can cut back, and Lynch is pushed towards the right. Butler gets the cleanup tackle, but Jones made the real play.

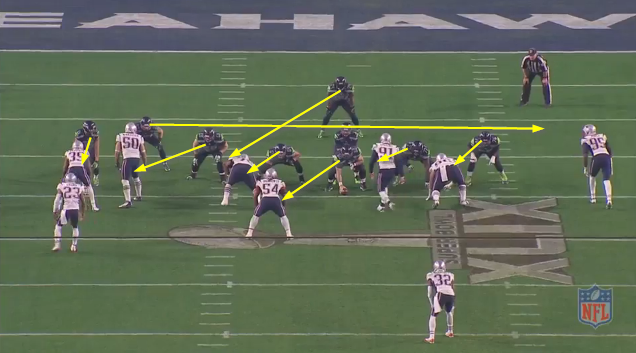
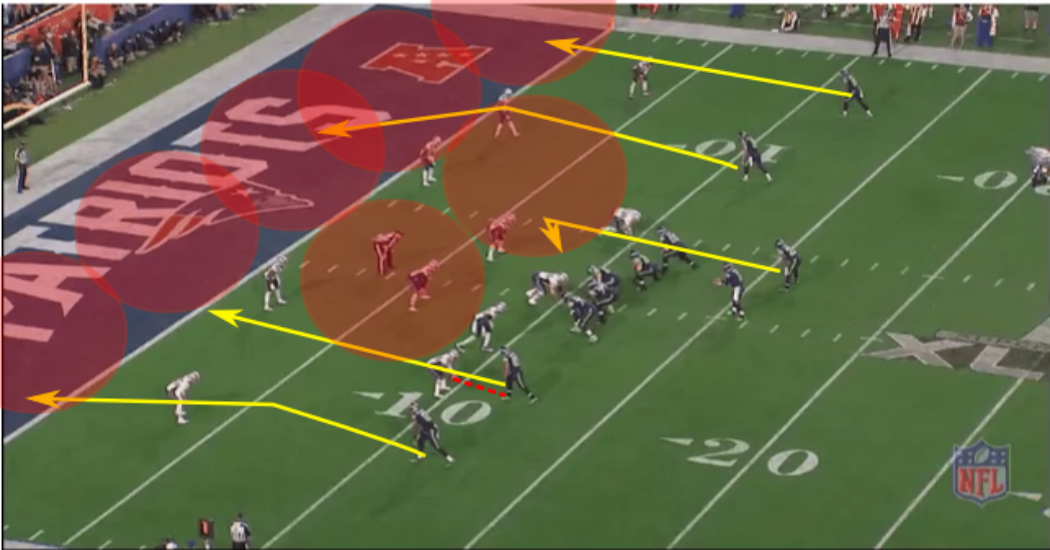
1-5-NE 5 (Q4, 1:06) M.Lynch left tackle to NE 1 for 4 yards (D.Hightower).

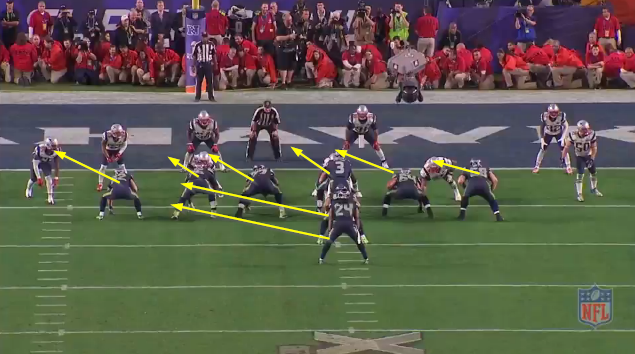
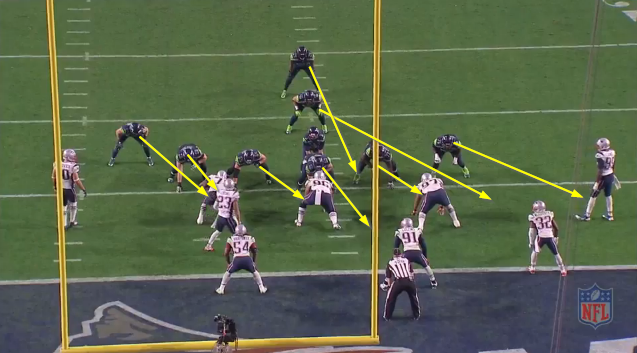
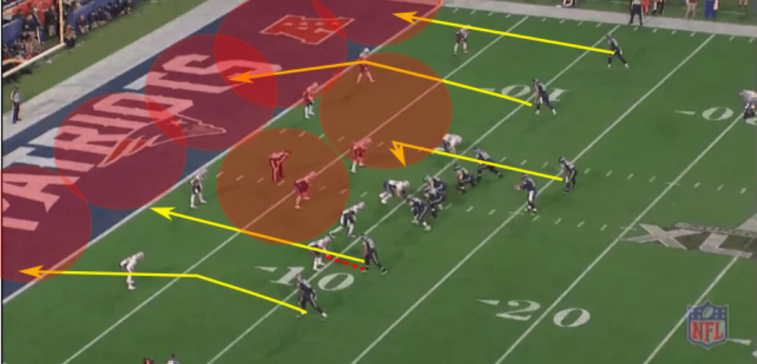
This is the down before the game ending interception. It’s a zone run to the left again.

There are three things to really pay attention to on this play. First, watch how Marshawn sets up his FB’s block. It’s subtle, but his first steps are fairly wide outside, which draws Chung to the outside of the hole. This allows the FB to widen out, and Lynch cut upfield slightly, to the inside of the hole. It gives Lynch a significantly wider hole to run through than if Chung had occupied the middle of it, which is important. Second, notice that Sweezy was too slow getting to Siliga, who got a hand on Lynch. Really, I think they should have had Unger chip Siliga before releasing towards Collins, but Unger is clearly avoiding touching Siliga. Third and finally, note how Okung appears to be in good position to block Hightower. However, he fails to do so effectively, and Hightower is able to (seeming easily) shed the block and make the stop at the 1 yard line. If Okung seals this block, Marshawn would have scored a TD on this play and everyone would be talking about the Patriots were able to drive down the field with under a minute left rather than debating the playcalling on 2nd and 1.

When evaluating decisions, it’s very important to look at possible alternatives. The decision to throw a slant on 2nd and 1 by the Seahawks is going to go down in history as one of the most questionable playcalls in NFL history. The main alternative proposed has been running the ball with Marshawn Lynch. As can be seen, all of Marshawn’s runs against 8 men in the box during Super Bowl XLIX gained at least a yard, although none gained more than four. Judging based on the evidence in the game, Lynch probably would have scored.

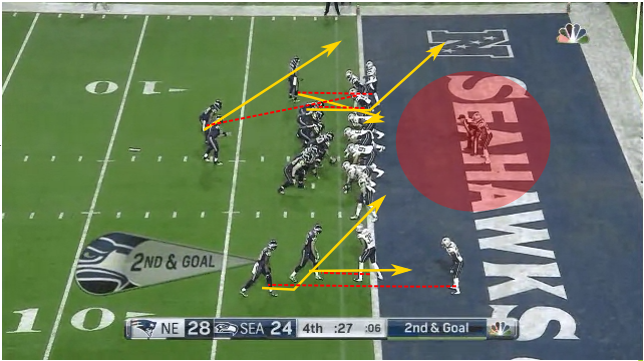
Hours can be spent debating back and forth on whether or not the playcall was correct, but ultimately it’s pointless. Instead, I think it’s more important to take a step back from the argument and just appreciate the play of the most powerful RB I’ve ever seen. Instead of focus on what could have been, I would rather focus on what Marshawn Lynch did as a runner in the game, showcasing his tenacity in the face of adversity against eight men in the box and with poor blocking.

Chris Matthews vs Patriots - Super Bowl XLIX

Chris Matthews went undrafted in 2011, was signed and cut from the Browns training camp, played in the AFL, then went to the CFL and then finally found his way back to an NFL team. Despite playing only 10 passing snaps all season long he got his number called upon in the Superbowl and left a big impression on the 11 passing plays he was in.

Don’t be surprised over the off-season if there’s going to be a decent amount of talk about Chris Matthews future potential. Being 6’5, running a 4.5 (pro day number) and having great ball skills with good hands (even if it is in a limited showing) are all baseline traits that people fall in love with. Although Matthews has definitely shown in this game that he can contribute to an NFL team, does he show that he is a viable starter for one? It’s too small a sample size to get a definitive answer but there’s no reason to not look and see some of his traits. I’ve decided to break down 7 of the 11 passing snaps he played on so we can get a feel for what kind of skills he shows but as anyone who reads this will see, the puzzle is clearly missing a lot of pieces.


2nd and 5 at SEA 45 (4:19) (Shotgun) R.Wilson pass deep right to C.Matthews to NE 11 for 44 yards (K.Arrington).

Right Outside WR, Vertical Route

Cover-1 Man

Kyle Arrington is directly over Chris Matthews in pure man coverage. He tries to come up and get a hand on him, but Matthews immediate release to the inside and shoulder dip doesn’t give Arrington any surface to make contact with. Matthews then begins driving up the field, keeping Arrington to his outside leaving a wide open space to the inside for Wilson to throw to. On the All-22, you can see Matthews slow up for just a moment before the ball arrives causing Arrington to bump into him before accelerating one last time to make the jumping catch. This last second slow affords him even more space to make the catch. Matthews also raises his hands to the sky as late as possible in order to ensure that he can make the catch without Arrington being aware when the ball is coming down, all very good moves.


1st and 10 at NE 44 (:17) (Shotgun) R.Wilson pass incomplete deep right.

Right Outside Slot, Vertical Route

Cover-1 Man

This time Matthews is inbetween two receivers on the right side and is facing off coverage with the CB slightly shading inside. Matthews takes two strong steps towards the CB before breaking to the right of him, he reaches his arm out (it’s very hard to see, but he’s doing it) to try and push the defender back but he does it too early and allows Arrington to get two arms on him, slowing him down. I think he could do this better by taking a third step into the CB engaging him in contact before breaking off to the right or by just having better timing with the arm he sticks out. I prefer the former, since it’s those types of skills that translate into being a great long term WR in the league. Either way, despite Arrington being able to get a push on him Matthews is strong enough to run through the contact (more of a reason why he should have taken another step into Arrington) and then heads upfield. He does manage to get above Arrington and would have likely seen this ball thrown his way if not for Wilson being pressured.


1st and 10 at NE 11 (:06) (Shotgun) R.Wilson pass short left to C.Matthews for 11 yards, TOUCHDOWN. S.Hauschka extra point is GOOD, Center-C.Gresham, Holder-J.Ryan.

Left Outside, Fade Route

Cover-2 Zone

There’s an ambiguity with some plays as to who has what role on any given play, especially when that play is so far outside of what that team has done in that game. On this play, it’s tough to say (given the route combinations) what the role of the defense actually is, but it looks to me like a Cover-2 zone where all the CBs (minus Revis) are in zone with outside responsibility, while the safeties take the inside. This is something that works against a Corner/Dig combo to keep the players from getting picked off their man. Anyway, lets move onto Chris Matthews.

Here, Matthews releases up the field and does a good job threatening the vertical by keeping his shoulders over his knees and his back bent while he drives up the field, coming up from this driving position only when he’s ready to look for the ball. This gives Logan Ryan the need to backpedal deeper into the endzone instead of keeping his ground for the potential out route/a throw before the endzone. As it would turn out, the throw would be before the endzone and the backpedaling would put Matthews in just the right position to take a ball thrown high and to the outside shoulder (purposely, to keep from any contest) and turn it into a touchdown. You’ll see that Matthews also raises his arms just as the ball arrives (if you use the two buttons on the bottom right of a gif to slow down the gif, you can see this clearly). Again, Matthews shows great ball skills and the only point to improve might be to wait a step longer before turning for the ball so the corner is really forced to back up even further. These are somewhat subtle movements that are the difference between an every down player and the 4th WR.


1st and 10 at SEA 38 (13:48) R.Wilson pass deep left to C.Matthews pushed ob at NE 17 for 45 yards (D.McCourty).

Left Outside, Vertical Route

Cover-1 Man

Matthews is again seeing Arrington and again running a Vertical. He releases to the outside and is very mindful to keep a solid distance between himself and the outside boundary. This is a pure battle of speed and positioning and Arrington isn’t really losing either battle, the only open option is a tough outside shoulder thrown at the sideline. Wilson’s great deep accuracy sets up Matthews for the catch towards the outside shoulder, which he makes a well timed leap while turning back in order to catch the ball at it’s earliest point. It’s very obvious that Matthews has a good understanding of how to make the reach for the ball and how to adjust his body to ensure the catch. He also positions himself well between the ball and Arrington.


1st and 10 at 50 (8:07) (Shotgun) R.Wilson pass short left to C.Matthews to NE 41 for 9 yards (B.Browner).

Left Outside, Curl Route

Cover-1 Man

When you’re facing man coverage you have to beat your man and get open, and with each different CB you have to beat them differently. Well, Matthews certainly beats his man here. While in the previous plays he beat Arrington and Logan through positioning, here he beats Browner through pure physical skills. The route is simple, he breaks outside and begins heading upfield at which point Browner tries to push him off his route. Matthews however does a pretty strong and well timed rip move to completely throw Browner off balance, while keeping his own balance throughout the push which he also showed in the earlier play against Arrington. But Browner isn’t as small as Arrington, he’s a much bigger guy and him being able to withstand the contact, maintain his balance and then give Browner a “get off me” is all very impressive.

Afterwards, it seems that maybe the contact got to him a bit as he decides to wait for the ball instead of reaching for it with his hands as well as makes a small jump while catching it instead of keeping his feet set. These seem like minor things but if he catches the ball a moment earlier by reaching out and keeps his feet on the ground while doing so, Browner would be taking his first step towards Matthews just after Matthews turns his head around- giving him the opportunity to get this first down entirely on his own and possibly more.


1st and 10 at SEA 20 (7:55) R.Wilson pass incomplete deep middle to R.Lockette.

Right Outside, Slant-Vertical Route

Cover-1 Man

Matthews won’t see this target but there’s no reason to not look at his route here. On this play, Matthews is going to draw coverage from the great Darrelle Revis. Matthews motions towards the line before the snap, prompting Revis to play off of him with an outside shade. After the snap, you can see Matthews has a really nice bend in his back as he really drives up the field on his slant release, this bend is trying to signal to the Corner that he’s going into that direction. Revis doesn’t bite and stays to his outside shoulder and as he turns upfield he manages to cover a lot of ground on Revis and is able to get over him. It looks like Matthews duty on this play was to get his man to bite on the slant before breaking back to the outside and becoming the man closer to the outside- which he fails to do. If I had to pick a reason, he chose the wrong release and should have tried to close the gap between himself and Revis before going inside and then vertically. As you can see, Revis is watching Wilson as he fakes the handoff and can see that Wilson isn’t ready to hit the slant, which is why he doesn’t close that cushion sooner.


2nd and 10 at NE 49 (1:50) (Shotgun) R.Wilson pass incomplete deep right to C.Matthews (B.Browner).

Outside Slot Right, Vertical Route

Cover-1 Man

Onto the final play I’m going to look at, up against Browner again he faces him from a different starting position. As he breaks outside, Browner tries to get physical with him and Matthews uses his right arm to slap away Browners outside arm, and then brings down his shoulder when Browner tries to use his inside arm to get into Matthews chest, this movement causes Matthews to stumble a bit and allows Browner to regain control of the situation. Matthews starts turning up field and uses his arm to push off of Browner (probably a penalty) and at this point Matthews is wide open. He signals for the ball but Wilson’s going to throw it short, forcing Matthews to adjust and try to save this before it gets intercepted- which he does. Again, he shows a good combination of moves to get off press and power through it.


So What Have We Learned?

The answer is almost nothing. In a 7 play sample size it’s really tough to digest much about a player. From what’s visible it’s that Matthews has good skills on the ball, good balance, and is a very powerful long striding runner. Matthews doesn’t use the vertical stem enough in his releases and the two where he did he didn’t take it far enough to be as effective with it as it could have been. He showed some good hand play when it came to getting physical with Browner (although in one of the plays I didn’t show, due to a very poor camera angle, Matthews gets completely stonewalled by Browner and taken out of bounds) and he came through on tough catches. Still, the traits Matthews showed in this game are the kinds of things that make you interested enough in a player to take a late round chance on them. It’s a bit telling though that on all but one play the Seahawks only trusted Matthews to take vertical routes, a strategy my own New York Jets used with Stephen Hill. The difference is that Russell Wilson is a Quarterback that could actually make a lot of use of a player who’s this big and able to catch downfield, so even if Matthews doesn’t develop into a legitimate starting option- he’s shown that he will be a real threat that opposing teams will have to deal with.

Click here for the rest of Russell Wilson’s passes during the Super Bowl.

Tom Brady vs Seahawks - Super Bowl XLIX


Tom Brady cemented his legacy as one of the all-time greats in Super Bowl XLIX vs. the Seattle Seahawks and one of the best defenses in the NFL. Brady led a patented 10 point comeback in the 4th quarter, the largest in Super Bowl history. Brady set the Super Bowl record for completions (37), while attempting 50 passes and finishing with 328 yards and 4 TD’s. But how did Brady do it? The Patriots offensive gameplan against Seattle was to get the ball out of Brady’s hand quick, to eliminate the pass rush that gave Peyton Manning so much trouble last year. Brady spread the ball, dinking and dunking for most of the game. But when he needed a big time throw, whether a tight window, a deep ball or a timing route. He made the throw, right on the money almost every time.


Let’s take a look at how Brady dominated the passing game and led the Patriots to victory.


Play 1: 3rd & 6. 10. 1:50 1st.

Formation: Shotgun Trips Open

Offensive Personnel: 11 Personnel

Coverage: Cover 2

The first play that we see is probably Brady’s worst of the day. After leading a drive with 6 straight completions, Brady throws an interception. The Seahawks run a Cover 2, something they don’t do often. To the field side, the Patriots outside WR runs a “dig” while the slot WR runs a “snag”. The TE to the field runs a crossing route to the boundary (top) side, while the single WR also runs a “dig”. The coverage by the Seahawks is perfect for this particular play. The field CB will be sitting right where the “snag” is coming to, while the slot CB and the SS will be bracketing the “dig”. While Brady struggles to find someone who is open, the Seahawks pass rush hits home. Brady sees the pressure and throws the ball up for grabs where it is easily intercepted. There was really no one open on the play, so in hindsight the best option would have been to throw the ball away.


Play 2: 3rd & 9. 35. 11:17 2nd.

Formation: Shotgun Double Flex

Offensive Personnel: 12 Personnel (TE2 split to the boundary)

Coverage: Cover 1

The Seahawks base coverage is usually Cover 3, but with the Patriots wanting to throw shallow routes most of the time you will see a lot of Cover 1. This play is an example. This time, the Patriots run a good man-beating play. To the boundary (bottom), the split TE runs a “go” while the in-line TE runs a “dig”. To the field, the Patriots motion the WR’s into a stack, in order to free up the underneath WR. The Seahawks DB’s to the motion side are playing at different levels, the reason for this is to eliminate the pick routes. The levels actually work against the Seahawks on this play, barely. The motioning WR immediately goes on a drag route running away from the CB. The CB shows very nice closing speed but the throw by Brady is excellent, leading his WR beautifully allowing for yards after catch. The play results in a gain of 23.


Play 3: 2nd & 9. 11. 9:51 2nd.

Formation: Shotgun Dice Slot

Offensive Personnel: 11 Personnel

Coverage: Cover 1

The Seahawks are once again in Cover 1. This time Brady makes a fantastic throw. To the field side (top), the Patriots run a “slant-flat” combo, and Brady throws the slant. What makes this throw so great is the placement of the ball. Brady must throw the slant to his WR in between 3 different defenders: the WLB, the FS and the CB. The WLB is pushing to the hash taking away any inside throw, while the CB is closing from the outside not allowing an outside throw and the FS is over the top so an up field throw can not be made. Brady gets the ball right over top of the WLB, while putting it in between the CB and FS perfectly. Brady’s 1st TD of the night.


Play 4: 2nd & 5. 22. 0:36 2nd.

Formation: Shotgun Flip Trips

Offensive Personnel: 11 Personnel

Coverage: Cover 1

With time winding down in the 1st half, the Patriots are driving deep into Seahawks territory. The coverage and route combinations are almost irrelevant on this play because I believe that Brady already knows where he’s going before he snaps the ball. He is throwing to the TE, aligned to the boundary (bottom), being covered man-to-man by the WLB. Brady throws the ball perfectly over the out stretched arms of the defender allowing his TE to make the grab in the endzone and finishing off the drive with his 2nd TD of the day.


Play 5: 3rd & 6. -24. 9:45 3rd.

Formation: Shotgun Flip Trips

Offensive Personnel: 11 Personnel

Coverage: Cover 1

It’s 3rd down and the Seahawks are bringing the blitz so the ball must come out quickly. The bunch WR’s to the field (bottom), run a vertical and a crossing route while the split out TE runs a “dig”. The TE is being covered by the SS in man-to-man coverage. With the Seahawks bringing their LB’s on the blitz, there are no underneath defenders making this an easy throw. What makes this so impressive is the throw Brady makes while taking a huge hit from the Seahawks. The ball is delivered to the TE allowing him to pick up the first down. The toughness in the pocket on this play is what makes Brady so great, always willing to hang in there and make the throw that needs to be made.


Play 6: 3rd & 9. -32. 8:15 3rd.

Formation: Shotgun Split Offset

Offensive Personnel: 21

Coverage: Cover 3

With the Seahawks DB’s playing off of the WR’s on this play, Brady knows that they are in a zone coverage. Both of the outside WR’s run deep comeback routes, taking the DB’s with them in order to stretch the defense so the TE in the slot comes open on his “spot” route. The MLB does over run the TE for a split second but as the TE spots up behind the MLB vacancy, he realizes. After the ball is throw, the MLB is able to cut the route off since the TE is stationary. The MLB makes a nice play intercepting the pass, Brady’s 2nd of the day.


Play 7: 1st & 10. -35. 4:48 3rd.

Formation: Singleback U-Wing

Offensive Personnel: 12 Personnel

Coverage: Cover 3

The Seahawks are in Cover 3 on this play, although the CB’s on the outside have man-to-man responsibilities with their WR’s. The underneath coverage on the Cover 3 takes away any crossing routes on in-breaking routes but leaves the underneath checkdowns open. To the boundary side (top), the WR runs a deep comeback route at 17 yards, deep enough to be behind the underneath coverage. Brady does a great job stepping up in the pocket after feeling the pressure and delivering a strike to the deep comeback route. The play was negated due to an unrelated penalty, but still a very impressive throw that is worth noting.


Play 8: 3rd & 9. -36. 3:28 3rd.

Formation: Shotgun Flip Trips

Offensive Personnel: 11 Personnel

Coverage: Cover 1

With it being 3rd and long here for the Patriots, they decide to run a double verticals concept while also running a “dig” on the backside. Those 3 routes can be seen as decoy routes on this play though. The Seahawks are in man-to-man coverage, and Brady knows that his WR in the slot can beat his man on the “pivot” route. The WR does beat his man, but the MLB recognizes what is happening and quickly breaks on the ball. Brady does not make a perfect throw on this play, although not terrible, and it is a little out in front of his WR instead of on his chest. Had he made the catch he may have came up short for the 1st down regardless.

Breakdown continues on the next page.

SB Wilson vs NE Cover

Russell Wilson vs Patriots - Super Bowl XLIX

Russell Wilson threw the final interception to Malcolm Butler to end Super Bowl XLIX, but does that one play tell the full story? Many critics are using that play and his overall statline to project and his criticize his performance in the Super Bowl. In this breakdown, you will see that looking at only one of his plays, even though a very negative play at that, is not enough data to justify these claims as Wilson actually performed very well against New England’s underrated defensive unit.

Stats
Wilson - 12/21, 247 yards, 11.8 y/a, 2 TDs, 1 INT, 3 sacks for 13 yards, 3 rushes for 39 yards
Note: The play numbers correspond to the plays found here.

Before we begin dissecting some of Wilson’s plays, I am going to forewarn you by saying that this breakdown will not cover the game ending interception by Malcolm Butler as I already broke down that specific play in depth in a previous article. Please click here if you would like to read that breakdown. With that in mind, let’s begin:

The game started slowly for Russell Wilson. The Patriots defense was playing tight man coverage across the board not allowing Wilson any place to throw the ball. In this first half, Wilson actually only threw the ball four times before the two minute warning. Patriots’ Tom Brady, for comparison, threw the ball 27 times in the same amount of time.

First, let’s take a look at Wilson’s two touchdown passes in Plays 11 and 15.

Play 11
Situation: 1st and 10 at NE 11
Description: Q2 - (:06) (Shotgun) R.Wilson pass short left to C.Matthews for 11 yards, TOUCHDOWN. S.Hauschka extra point is GOOD, Center-C.Gresham, Holder-J.Ryan.


Offense Formation: Empty-set Shotgun Double Twins Near
Offensive Grouping: 11
Defense Formation: Cover 5, two LB zones underneath, Revis in man-to-man coverage on WR89 Baldwin

With six seconds left in the half, the Seahawks are down by 7. Pete Carroll wants to take a quick shot to the endzone before kicking a field goal if unsuccessful. The Patriots and DC Patricia are gambling that Wilson is going to throw a backshoulder fade route to the corner of the endzone. This is the reason why I’m not a fan of this play call at all by the Patriots.

Wilson only has six seconds to catch and throw a fade route, which is what this defense is designed to stop. Fade routes are typically short plays which is why it’s the obvious call in the situation to use the size advantange of Matthews. The key here is the adjustment by Wilson and Matthews. Wilson instantly notices that the Patriots are in zones across the goalline to prevent the deep throw which means that an underneath or purposely underthrown ball is ideal here.

The Patriots secondary is already in deep zone coverage meaning they are expecting a jump ball situation. This begs the obvious question: Why is a 5’11” cornerback (Ryan) covering an obvious fade route against a 6’5″ wide receiver like Matthews? This is a clear mismatch from the start.

If you combine these two scenarios (deep goalline zone coverage with a size mismatch) you have an easy read and adjustment by Wilson to throw a short fade route only to Matthews for a touchdown. Which is exactly what happened on this play.

Click here for more of Chris Matthews plays during the Superbowl.

Play 15
Situation: 2nd and 3 at NE 3
Description: Q3 - (5:00) R.Wilson pass short right to D.Baldwin for 3 yards, TOUCHDOWN. PENALTY on SEA-D.Baldwin, Unsportsmanlike Conduct, 15 yards, enforced between downs. S.Hauschka extra point is GOOD, Center-C.Gresham, Holder-J.Ryan.


Offense Formation: Power I-formation Twins Stack Left
Offensive Grouping: 21
Defense Formation: Goalline, Three Zones, man-to-man coverage across board

From I-formation, Wilson motions WR15 Kearse across the formation to drawing CB39 Browner. This shows Wilson that Browner and Revis are in man-to-man coverage on the two wide receivers. Next, Wilson snaps the ball and fakes the hand-off to Lynch drawing the linebackers in zones across the goalline to crash the line. The fake hand-off is the reason why this play works. If there was no fake, and the linebackers were left in their zones then one of them might (Hightower) might have been able to interfere with the easy touchdown throw. Instead, Baldwin is left wide-open.

Revis is covering Baldwin and gets picked by the referee standing in the endzone. This is an excellent play set-up to use the referee to score the touchdown.

The next thing we are going to look at is Russell Wilson’s deep ball accuracy. In my two previous post-season breakdowns (Divisional vs Carolina; Conference vs Green Bay), Wilson seemed to struggled with accuracy tending to underthrow his passes. His deep ball accuracy will be analyzed in the following plays:

Play 5
Situation: 3rd and 8 at SEA 22
Description: Q2 - (8:24) (Shotgun) R.Wilson pass incomplete deep right to J.Kearse (L.Ryan).


This is Wilson’s second throw of the day and it didn’t come until the second quarter. In this play, Wilson from shotgun has WR15 Kearse on the right outside running a go-route against CB26 Ryan. Wilson’s footwork on this throw is excellent as he steps fully into his throw, but he leaves the ball too far inside of his receiver. Ryan also deserves credit for the pass breakup, but this ball should have been closer to the sideline for Kearse to have a better shot at it.

Play 7
Situation: 2nd and 5 at SEA 45
Description: Q2 - (4:19) (Shotgun) R.Wilson pass deep right to C.Matthews to NE 11 for 44 yards (K.Arrington).


Wilson from shotgun takes the snap and moves to the right after the play-action to RB24 Lynch. WR13 Matthews is running a go-route and instantly beats CB25 Arrington almost immediately off of the the line. Once Arrington is beat, he can’t turn and locate the ball giving Matthews a clear shot at the reception who pulls it down for the 44 yard gain. Excellent footwork to step into the throw and great placement on the throw to put it where only Matthews could come down with it.

Play 12
Situation: 1st and 10 at SEA 38
Description: Q3 - (13:48) R.Wilson pass deep left to C.Matthews pushed ob at NE 17 for 45 yards (D.McCourty).


Another go-route to Matthews from shotgun formation, OC Bevell is clearly targetting CB25 Arrington early in this game to take advantage of the mismatch with Matthews’ physical prowess. Arrington actually turns to locate the ball, but he can’t out jump the massive 6’5″ wide receiver. Wilson again places the ball perfectly like in Play 7 just so Matthews can have a shot at the ball. Unlike Play 5 where the ball was placed too far inside, this ball was placed right on the sideline which is the ideal location for the jumpball in this situation.

Play 18
Situation: 3rd and 2 at NE 47
Description: Q3 - (1:12) (Shotgun) R.Wilson pass incomplete deep left to J.Kearse (M.Butler).


After CB25 Arrington was benched in favor of CB21 Butler, things started to change for Wilson’s deep ball. In this play, Wilson’s throw was actually in the right place for WR15 Kearse to come away with it on the wheel route, but Butler made the excellent pass break-up to stop this third down conversion. Give full credit to Butler here. Please continue reading on the next page.

Butler Interception Cover

Malcolm Butler’s Final Super Bowl Interception on Russell Wilson

Since not everyone understands what happened on Malcolm Butler’s interception I wanted to do a quick breakdown of the play that ended Super Bowl 49 for Russell Wilson and the Seahawks.

Edit [2/4/2015]: If you are interested in reading about all of Russell Wilson’s other plays please click here.

Situation: 2nd and 1 at NE 1
Description: Q4 - (:26) (Shotgun) R.Wilson pass short right intended for R.Lockette INTERCEPTED by M.Butler at NE -1. M.Butler to NE 2 for 3 yards (R.Lockette). PENALTY on NE, Unsportsmanlike Conduct, 1 yard, enforced at NE 2

Offense Formation: Shotgun Twins Stack Right Near

Offensive Grouping: 11 (1 RB - Lynch, 1 TE - Willson, 3 WR - Lockette, Kearse, Baldwin)

Defense Formation: Cover 1, Man-to-man coverage across the board

Play Concept: Rub/pick route

Pre-snap, Wilson is in shotgun with twins stack right with Baldwin in the slot. The Patriots have Revis directly over Baldwin and Browner playing shallow on the twins right with Butler directly behind. This is a very standard defensive call against twins stack.

Wilson motions Baldwin across the formation and Revis follows. This signals man-to-man coverage at least where Revis is concerned since none of the other defenders switch or move around they don’t “re-adjust” their zones if they are playing zone coverage here. This is a GOOD sign for a pick play. Pick plays work best against man-to-man coverage and that’s exactly what NE was showing here.

Wilson snaps the ball and Browner immediately jams Kearse on the line of scrimmage. THIS is where the play is won for NE. Kearse’s goal is to interfere with Butler’s man-to-man coverage responsibilities on Lockette, but Browner stops Kearse immediately at the line. This is an amazing jam that set up the play for Butler.

Once Browner jams Kearse, Butler is free to attack Lockette’s route. Lockette steps forward and runs a slant route to the middle of the field. Wilson sees his receiver and leads him too far up the middle allowing Butler to jump over the back of Lockette for the interception.

At the point where Wilson snaps the ball and Kearse can’t interfere with Butler, he needs to throw the ball at the feet of Lockette or throw it low and behind his target so that Butler can’t make the play. Instead he leads him too much on a quick slant route over the middle of the field. Really the worst place for the throw.

Notes

The Patriots were ready for this play. Simply by studying the tape they knew a rub route was coming on this goal line play.

This is actually a well-designed play. Some people are instantly throwing Bevell under the bus, but from a pure objective standpoint this is a good play on goal line when you have man-to-man coverage across the board plus a larger WR going up against a rookie undrafted CB. BUT the key here is that Kearse HAS to be able to interfere with Butler’s coverage responsibilities. Remember in a league where the talent disparity is so minuscule that even an undrafted rookie can make an impact.

People are saying that “Wilson telegraphed his throw.” No. This is not true. It’s a designed pick route that the Patriots KNEW it was coming. He took the snap and immediately threw the ball. The fault was the decision to throw it, the physical throw, but not the mental aspect of “looking off a CB” or something.

Give credit to Butler and Browner for making a great play, but more importantly, give credit to Belichick and NE’s DC Patricia for recognizing the play and teaching their defense how to attack it.

Some have argued that “Lynch was open.” He was open for the slightest of moments AFTER the ball was thrown. Chandler Jones was on him from the start of the play and his only role on this play was to clear the linebackers which is why his “shoot” route was on the complete opposite side of the field.

Bevell was quoted in saying that “Lockette could have been stronger through the ball.” - While I agree with this, I don’t personally think this was the game changer here. Maybe if Lockette fought off Butler this would have been an incompletion instead of a INT, but I feel like Butler’s full acceleration and jump at the ball was greater than any additional strength Lockette could have mustered to stop the interception. But that’s just me.

Some have argued that Wilson should have kept the ball and tried to run it or go through his reads. While it’s “possible”, Wilson and the Seahawks were committed to throwing the ball. The ball should have just been thrown low and behind Lockette or at the feet to stop the play and live to fight another down. In my opinion, the decision-making was WAY too quick for him to realize he should have pumped and rolled around or done something else with it, so basically the throw just needs to be better placed to not have the INT happen.

Edit [2/4/2015]: If you are interested in reading about all of Russell Wilson’s other plays please click here.

Layout mode
Predefined Skins
Custom Colors
Choose your skin color
Patterns Background
Images Background