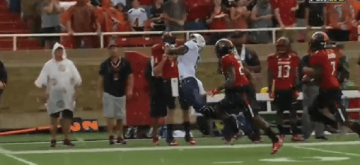

Antonio Brown vs. Colts - 8 catches, 118 yards, 2 TD
Antonio Brown has had his typical season once again in 2015, but in Week 13 against the Colts he had a great game in a must-win game. Brown has exceptional quickness and acceleration out of his breaks that allow him to get open. Listed at 5’10” 181 lbs., Brown plays much bigger than his frame, he is a red zone threat using crafty moves and good positioning to get open in the end zone. On top of that, Brown uses his quickness and acceleration as well as good hands to beat defenders deep and catch passes over taller defenders. Along with his 2 receiving TD’s in this 45-10 win, Brown also ran back a punt in order to solidify his dominance of the game. Let’s take a look at the film to see just how good Brown was in this game.
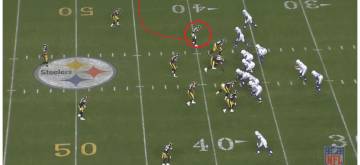
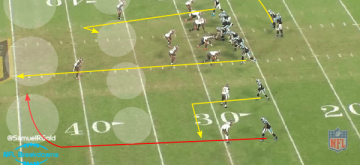
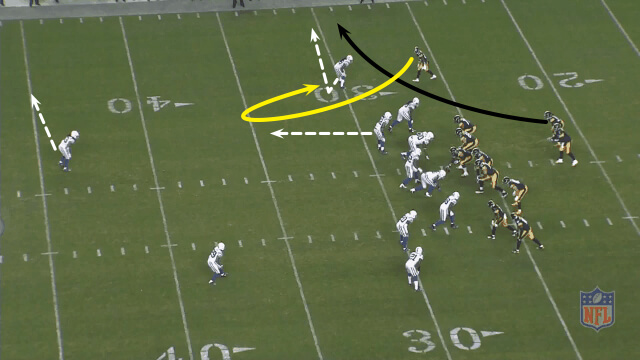
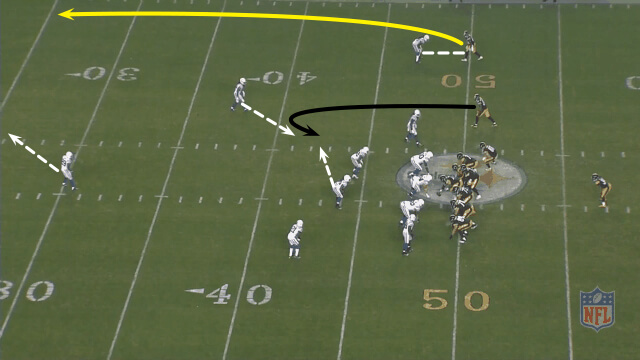
Play 1: 2nd & 5. -25. 9:42 1st.
Coverage: Cover 2
Antonio Brown does not get the ball on this play, but this is an example of how much attention the defense will pay to him. The Colts are in Cover 2, but the CB matched up on Brown completely ignores his assignment and follows Brown similar to man-to-man coverage. The Steelers run a “smash” concept, a short hitch and a post corner (or flag) route behind it. Had the Colts CB taken his proper drop, which should be splitting the difference between the two WR’s, the play would have been shut down. Instead, the flag route is wide open for a gain of 21 yards.
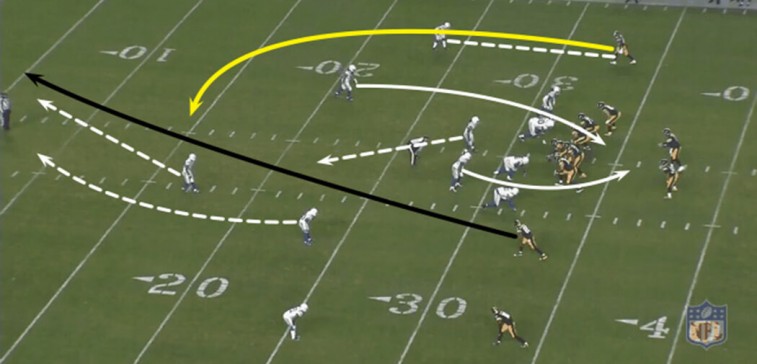
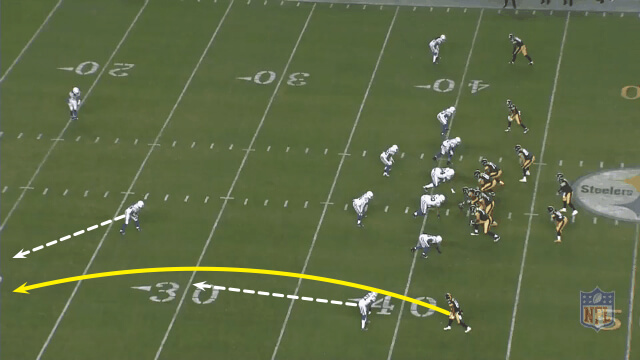
Play 2: 2nd & 10. 29. 6:58 1st.
Coverage: Cover 1 Bracket

What makes Brown so good is what he can do after the catch. On this play the Steelers realize that when their RB leaves the backfield the LB will go with him into the flats, leaving an opening there for Brown. The Colts CB is playing outside, deep on Brown to defend those two areas; while the SS plays the inside breaking routes. Brown runs a quick 5 yard spot route and the QB hits him right on time. After the catch Brown is able to make a couple Colts defenders miss and pick up the 1st down for the Steelers with a gain of 16.
Play 3: 2nd & 8. 11. 5:39 1st.
Coverage: 2-Man Under
As previously mentioned, Brown is small in stature and most WR’s of his size would be featured out of the slot position on most plays. Not Brown, on most plays he is the outside WR1 and when the Steelers get into the Red Zone with 1-on-1 coverage on Brown, they’re going to throw his way. Brown is a master of being able to position himself on the hip of the CB and using his cut on a dime ability to try and make the catch on his back shoulder. On this play, Brown get himself in position but the ball is just a bit too high for him to reach as he can only get one of his hands free from the defender.
Play 4: 3rd & 3. -27. 7:39 2nd.
Coverage: Cover 2
Although this is only a gain of 3 yards, it is a play that really shows what makes Brown such a great WR every week no matter how the defense plans against him. The Colts are in Cover 2 and the Steelers run their routes right into the coverage. When Brown realizes he is covered up, he does a nice job of moving to get himself open for the QB with a sneaky swim move of the Colts LB. Many WR’s have problems getting open because they don’t know how to work after their route. Brown works to get open on every play, no matter if it is a 3 yard hitch or an 80 yard post. Brown gets into the QB’s vision working back to the ball and makes the catch and gains enough for the first down.
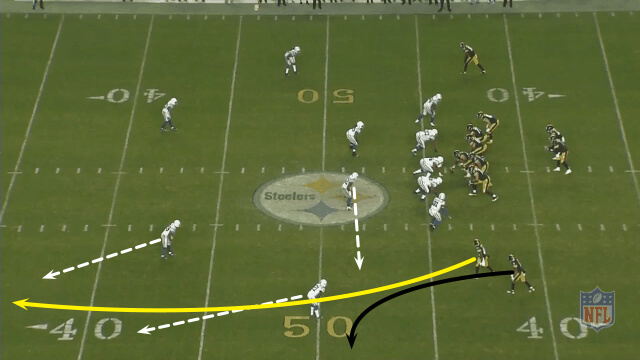
Play 5: 2nd & 10. 41. 5:51 2nd.
Coverage: Cover 2
Again the Colts are essentially double teaming Brown on this play. With the defense in Cover 2 and Brown being the only WR on the boundary side of the field, the CB can play underneath with the SS over the top. Brown runs a post corner and does a nice job of creating separation from the CB and using his speed to avoid getting jammed off his route. The QB does a beautiful job of dropping the pass right in between the two defenders into the arms of Brown right on the sideline for a gain of 26 yards.
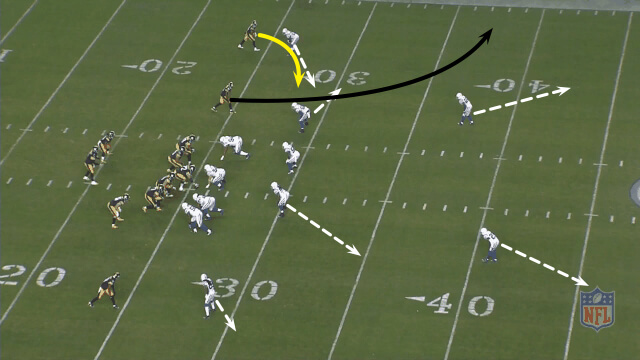
Play 6: 3rd & 2. 7. 4:08 2nd.
Coverage: Cover 1 (Strong side help)
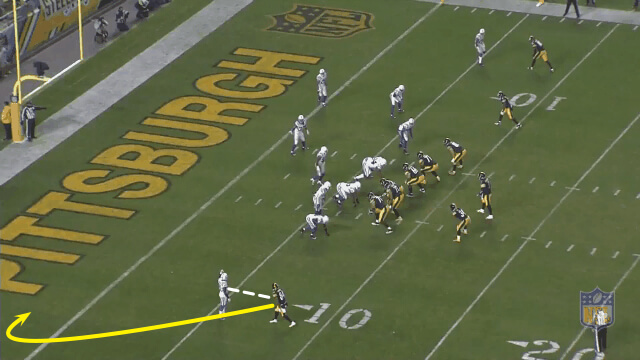
Similar to play 3, the Colts are in 1-on-1 coverage with Brown near the goal line. The Colts run a Cover 1, but the help is to the two WR side, leaving Brown alone with the defender. This time, Brown does a good job of extending the defender away from him with a small push off to get the last bit of separation needed for the pass. The ball is right there as Brown turns around and he hauls in his first touchdown of the day.
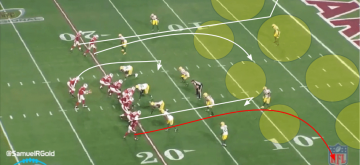
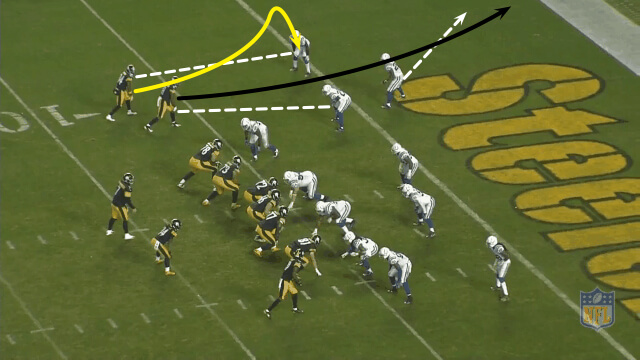
Play 7: 1st & 10. 32. 1:03 2nd.
Coverage: Cover 1
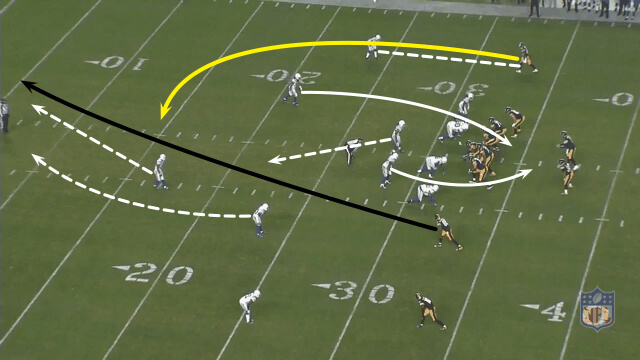
The Colts are in Cover 1 once again, this time bringing a Free Safety blitz. It is the single high Safety’s responsibility to get over top of the deepest route of the play. The Steelers slot WR (strong side) runs a deep post to take the top off of the defense and attract attention from the single high Safety. With the FS coming on a blitz it leaves a whole in the coverage, where he would otherwise be sitting. This is where Brown comes in, he does a nice job of gaining ground on his route and breaking down the cushion of the coverage. The CB is sitting on an in-breaking route but Brown is too quick out of his break and creates some separation. The play is ultimately called back for a personal foul, wiping away a gain of 22 yards.
Play 8: 1st & 10. 49. 8:01 3rd.
Coverage: Cover 1
On this play, the Steelers believe that the Colts have jumped offside and you will notice Brown gets a jump on the snap before any of his other players and almost appears to false start. If the Colts jump offside, it is essentially a free play for the Steelers. The CB does a good job of getting his hands on Brown, and does a good job of sticking with the speedy WR. The ball is a little bit overthrown and it falls incomplete.
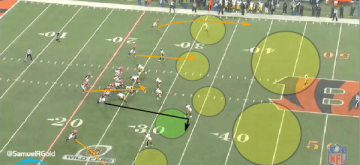
Play 9: 1st & 10. -44. 0:09 3rd.
Coverage: 2-Man Under
The Colts are double covering Brown again on this play, being in a 2-man under coverage, which means the CB is in man-to-man coverage with Safety help on deep routes. The offset WR on Brown’s side runs an out route, and with two defenders going with the deep route he is very open. Brown runs a go route, and even though he is double covered, he is able to exploit a poor angle by the over the top Safety and reel in the catch. This play shows how much the QB trusts Brown and that he is able to throw the ball up and trust Brown to underneath the ball and make the catch.
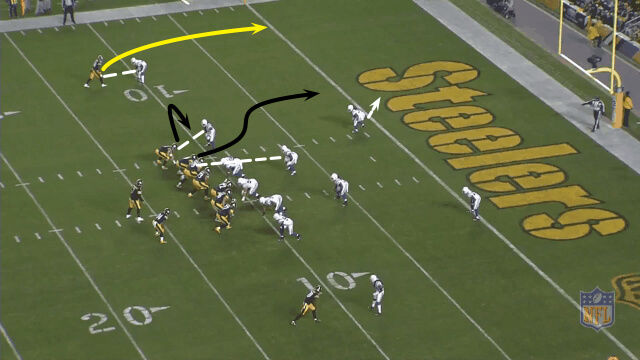
Play 10: 3rd & 5. 5. 14:15 4th.
Coverage: 2-Man Under
Once again the Steelers are in the Red Zone, threatening to score and once again they look toward Brown. The Colts are in a 2-man under coverage again, this time the Steelers use the slot WR to run off the double coverage. While the slot WR takes away the inside and deep help, Brown is able to stem outside and break back inside for an easy catch and another TD.