Cam Newton was drafted out of Auburn first overall in 2011. During the 2014 season, Newton dealt with some injuries but played the vast majority of the season completing 27 touchdowns for the Panthers’ offense and leading them to the divisional round of the NFC playoffs. In this breakdown we will look at all of Newton’s touchdowns both in the regular season as well as the postseason.
Regular Season Stats
Newton - 262/448 (58.5%), 6.98 y/a, 18 TDs, 12 INTs, 103 rushes for 539 yards and 5 TDs
Postseason Stats
Newton - 41/68 (60.3%), 6.53 y/a, 4 TDs, 3 INTs, 18 rushes for 72 yards
Note: Play numbers correspond to plays found here in the GIF Database.
Before we begin looking at some of his plays, I wanted to take a look at the recipients of Newton’s touchdowns:
Receiver Breakdown
| Kelvin Benjamin | 9 |
| Greg Olsen | 5 |
| Corey Brown | 2 |
| Fozzy Whittaker | 2 |
| Jason Avant | 1 |
| Jonathan Stewart | 1 |
| Ed Dickson | 1 |
| Mike Tolbert | 1 |
Kelvin Benjamin, the rookie wide receiver from Florida State University, really stepped up and made an impact catching 73 balls for 1,008 yards. He should continue to grow as Newton’s primary target alongside 2015 NFL Draft pick Devin Funchess from Michigan. Greg Olsen remains a valuable endzone target also when the Panthers aren’t running a variation of a misdirection involving Newton’s athletic ability. Here are the touchdowns broken down by quarter and down:
Quarter Breakdown
| 1st Quarter | 4 |
| 2nd Quarter | 6 |
| 3rd Quarter | 7 |
| 4th Quarter | 10 |
Down Breakdown
| 1st Down | 9 |
| 2nd Down | 7 |
| 3rd Down | 10 |
| 4th Down | 1 |
As well as the distance and location of the touchdowns:
Distance Breakdown
| Fewer than 6 Yards | 6 |
| Between 6 and 15 yards | 11 |
| More than 15 yards | 10 |
Location Breakdown
| Deep Left | Deep Middle | Deep Right |
| 3 | 0 | 2 |
| Intermediate Left | Intermediate Middle | Intermediate Right |
| 3 | 1 | 3 |
| Short Left | Short Middle | Short Right |
| 5 | 2 | 3 |
I find it interesting that the vast majority of Newton’s touchdowns were on the sidelines as opposed to over the middle of the field. Here is are all the routes broken down with the slant/drag routes being the most popular touchdown causing move.
Route Breakdown
| Slant/Drag | 5 |
| Go/Stop-n-Go | 4 |
| Fade | 3 |
| Hitch | 2 |
| Post | 2 |
| Screen | 2 |
| Shoot/Swing | 2 |
| Seam | 1 |
| Out | 1 |
Play 1
Situation: 2nd and 14 at DET 14
Description: Q3 - (2:36) (Shotgun) C.Newton pass short left to J.Avant for 14 yards, TOUCHDOWN. G.Gano extra point is GOOD, Center-J.Jansen, Holder-B.Nortman.
Opponent: 2. DET
Offensive Formation: Shotgun Split Slot Left
Offensive Personnel: 11
Defensive Formation: Cover 3
Newton in shotgun takes the snap and immediately looks left. WR81 Avant runs a post route from the left wide out position. Newton fires a bullet hitting Avant perfectly in the hands for an a touchdown underneath the Cover 3 shell of the defense.
Play 2
Situation: 1st and 10 at PIT 37
Description: Q4 - (13:37) (No Huddle, Shotgun) C.Newton pass short right to G.Olsen for 37 yards, TOUCHDOWN. G.Gano extra point is GOOD, Center-J.Jansen, Holder-B.Nortman.
Opponent: 3. PIT
Offensive Formation: Shotgun Trips Left Near - “Rope” Call
Offensive Personnel: 11
Defensive Formation: Cover 1
Newton takes the snap from shotgun and instantly finds the safety deep middle of the field. This forces him to look to the right and see TE88 Olsen running an out-route towards the sideline. Newton fires an excellent ball past the outstretched arms of CB28 Cortez. Olsen catches the ball with excellent technique reaching for it and cuts up the field for a touchdown.
Play 3
Situation: 3rd and 14 at BAL 28
Description: Q2 - (8:41) (Shotgun) C.Newton pass deep left to K.Benjamin for 28 yards, TOUCHDOWN. G.Gano extra point is GOOD, Center-J.Jansen, Holder-B.Nortman.
Opponent: 4. BAL
Offensive Formation: Shotgun Split Slot Right
Offensive Personnel: 11
Defensive Formation: Cover 2 with 5 underneath zone defenders
This is a busted coverage by FS24 Stewart of the Ravens defense. Benjamin lining up by himself on the left wide out spot runs a go route past the first line underneath zone defenders into the deep left zone. Newton does an excellent job of keeping Stewart in the middle of the field by starting his reads right and then finding Benjamin for the long strike down the sideline.
Play 4
Situation: 1st and 9 at CHI 9
Description: Q2 - (:17) (Shotgun) C.Newton pass short right to G.Olsen for 9 yards, TOUCHDOWN. G.Gano extra point is GOOD, Center-J.Jansen, Holder-B.Nortman.
Opponent: 5. CHI
Offensive Formation: Shotgun Trips Right Far - “Lasso” Call
Offensive Personnel: 11
Defensive Formation: Cover 3 with 4 underneath zone defenders
Olsen lines up in the slot right position and runs a seam route between the deep middle and deep right zones of the Cover 3 shells. Newton goes through his reads and recognizes the coverage finding Olsen for the touchdown.
Play 5
Situation: 3rd and 6 at CHI 6
Description: Q4 - (2:23) (Shotgun) C.Newton pass short middle to G.Olsen for 6 yards, TOUCHDOWN. G.Gano extra point is GOOD, Center-J.Jansen, Holder-B.Nortman.
Opponent: 5. CHI
Offensive Formation: Shotgun Jumbo Left
Offensive Personnel: 13
Defensive Formation: Goalline two zones

On 3rd and 6, the Bears line up in goalline defense dropping two safeties into the endzone. Newton takes the snap from shotgun and fakes the handoff to the runningback drawing in the linebackers. TE88 Olsen slips between the two dropping zone safeties for an easy touchdown strike.
Click here for the next page of the article.
Play 6
Situation: 3rd and 3 at CIN 3
Description: Q1 - (5:53) (Shotgun) C.Newton pass short middle to K.Benjamin for 3 yards, TOUCHDOWN. G.Gano extra point is GOOD, Center-J.Jansen, Holder-B.Nortman.
Opponent: 6. CIN
Offensive Formation: Shotgun Trips Left Far - “Rope” Call
Offensive Personnel: 11
Defensive Formation: Cover 1 with four underneath linebacker zones.
The Bengals pre-snap line up in a Cover 2 shell. FS20 is lining up shallow and post-snap jumps up into a zone on the line of scrimmage. This is Newton’s key to the touchdown. After Nelson rushes forward, Benjamin is left with an unimpeded path over the middle of the endzone for a quick-slant route touchdown.
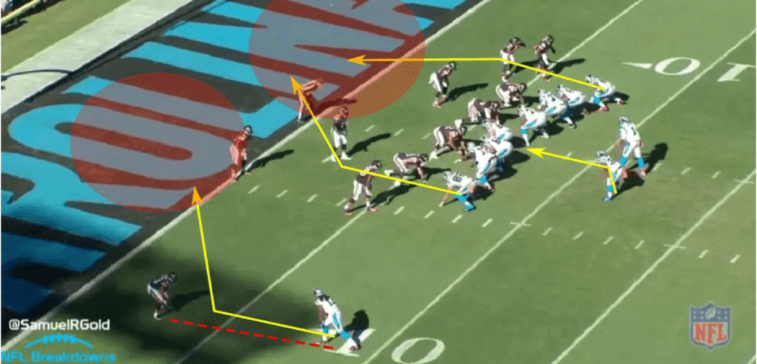
Play 7
Situation: 3rd and 3 at CIN 12
Description: Q3 - (4:01) (Shotgun) C.Newton right tackle for 12 yards, TOUCHDOWN. CAR-F.Velasco was injured during the play. G.Gano extra point is GOOD, Center-J.Jansen, Holder-B.Nortman.
Opponent: 6. CIN
Offensive Formation: Shotgun Near - “Lion” Call
Offensive Personnel: 12
Defensive Formation: Cover 3
Outside of Newton’s passing ability he is known for his running ability. This is a QB Power run to the right using the fullback and the pulling left guard from across the formation to seal out the safety. WR81 Avant does an excellent job of sealing out his cornerback while Newton set him up perfectly for the cutback to the inside.
Play 8
Situation: 1st and 10 at CIN 13
Description: Q4 - (4:58) C.Newton pass short left to G.Olsen for 13 yards, TOUCHDOWN. The Replay Official challenged the runner broke the plane ruling, and the play was Upheld. The ruling on the field stands. G.Gano extra point is GOOD, Center-J.Jansen, Holder-B.Nortman.
Opponent: 6. CIN
Offensive Formation: Singleback Big 3TE Right
Offensive Personnel: 13
Defensive Formation: Cover 1
This is an excellent play set-up. Newton takes the snap from under center and runs bootleg to the right. Meanwhile TE88 Olsen on the line of scrimmage pretends to block, but then disengages on a drag route to the left wide open for the touchdown. Give credit to the play design and execution more than any individual player here.
Play 9
Situation: 2nd and 11 at GB 13
Description: Q4 - (9:43) (Shotgun) C.Newton pass short right to K.Benjamin for 13 yards, TOUCHDOWN. G.Gano extra point is GOOD, Center-J.Jansen, Holder-B.Nortman.
Opponent: 7. GB
Offensive Formation: Shotgun Trips Left Near - “Rope” Call
Offensive Personnel: 11
Defensive Formation: Cover 1
Newton from shotgun instantly diagnoses the Cover 1 defense of the Packers and targets WR13 Benjamin on a fade route to the endzone for the touchdown. On these type of routes I like to see the ball go more towards the sideline of the endzone so that Benjamin can have more space to box out his defender better. Even still he pulls it down using great arm strength to not let the ball hit the ground.
Play 10
Situation: 3rd and 10 at NO 10
Description: Q3 - (10:20) Cam Newton 10 Yd Run (Graham Gano Kick)
Opponent: 9. NO
Offensive Formation: Shotgun Trips Right Far - “Lasso” Call
Offensive Personnel: 11
Defensive Formation: Cover 4
Here is an excellent play showing Newton’s scrambling ability in dealing with pressure. CB21 Robinson is the free rusher from the right edge. Newton recognizes that it’s a busted play from the start so he uses his athleticism to get to the edge and scramble up the sideline for a touchdown.
Play 11
Situation: 2nd and 4 at PHI 21
Description: Q4 - (9:11) (Shotgun) C.Newton pass short left to K.Benjamin for 21 yards, TOUCHDOWN. G.Gano extra point is GOOD, Center-J.Jansen, Holder-B.Nortman.
Opponent: 10. PHI
Offensive Formation: Shotgun Trips Right Far - “Lasso” Call
Offensive Personnel: 11
Defensive Formation: Cover 1
On 2nd and 4 I love this play set-up versus the Cover 1 defense by the Eagles. First Newton takes the snap and idenfities the Cover 1 shell with the deep free safety by the endzone. On both sides of the field the Panthers are running slant-flat concepts to horizontally stretch the defense. On the left side of the field the linebacker instantly attacks the flat-route run by the runningback from the backfield and CB26 Williams covers Benjamins slant route. Newton fits a tight ball into Benjamin’s hands who shakes the initial tackle by Williams and makes it to the endzone for the score.
On the right side of the field, the Panthers are running the same slant-flat concept. If you notice the slot defender standing 5-10 yards off of the line of scrimmage from WR82 Cotchery this should be Newton’s sign to attack the defense on this side. Once the outside cornerback follows the right slant route up the middle of the field, Cotchery is left wide open. On 2nd and short (4 yards) this is an instant first down and possibly more depending on Cotchery’s escapability on the sideline. Overall, just an excellent play set-up by the Panthers offensive coordinator Mike Shula.
Play 12
Situation: 3rd and 19 at PHI 40
Description: Q4 - (5:37) (Shotgun) C.Newton pass deep left to K.Benjamin for 40 yards, TOUCHDOWN. G.Gano extra point is GOOD, Center-J.Jansen, Holder-B.Nortman.
Opponent: 10. PHI
Offensive Formation: Shotgun Twin Stacks Right
Offensive Personnel: 01
Defensive Formation: Cover 1
The Eagles are in Cover 1 defense with CB26 Williams playing press-man coverage on WR13 Benjamin. Benjamin runs an excellent stop-n-go route up the left sideline. Newton keeps his eyes on the right side of the field pulling the single high safety over in their direction. This leaves a wide-open space for Benjamin. Newton launches the ball deep to the left, but underthrows it to the beginning of the endzone when this ball could have been placed further in the back of the endzone. Some may argue that since Benjamin had Williams beat that he might have been able to react better to the ball if it was thrown deeper into the endzone, but in my opinion Benjamin clearly had a full yard on Williams leading to an easy over touchdown in the back.
Play 13
Situation: 1st and 10 at ATL 22
Description: Q4 - (9:18) (No Huddle, Shotgun) C.Newton pass deep left to K.Benjamin for 22 yards, TOUCHDOWN. G.Gano extra point is GOOD, Center-J.Jansen, Holder-B.Nortman.
Opponent: 11. ATL
Offensive Formation: Shotgun Slot Right Far
Offensive Personnel: 11
Defensive Formation: Cover 2
In this fade route pass to the endzone give full credit to Benjamin for the excellent double catch. His defender CB21 Trufant had perfect coverage draping over him and even helped break up the initial reception away , but Benjamin while falling down was able to pull it in for a spectacular catch. Extremely impressive for the rookie wide receiver.
Play 14
Situation: 1st and 10 at ATL 47
Description: Q4 - (6:29) C.Newton pass deep right to C.Brown for 47 yards, TOUCHDOWN. G.Gano extra point is GOOD, Center-J.Jansen, Holder-B.Nortman.
Opponent: 11. ATL
Offensive Formation: Offset-I Near Right
Offensive Personnel: 21
Defensive Formation: Cover 1
Newton takes the snap from under center and fakes the handoff to the runningback in offset-I formation. On 1st and 10 the outside wide receivers are running go-routes down the sidelines. WR16 Brown uses his second gear to burn past his defender to get open. This is another throw like in Play 12 where Newton left the ball short of his mark, but got bailed out by his wide receiver. Brown clearly had the edge on CB27 McClain, but had to come back to the ball in the same fashion that Benjamin did previously.
Play 15
Situation: 4th and 4 at MIN 32
Description: Q3 - (9:21) (Shotgun) C.Newton pass deep middle to C.Brown for 32 yards, TOUCHDOWN. G.Gano extra point is GOOD, Center-J.Jansen, Holder-B.Nortman.
Opponent: 13. MIN
Offensive Formation: Shotgun Split
Offensive Personnel: 21
Defensive Formation: Cover 1
On 4th down and 4 with 13:28 remaining in the 4th quarter, the Panthers are down 28-6 to the Vikings. This explains the play-call. The Vikings line up in Cover 1 but the Panthers decide to go deep to stretch their defense and see if the deviation from a standard play-call will result in a big gain. This play works as Newton finds WR16 Brown on a deep-post route over the middle of the field. This ball again is underthrown as the defender was trailing behind Brown and Brown had to slow down and adjust to it. With the single high safety getting pulled to the left on the misdirection this ball could have been thrown deeper into the endzone.
Play 16
Situation: 2nd and 7 at NO 9
Description: Q1 - (11:47) (No Huddle, Shotgun) C.Newton pass short left to K.Benjamin for 9 yards, TOUCHDOWN. Pass 9, YAC 0 G.Gano extra point is GOOD, Center-J.Jansen, Holder-B.Nortman.
Opponent: 14. NO
Offensive Formation: Shotgun Slot Left Near
Offensive Personnel: 11
Defensive Formation: Cover 2
Here is an excellent throw by Newton against the Saints defense on 2nd down. In this play, Benjamin runs a hitch route on the far left sideline. His defender has good inside coverage, but leaves the outside sideline susceptible for a well-thrown ball. Newton places the ball perfectly and Benjamin pulls it in.
Click here for the next page of the article.
Play 17
Situation: 3rd and 1 at NO 2
Description: Q1 - (7: 30) Cam Newton 2 Yd Run (Graham Gano Kick)
Opponent: 14. NO
Offensive Formation: Shotgun Goalline Heavy
Offensive Personnel: 14
Defensive Formation: Goalline
Here is a QB Power draw on the goalline utilizing Newton’s athletic ability to jump over the pile for the score. It looks like Newton fumbles the ball, but he crossed the plain with possession resulting in the score. Watch closely as the left guard pulls across the formation and misses his block almost not letting in the touchdown.
Play 18
Situation: 3rd and 1 at NO 16
Description: Q2 - (2:20) Greg Olsen 16 Yd pass from Cam Newton (Graham Gano Kick)
Opponent: 14. NO
Offensive Formation: Power-I Heavy
Offensive Personnel: 23
Defensive Formation: Goalline
This is an interesting play call. It’s 3rd and 1, and the Panthers sub out all of their wide receivers for extra tight ends forming the “23” personnel group. TE88 Olsen releases from the blocking package after the play-action is executed to get behind the defense on this fake run play setup. This is a blown assignment by the Saints defense as multiple defenders rush to pick up TE84 Dickson running the drag route and fail to pick up Olsen on the go-route.
Play 19
Situation: 1st and 10 at NO 26
Description: Q3 - (5:22) (Shotgun) C.Newton pass short left to F.Whittaker for 26 yards, TOUCHDOWN. Pass -6, YAC 32 G.Gano extra point is GOOD, Center-J.Jansen, Holder-B.Nortman.
Opponent: 14. NO
Offensive Formation: Shotgun Slot Right Far
Offensive Personnel: 11
Defensive Formation: Cover 1
This play is a screen pass to RB43 Whittaker on the left side of the field after a fake end-around pass to WR16 Brown was used as misdirection to pull the cornerback in man-to-man coverage away from that side of the field.
Play 20
Situation: 3rd and 2 at CLE 2
Description: Q2 - (2:00) C.Newton right end for 2 yards, TOUCHDOWN. G.Gano extra point is GOOD, Center-J.Jansen, Holder-B.Nortman.
Opponent: 16. CLE
Offensive Formation: Split I
Offensive Personnel: 23
Defensive Formation: Goalline
This play from I-formation is setup as a fake power off-tackle to FB35 Tolbert on goalline, but instead Newton keeps it for a naked bootleg run to his right.
Play 21
Situation: 2nd and 9 at CLE 9
Description: Q4 - (7:15) (No Huddle) C.Newton pass short right to J.Stewart for 9 yards, TOUCHDOWN. G.Gano extra point is GOOD, Center-J.Jansen, Holder-B.Nortman.
Opponent: 16. CLE
Offensive Formation: Offset-I Far Right
Offensive Personnel: 21
Defensive Formation: Cover 2
This play is a mesh concept over the middle of the field that was covered pretty well after the play-action fake to RB34 Stewart. After all of Newton’s reads were covered, he does an excellent job of stepping up into the pocket to buy more time and find Stewart in the endzone for a dump pass as his checkdown. Give credit to the offensive line on this play as well as Newton for keeping his eyes up to find Stewart at the end.
Play 22
Situation: 2nd and 4 at ATL 5
Description: Q1 - (:10) (Shotgun) C.Newton pass short right to E.Dickson for 5 yards, TOUCHDOWN. G.Gano extra point is GOOD, Center-J.Jansen, Holder-B.Nortman. CAR-B.Bell was injured during the play. His return is Probable.
Opponent: 17. ATL
Offensive Formation: Shotgun Bunch Right - “Rob” Call
Offensive Personnel: 13
Defensive Formation: Cover 0 with man-to-man across the board.
This is an easy touchdown pass to TE84 Dickson by Newton. The bunch formation and route combinations especially the underneath drag route gains Dickson the separation necessary to beat LB55 Worrilow to the sideline on the shoot route.
Play 23
Situation: 1st and 4 at ATL 4
Description: Q2 - (1:54) (Shotgun) C.Newton right guard for 4 yards, TOUCHDOWN. G.Gano extra point is GOOD, Center-J.Jansen, Holder-B.Nortman.
Opponent: 17. ATL
Offensive Formation: Shotgun Slot Right
Offensive Personnel: 11
Defensive Formation: Cover 1
Just like in the screen pass in Play 19, the Panthers use a wide receiver end-around to help misdirect the defensive secondary away from the play-side run. Newton takes the snap and runs a QB power to the right like in Play 7.
Play 24
Situation: 1st and 10 at ARI 39
Description: Q3 - (5:50) Fozzy Whittaker 39 Yd pass from Cam Newton (Graham Gano Kick)
Opponent: 18. ARI (WILD)
Offensive Formation: Shotgun Slot Right Near
Offensive Personnel: 11
Defensive Formation: Cover 1
This is a simple screen pass to RB43 Whittaker like in Play 19 without the misdirection by use of an end-around wide receiver. Give credit to the downfield blocking and especially Whittaker for breaking the tackle of FS26 Johnson which helped him break free for the touchdown run while showing excellent vision to set up his blocks.
Play 25
Situation: 1st and 1 at ARI 1
Description: Q3 - (4:10) Mike Tolbert 1 Yd pass from Cam Newton (Graham Gano Kick)
Opponent: 18. ARI (WILD)
Offensive Formation: Power-I Heavy
Offensive Personnel: 23
Defensive Formation: Goalline
This is an easy touchdown pass by Newton to RB35 Tolbert in the left flat. The play-action draws in the linebackers that would be responsible for coverage allowing him to escape unnoticed outside to the left.
Play 26
Situation: 3rd and 6 at SEA 7
Description: Q2 - (7:48) (Shotgun) C.Newton pass short left to K.Benjamin for 7 yards, TOUCHDOWN. G.Gano extra point is GOOD, Center-J.Jansen, Holder-B.Nortman.
Opponent: 19. SEA (DIV)
Offensive Formation: Empty-Set Shotgun Bunch Right - “Rob” Call
Offensive Personnel: 03
Defensive Formation: Cover 1
This is a quick pass to WR13 Benjamin who beats CB27 Maxwell to the inside on a slant route. Good throw and good separation by Benjamin. As a side-note, when watching Benjamin I feel like he jumps too much over easily catchable balls over the middle of the field. It’s happened multiple times just by watching the touchdown plays.
Play 27
Situation: 2nd and 1 at SEA 15
Description: Q4 - (2:41) (No Huddle, Shotgun) C.Newton pass short left to K.Benjamin for 15 yards, TOUCHDOWN. G.Gano extra point is GOOD, Center-J.Jansen, Holder-B.Nortman.
Opponent: 19. SEA (DIV)
Offensive Formation: Shotgun Slot Left Far
Offensive Personnel: 11
Defensive Formation: Cover 1
After a 9 yard gain on first down Newton takes a risk and throws the fade route to Benjamin on 2nd down and short against CB27 Maxwell. Benjamin catches it in the back of the endzone with both feet down for the TD. Excellent job of bringing it in for the score.
Overall, the Panther’s offensive strategy puts Newton in shotgun the vast majority of the time utilizing his scrambling ability as a threat to help the run game by opening up lanes for his runningbacks. What I found really interesting was that none of Newton’s rushing touchdowns this year were the result of a read-option play. Instead the Panthers’ utilized Newton’s running ability similar to how a runningback would be used. The Panthers designed more power concept plays by pulling the backside guard across the formation to seal the edge for him. In terms of the passing game, Newton needs to keep working on his deep ball by trusting his wide receivers to get to the ball and not underthrowing them. There were plenty of touchdowns showcased above that could have been deflected if the cornerback turned in time after being clearly beaten off of the line of scrimmage. Since Newton entered the NFL, his progression through his reads has certainly improved as well as his decision-making and poise in the pocket. In my next article we will take a look at Newton’s interceptions during the 2014 season to see what happened.