Dallas Cowboys Rushing Attack vs. Buccaneers (21 Carries, 42 Yards)
Quarter #2
Run #7
Situation: 2nd and 10 DAL 31
Description: Q2-(14:04) D. McFadden Left End to DAL 38 for 7 Yards (J. Adjel-Barimah)
While the blocking isn’t pretty, it is effective as every key block gets the job done. The Cowboys hoped that when they brought the crack block of WR Terrance Williams (#83) on McDougald (#30), CB Jude Adjel-Barimah (#38) would follow Williams down far enough to take himself out of the play. Adjel-Barimah recovers nicely though and is able to pursue back to the outside and make the tackle.
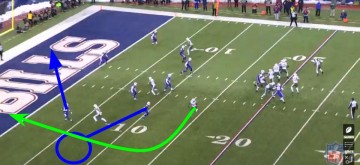
Run #8
Situation: 1st and 10 TB 38
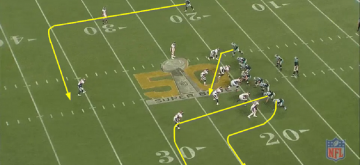
Description: Q2-(12:43) D. McFadden Up the Middle to TB 32 for 6 Yards (D. Lansanah)
The offensive front blocks this play extremely well and the offensive line gets a great push on the defensive line. Lansanah (#51) makes a great play though to make a tackle on this play as he out of the box before the play begins. Williams (#83) is responsible for blocking Lansanah but expecting a WR to block Lansanah is ridiculous. Lansanah makes a great read on the play and shoots the gap between Free (#68) and Martin (#70) who are occupied by Gholston (#92) and Spence (#97) respectively. This allows him to get to McFadden (#20) and makes the tackle, preventing a big gain.
Run #9
Situation: 2nd and 4 TB 32
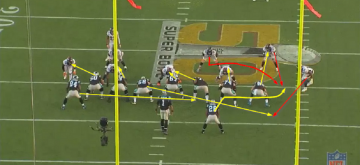
Description: Q2-(12:04) D. McFadden Left Guard to TB 31 for 1 Yard (H. Jones, L. David)
I know David (#54) is one of the best LBs in the league and he can take on the best of linemen. But Smith (#77) has a clean shot on David and I would expect Smith to have the upper hand on David. David instead stonewalls Smith and is able to follow McFadden (#20) to the hole to make the tackle. Smith is not the only linemen to struggle though as the Buccaneers has this play swallowed up quickly. The combo block of Collins (#71) and Frederick (#70) is initially good on Spence (#97) and Frederick is able to get to the second level to block Alexander (#58). But Collins loses control of Spence though as he doesn’t try to get his hips in front of Spence and Spence is able to clog up the hole. Witten (#82) also struggles on his block of DE Howard Jones (#95). Jones does have inside leverage on Witten so the cutback block by Witten is going to be tough. But Witten doesn’t bring his feet with him on the block and is way too high. This allows Jones to beat Witten to the inside and pursue McFadden from the backside to help make the tackle.
Run #10
Situation: 3rd and 3 TB 31
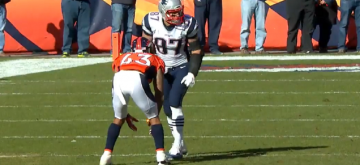
Description: Q2-(11:19) D. McFadden Left Guard to TB 35 for -4 Yards (H. Jones)
Collins (#71) needs to help Smith (#77) on this play as Smith has a nearly impossible block on McCoy (#93). McCoy in lined up in between Smith and Collins and Smith is responsible for cutting off McCoy from getting inside. McCoy’s positioning makes the Smith block almost impossible without help so Collins should hit McCoy on his way to block David (#54). Instead, McCoy beats Smith to the inside and gets in the way of McFadden (#20). This forces McFadden to cut back to his left. The problem with this is the Buccaneers have an extra man in the box. Witten (#82) blocks McDougald (#30) on the second level and leaves Jones (#95) unblocked. McFadden cuts right back into Jones who is able to make the tackle for a loss. QB Matt Cassel (#16) should have audibled out of this play and go to a pass because the Buccaneers putting an extra man in the box to take away the run on a third down play.
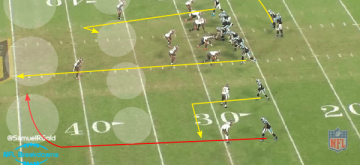
Run #11
Situation: 1st and 10 DAL 36
Description: Q2-(7:47) C. Michael Right Tackle to DAL 40 for 4 Yards (G. McCoy, G. Johnson)
The blocking on the play is initially good but this play takes a long time to develop and the Buccaneers are able to slip off of multiple blocks. The first block to notices is Witten (#82) against Johnson (#94). Witten does a good job sealing Johnson to the inside, but Johnson realises this is a cutback run by RB Christain Michael (#30) and tries to get back to the outside. Witten never gets his hips in front of Johnson which allows Johnson to beat him to the outside and help make the tackle. The second block to notice is the combo block of Martin (#70) and Free (#68) on McCoy (#93). Martin and Free get great initial movement on McCoy and help create the hole for Michael to run through. From there, the combo block falls apart for two reasons. The first is Free never picks up David at the second level(#54). David overpursues on the cutback by Michael but does scrape well to get back into the play. Free tries to get up to the second level but gets blocked by the Witten block, allowing David to be unblocked. The second reason is Martin loses control of McCoy. Martin does push McCoy backwards, but he fails to keep McCoy to the inside as he doesn’t get his lower body in the way. McCoy is able to pursue from the inside and get in on the tackle.
Run #12
Situation: 1st and 10 TB 44
Description: Q2-(6:32) C. Michael Left Guard to TB 42 for 2 Yards (W. Gholston, L. David)
The blocking on this play is not perfect, but this run should have been a bigger gain and Michael (#30) is to blame for this. This is a zone run to the left against an extra man in the box for the defence so there is going be an unblocked defender. On this play, it’s David (#54) from the outside. Michael has to know where this unblocked defender is run away from him. Instead, he cuts back to the right and runs right into David. Yes, Hanna (#84) gets pushed into the backfield by McDougald (#30) but Michael should of ran off Martin’s (#70) hip and trust that Free (#68) is going to block Alexander (#58). Instead, he doesn’t trust his blocks and tries to make this play work on all his own.
Run #13
Situation: 1st and 10 TB 34
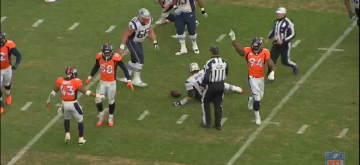
Description: Q2-(5:07) C. Michael Right Guard to TB 32 for 2 Yards (S. Moore)
No wonder Michael (#30) was cut after this game. The blocking on this play is good and there is a hole that opens up behind Martin (#70) once he blocks Alexander (#58). If Michael hits the hole behind Martin, he only has Conte (#23) to beat for a touchdown. Instead, he cuts to the outside and right into CB Sterling Moore (#26). Moore is the unblocked defender as the Buccaneers have loaded up the box again and Michael has to run away from him.
For the 3rd Quarter, click on the next page