
Play 13
Situation: 1st and 10 at GB 22
Description: Q4 - (1:19) (Shotgun) A.Rodgers pass short left to J.Nelson to GB 37 for 15 yards (B.Maxwell).
Sherman lines up against Adams in press-man coverage and sticks to him the entire route not allowing any separation on his deep-out route.
Play 14
Situation: 1st and 10 at SEA 36
Description: Q4 - (:35) (Shotgun) A.Rodgers pass incomplete short right to E.Lacy.
This is a designed pick play to get Nelson open on Sherman’s press coverage. WR87 Nelson lines up with TE89 Rodgers in twins bunch on the right side of the field. Rodgers is supposed to box out Sherman, but Sherman avoids him staying with Nelson the netire play over the middle of the field. Something else to notice is that SS31 Chancellor sees the pick route developing and steps up to make sure Nelson is covered as well over the middle of the field.
Play 15
Situation: 3rd and 10 at SEA 36
Description: Q4 - (:26) (Shotgun) A.Rodgers pass short left to J.Nelson to SEA 30 for 6 yards (R.Sherman) [L.Cohen].
Here is Sherman’s only allowed catch of the day. Nelson lines up in the right slot and runs a crossing route over the middle of the field. Sherman sticks to Nelson and doesn’t allow separation. On the defensive line the defenders all overpursue forcing Rodgers to step up into the created free space. Sherman sees this and slows down thinking that Rodgers is about to scramble. Instead, Rodgers pulls back at the last moment passes it to the newly open Nelson who gains 6 yards on the play. Fortunately, Sherman was able to pull him down for a short gain not allowing a crucial 1st down in the end of the 4th quarter.
Outside of these plays, the only play where Sherman was in man-coverage that I didn’t like from him was early on in Play 2.
Play 2
Situation: 1st and 10 at SEA 29
Description: Q1 - (11:32) (Shotgun) A.Rodgers pass incomplete short right to D.Adams.
Sherman lines up on the line of scrimmage directly opposite of WR17 Adams. Intially after the snap, Sherman reaches out with one arm to push Adams thinking he is going to run outside.
Instead, Adams actually runs a slant route over the middle of the field and this play is only an incompletion because DE93 Schofield is a free edge rusher who gets in front of Rodgers’ throwing lane.
Run Support
In order to get a complete picture of a cornerback you should also look at his run defense and his ability to shed blocks. Normally Sherman is a sure tackler and stout in run defense, but he had a particulary rough day getting off of blocks and tackling runningbacks in the open field. This can be seen in the following three plays.
Play 4
Situation: 1st and 10 at SEA 23
Description: Q1 - (8:01) (Shotgun) E.Lacy right tackle to SEA 16 for 7 yards (T.McDaniel; K.Chancellor).
This is a simple dive run from pistol formation. WR17 Adams lines up on the far right side and blocks Sherman completely out of the play.
Adams’ block is the difference between a 3-4 yard run and a 7 yard run due to him sealing the edge from Sherman.
Play 7
Situation: 2nd and 10 at SEA 41
Description: Q1 - (2:58) (Shotgun) E.Lacy right tackle to SEA 32 for 9 yards (B.Wagner; T.McDaniel).
Sherman is playing the right outside zone when he notices it’s a running play to Lacy. Sherman approaches Lacy making sure he doesn’t lose outside contain and lowers his shoulder to tackle Lacy. Just before Sherman goes down for his attempted tackle, Lacy takes a giant step outside which causes Sherman to shift further outside setting up Lacy for a spin move around him.
This is what causes Sherman to miss his tackle. Give credit to Lacy on this play for making Sherman miss, which is surprisingly hard to do.
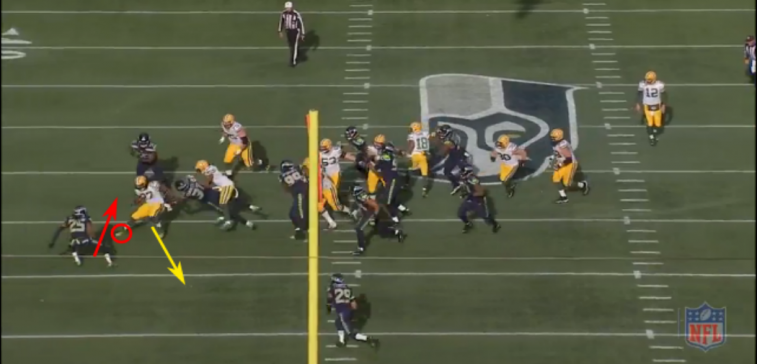
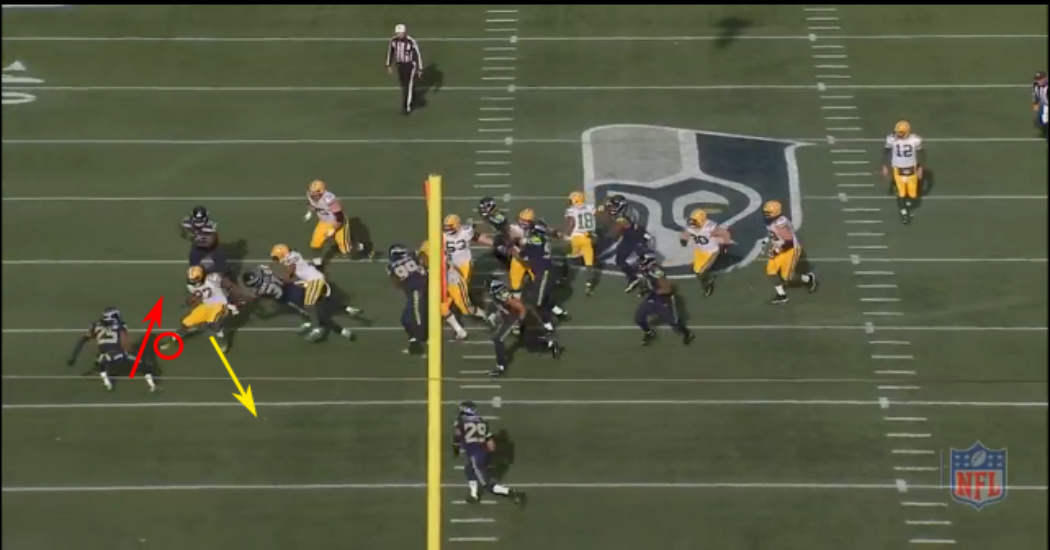
Play 10
Situation: 1st and 10 at GB 25
Description: Q4 - (15:00) (Shotgun) J.Starks left tackle pushed ob at SEA 43 for 32 yards (R.Sherman).
The final run play is a pistol run off-tackle to the left where Starks makes an excellent cut past the line of scrimmage to run across the field. Starks makes Earl Thomas miss completely and then he continues to move towards the left sideline. In this play, Sherman attempts to play deep run support after following Nelson on the slant route, but he loses backside contain. This play is not nearly as egregious as the other two plays shown previously, but for some reason Sherman wasn’t good in run protection in this game.
Edit: This is actually the play where Sherman injured his elbow.
Overall, Sherman played excellent coverage through the air displaying why so many quarterbacks are afraid to throw in his direction. In the Superbowl, Sherman needs to make sure he fights through his blocks to help with run support.
Leave A Comment